
Equipment Needed
- Large sheet pan (half-sheet, 13×18 inches)
- Parchment paper (non-negotiable for easy cleanup!)
- Sharp knife and cutting board
- Small microwave-safe bowl or double boiler
- Spoon or small spatula for drizzling
- Cooling rack
Step-by-Step Instructions
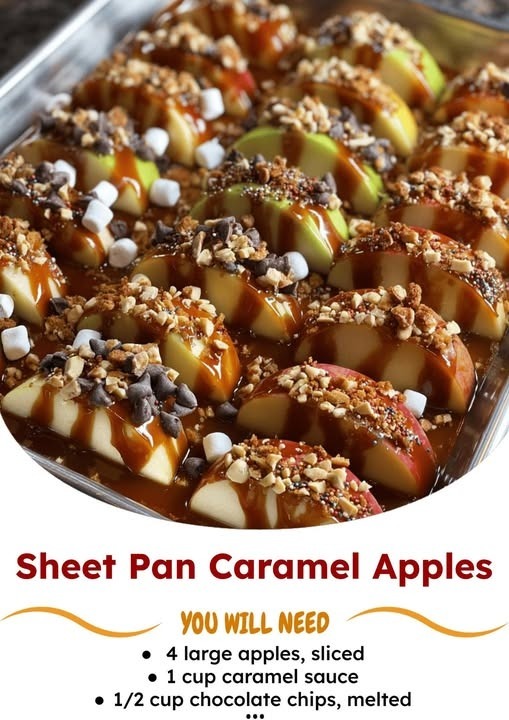
First, I prepare my apples. I wash and dry them thoroughly, because any water will prevent the caramel from sticking. Then, I carefully core each apple and slice it into even, half-inch thick rings. Slicing into rings, rather than wedges, is my preferred method because they lay flat on the pan, roast evenly, and are the perfect size for picking up. I’ve tried wedges, and they tend to roll and cook unevenly. I line my sheet pan with parchment paper—this is a lifesaver for cleanup—and arrange the apple rings in a single layer, not touching. I give them a very light brush with a neutral oil; this helps them roast instead of steam.
Next comes the caramel. I gently warm my thick caramel sauce just until it’s easily pourable, about 15-20 seconds in the microwave. You don’t want it hot, just loosened. Then, using a spoon, I drizzle it generously over each apple ring, trying to cover as much surface area as possible. The first time I did this, I glopped it all in the center and it didn’t spread. Now, I use a back-and-forth drizzling motion. It’s okay if some caramel pools in the pan—it creates delicious, chewy bits later.
Now, into the oven it goes! I preheat my oven to 400°F (200°C). The high heat is key. It roasts the apples quickly, keeping them from getting mushy, and helps the caramel bubble and adhere to the surface. I bake them for 15-18 minutes. You’ll know they’re done when the apple edges are just starting to brown and tenderize, and the caramel is actively bubbling across the entire pan. The smell at this stage is absolutely incredible. I then carefully remove the pan and let it cool on a rack for at least 10 minutes. The caramel needs this time to set from a lava-like state into a chewy, gorgeous coating.(See the next page below to continue…)