
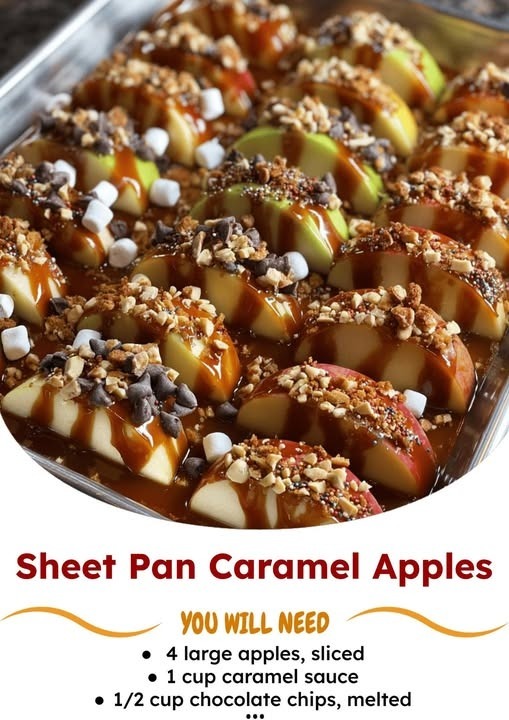
I stumbled upon the idea for sheet pan caramel apples on a busy autumn afternoon when I craved that classic fairground treat but dreaded the sticky, individual dipping process. What I discovered was a revelation: all the nostalgic flavor of caramel apples, transformed into an effortless, shareable dessert. My kitchen filled with the warm, buttery scent of melting caramel and roasting apples, a smell that instantly feels like a hug. The moment I pulled that pan from the oven, seeing the caramel bubbly and the apples tender, I knew this messy-free method was a game-changer. It’s now my secret weapon for a quick, impressive, and universally loved treat that brings everyone running to the kitchen.
Why You’ll Love This Recipe
You will love this recipe because it captures the magic of a caramel apple without any of the fuss. There are no sticks to manage, no awkward biting, and no sticky hands—just perfectly tender, caramel-coated apple slices that are meant to be shared straight from the pan. It’s the ultimate dessert for when you want something special without spending hours in the kitchen. From my chaotic counter to yours, I promise this method is a total joy and will make you feel like a dessert genius with minimal effort.
Ingredients
- 4 large, firm apples (I use Honeycrisp or Granny Smith)
- 1 cup thick caramel sauce (store-bought or homemade)
- 1/2 cup chocolate chips, melted
- 1 tablespoon neutral oil (like avocado or canola)
- 1/2 teaspoon flaky sea salt (optional, but highly recommended)
- Optional toppings: chopped nuts, sprinkles, toffee bits, coarse sugar
Let’s talk ingredients. The apple choice is critical—you need a firm variety that will hold its shape when baked. I tried this once with Red Delicious, and they turned to complete mush. Honeycrisp gives a sweet, crisp result, while Granny Smith offers a wonderful tart contrast to the sweet caramel. For the caramel, a thick, scoopable sauce (not a thin ice cream topping) is essential; it needs to cling to the apples, not puddle. The flaky sea salt at the end isn’t just for looks; it cuts the sweetness and elevates every single bite, so please don’t skip it.(See the next page below to continue…)
Equipment Needed
- Large sheet pan (half-sheet, 13×18 inches)
- Parchment paper (non-negotiable for easy cleanup!)
- Sharp knife and cutting board
- Small microwave-safe bowl or double boiler
- Spoon or small spatula for drizzling
- Cooling rack
Step-by-Step Instructions
First, I prepare my apples. I wash and dry them thoroughly, because any water will prevent the caramel from sticking. Then, I carefully core each apple and slice it into even, half-inch thick rings. Slicing into rings, rather than wedges, is my preferred method because they lay flat on the pan, roast evenly, and are the perfect size for picking up. I’ve tried wedges, and they tend to roll and cook unevenly. I line my sheet pan with parchment paper—this is a lifesaver for cleanup—and arrange the apple rings in a single layer, not touching. I give them a very light brush with a neutral oil; this helps them roast instead of steam.
Next comes the caramel. I gently warm my thick caramel sauce just until it’s easily pourable, about 15-20 seconds in the microwave. You don’t want it hot, just loosened. Then, using a spoon, I drizzle it generously over each apple ring, trying to cover as much surface area as possible. The first time I did this, I glopped it all in the center and it didn’t spread. Now, I use a back-and-forth drizzling motion. It’s okay if some caramel pools in the pan—it creates delicious, chewy bits later.
Now, into the oven it goes! I preheat my oven to 400°F (200°C). The high heat is key. It roasts the apples quickly, keeping them from getting mushy, and helps the caramel bubble and adhere to the surface. I bake them for 15-18 minutes. You’ll know they’re done when the apple edges are just starting to brown and tenderize, and the caramel is actively bubbling across the entire pan. The smell at this stage is absolutely incredible. I then carefully remove the pan and let it cool on a rack for at least 10 minutes. The caramel needs this time to set from a lava-like state into a chewy, gorgeous coating.(See the next page below to continue…)
The final flourish is the chocolate. While the apples cool, I melt my chocolate chips gently, either in the microwave using 20-second bursts or over a double boiler. Once the apples are just warm (not scalding hot), I take a spoon or a fork and drizzle the melted chocolate back and forth across the entire pan in a zig-zag pattern. This is when I immediately sprinkle on any extra toppings like chopped peanuts or a pinch of flaky sea salt, so they stick to the chocolate before it sets. Then, the hardest part: I let the whole pan sit until the chocolate is fully set.
Pro Tips for Best Results
Parchment paper is your absolute best friend here. I tried skipping it once, thinking a well-oiled pan would suffice. Big mistake. The caramel hardened into an impossible, pan-scouring cement. Parchment paper guarantees you can lift every delicious piece off easily and makes cleanup a simple matter of tossing the paper.
Timing the chocolate drizzle is everything. If you drizzle the chocolate onto the apples when they are straight out of the oven, the heat will cause it to melt into a thin, messy layer instead of beautiful, distinct lines. I wait until the caramel has firmed up slightly and the pan is just warm to the touch. This gives you those perfect, photogenic chocolate streaks.
For the most professional-looking drizzle, don’t overload your spoon with chocolate. I use a fork or the tip of a spoon, dip it in the melted chocolate, and let it stream off from a height of about 6-8 inches above the pan. The thin stream creates finer, more elegant lines. A heavy, gloppy drizzle looks messy and can overwhelm the apple flavor.
Common Mistakes to Avoid
My biggest early mistake was using the wrong type of apple. As I mentioned, a soft apple like Red Delicious or McIntosh will completely break down in the oven, leaving you with a pan of applesauce. It’s disappointing and messy. Always opt for a firm, crisp baking apple. The texture contrast between the tender-but-intact apple and the chewy caramel is what makes this dessert so good.(See the next page below to continue…)
Another pitfall is overcrowding the pan. If the apple slices are touching or piled on top of each other, they’ll steam instead of roast. This leads to soggy apples and the caramel won’t set properly because of all the released moisture. Give each ring some personal space. It’s okay to use two pans if you need to; it’s better than a soggy result.
Don’t skip the brief cooling period before adding chocolate. In my excitement, I poured melted chocolate onto the piping hot caramel once. The chocolate immediately seized and separated into a greasy, grainy mess on contact with the heat. Letting the pan cool for those 10 minutes allows the caramel to set up enough so it won’t melt your beautiful chocolate drizzle.
Finally, be mindful of your caramel consistency. If your sauce is too thin, it will slide right off the apples and create a burnt, sticky lake in your pan. If it’s too thick and cold, it won’t drizzle at all. The sweet spot is a sauce that is thick but pourable at room temperature. If needed, warm it gently just until it loosens.
Serving Suggestions
I love serving these right on the sheet pan, placed in the middle of the table with a stack of napkins. It’s a wonderfully casual, interactive dessert that encourages everyone to dig in and grab their favorite piece—some might want more caramel, others more chocolate. It feels festive and fun.
For a more composed presentation, I’ll carefully transfer a few caramel apple rings to individual small plates. I like to add a small scoop of vanilla bean ice cream on the side. The cold, creamy ice cream melting into the warm, chewy caramel and tender apple is a combination that’s simply impossible to beat.
These are also fantastic chopped up and used as a topping. I’ve taken cooled pieces, chopped them roughly, and sprinkled them over oatmeal, yogurt, or even a basic vanilla cake for an instant upgrade. They add wonderful texture and flavor to simpler dishes.
Variations & Customizations
For a nutty twist, I love sprinkling finely chopped pecans, walnuts, or peanuts over the caramel before it goes into the oven. The nuts toast in the oven along with everything else, becoming incredibly fragrant and adding a wonderful crunch to every bite. It’s like a turtle candy in apple form.
You can play with different drizzles! While semi-sweet chocolate is classic, I’ve made a stunning version with white chocolate and a sprinkle of dried cranberries for a holiday look. A simple drizzle of melted peanut butter instead of chocolate is also phenomenal, creating a fantastic sweet-and-salty profile.
Feeling adventurous? Add a pinch of spice to the apples before baking. A light dusting of cinnamon, nutmeg, or even a tiny bit of cayenne pepper mixed with the sugar can add a wonderful depth of flavor. I’ve also brushed the apple rings with a little bourbon or rum before adding the caramel for a grown-up kick.
How to Store, Freeze & Reheat
These are best enjoyed the day they are made, as the apples will eventually release moisture and soften the caramel. However, leftovers can be stored in a single layer (not stacked) in an airtight container in the refrigerator for up to 2 days. The caramel will harden significantly when cold, giving it a different, but still delicious, chewy texture.
I do not recommend freezing the fully assembled sheet pan caramel apples. The texture of the thawed apple becomes unpleasantly soft and watery. If you want to get ahead, you can slice and core the apples ahead of time and store them submerged in a bowl of water with a squeeze of lemon juice in the fridge for a day to prevent browning. Pat them completely dry before using.
Reheating is tricky and not generally advised, as it can melt the chocolate and make the apples mushy. If you must, place them on a parchment-lined tray in a very low oven (250°F) for just a few minutes to slightly soften the caramel. But honestly, I think they’re lovely eaten cold straight from the fridge, almost like a caramel apple candy.
Conclusion
This sheet pan method has completely changed my relationship with caramel apples. It took a treat that felt like a project and turned it into a simple, joyful, and shareable dessert that never fails to bring smiles. I hope you give it a try and experience the same magic—the irresistible aroma, the satisfying crunch of the apple against the chewy caramel, and the happy mess of a pan meant for sharing. It’s a little piece of autumnal bliss, made easy