
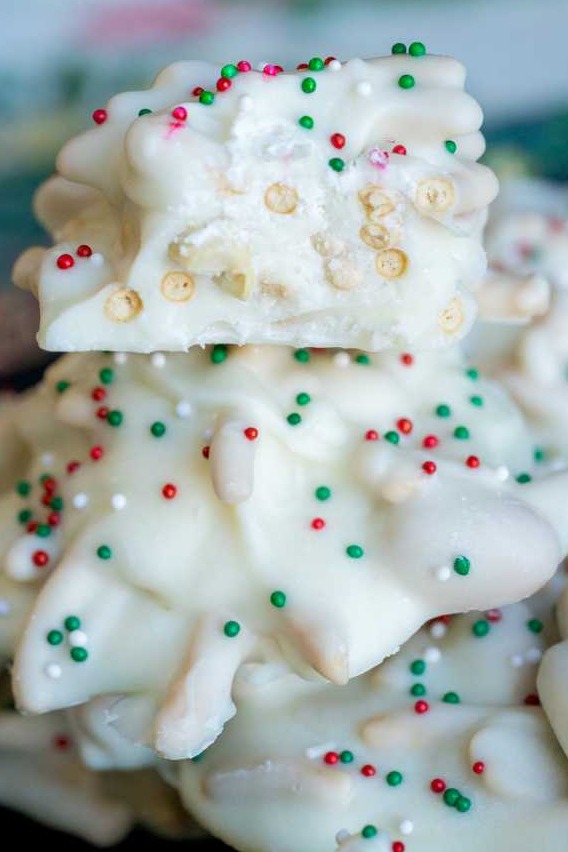
The first time I made White Chocolate Haystacks in my kitchen, it was like a sweet, simple magic trick. The air filled with the rich, creamy scent of melting white chocolate, a comforting aroma that promised pure delight. I remember the satisfying crunch of mixing the chow mein noodles and peanuts into the glossy chocolate, and the fun, messy joy of shaping little nests on the parchment paper. Watching them set into glossy, golden-white clusters was a thrill. That first bite—a perfect harmony of sweet, creamy white chocolate, salty peanuts, and the delicate, crispy crunch of the noodles—was an instant revelation of how something so easy could be so utterly addictive.
Why You’ll Love This Recipe
You are going to love this recipe because it is the ultimate in no-bake, beginner-friendly cooking that yields impressive, delicious results in under 30 minutes. It’s the perfect project to do with kids, a lifesaver for last-minute holiday treats, and a guaranteed crowd-pleaser at any potluck or party. From my experience, these haystacks have a universal appeal—the sweet and salty combination is irresistible, and their whimsical, rustic look makes them stand out on any dessert table. They require zero special skills, just a microwave and a spoon, yet they taste like you spent hours crafting something special.
Ingredients
- 1 (10-12 oz) bag of white chocolate chips or high-quality white chocolate baking bars, chopped
- 1 tablespoon coconut oil or vegetable shortening
- 3 cups chow mein noodles (the crispy kind, found in the Asian aisle)
- 1 cup dry roasted peanuts (salted or unsalted)
- ½ cup mini marshmallows (optional, for extra chewiness)
- ¼ cup festive sprinkles (optional, for decoration)
Let’s talk ingredients, as a couple of choices here are make-or-break. First, the white chocolate: I insist on using a good-quality white chocolate baking bar or chips specifically made for melting. I’ve tried this with almond bark or candy coating, and while it works, real white chocolate has a far superior, creamier flavor. The tablespoon of coconut oil or shortening is your secret weapon—it thins the chocolate just enough to coat every noodle and peanut smoothly without making it greasy. For the chow mein noodles, you must use the crispy, fried kind in a canister, not soft lo mein noodles. The peanuts add the essential salty crunch; I prefer salted for that perfect sweet-salty balance. Trust me, it makes a huge difference.(See the next page below to continue…)
Equipment Needed
- Large microwave-safe bowl
- Parchment paper or silicone baking mat
- Baking sheets
- Spatula or large spoon
- Measuring cups
Step-by-Step Instructions
My process starts with setting up for success. I line two baking sheets with parchment paper—this is non-negotiable for easy cleanup and release. I then measure out all my ingredients and have them ready to go. In my large microwave-safe bowl, I combine the white chocolate chips and the tablespoon of coconut oil. The oil is crucial; I learned the hard way that without it, melted white chocolate can be too thick and clumpy for coating. I microwave this mixture on 50% power in 30-second bursts, stirring vigorously after each one. Patience is key here; rushing with full power will scorch the chocolate.
Once the chocolate is completely smooth and glossy—it usually takes about 90 seconds total—I remove it from the microwave. The smell is heavenly. Now, for the fun part: the mix-ins. I immediately add the chow mein noodles and peanuts to the bowl of melted chocolate. If I’m using mini marshmallows, I add them now too. Using a large silicone spatula, I gently fold everything together. I work quickly but carefully, using a lifting and turning motion to avoid breaking too many noodles. The goal is to get every single noodle and peanut coated in that luxurious white chocolate. The sound of the crispy noodles mixing is so satisfying.
Once everything is evenly coated, I grab a spoon or use my hands (lightly greased with a bit of oil to prevent sticking) to portion out small mounds onto the prepared baking sheets. I aim for clusters about the size of a golf ball, gently shaping them into little haystack or nest-like piles. I don’t press them down too firmly; I want them to have lots of nooks and crannies for texture. If I’m using sprinkles, I quickly add a few to the top of each haystack before the chocolate sets. This is when they really start to look festive and special.(See the next page below to continue…)
Finally, the hardest part: the wait. I transfer the loaded baking sheets to the refrigerator to let the white chocolate set completely. This takes about 20-30 minutes. I used to leave them at room temperature, but it took forever and they sometimes wouldn’t firm up properly in a warm kitchen. The chill sets the chocolate quickly, giving you that perfect snap when you bite into one. Once they’re firm to the touch, I gently peel them off the parchment paper. The moment they release cleanly is a small, sweet victory.
Pro Tips for Best Results
I tested the melting method three different ways: a double boiler, full-power microwave, and the 50% power method. The 50% power microwave method is the simplest and most foolproof for preventing the chocolate from seizing. The double boiler works but risks steam getting into the bowl (which will ruin your chocolate). Full power is a guaranteed path to burnt, grainy chocolate. Low and slow in the microwave, with lots of stirring, gives you perfect, silky results every time.
Here’s what I learned the hard way about the noodles: handle them with care. The first time, I was too vigorous with my stirring and ended up with a bowl of mostly broken noodle bits. It still tasted good, but it lacked the wonderful, craggy texture. Now, I fold the mix-ins gently with a large spatula, just until coated. You want to preserve those long, crispy strands for the classic haystack look and the best crunch in every bite.
For the absolute best texture and to prevent the haystacks from becoming soggy, make sure your add-ins are completely dry and at room temperature. If your peanuts or noodles have been in a humid pantry, they can introduce moisture that might prevent the chocolate from setting crisply. I give my chow mein noodles a quick check and even spread them on a tray for a few minutes if my kitchen feels damp.
Common Mistakes to Avoid
My first batch was a gloopy mess because I used cheap white chocolate chips that weren’t designed for melting. They seized up and became thick and pasty no matter what I did. Don’t do what I did! Invest in a good-quality white chocolate baking bar (like Ghirardelli or Baker’s) or chips labeled specifically for melting. The higher cocoa butter content melts smoothly and sets with a beautiful snap.(See the next page below to continue…)
Another critical error is adding wet ingredients. I once thought a handful of dried cranberries would be lovely, but I didn’t realize they still contained a bit of moisture. It caused the chocolate to “seize,” turning it into a grainy, clumpy mass that wouldn’t coat anything. If you want to add dried fruit, make sure it’s bone-dry, and consider tossing it in a tiny bit of the melted chocolate separately first to create a barrier.
Don’t skip the coconut oil or shortening. White chocolate is notoriously thick when melted. The small amount of fat thins it to the perfect “coating” consistency, ensuring you don’t have to overmix to get coverage, which would break your noodles. It also gives the finished haystacks a smoother mouthfeel and a glossier appearance.
Finally, avoid storing them at room temperature if your kitchen is warm. The white chocolate has a low melting point. I left a beautiful platter out during a summer party, and they slowly slumped into puddles. For make-ahead or serving, they are fine at cool room temperature for a few hours, but for any longer storage, the refrigerator or even the freezer is your friend.
Serving Suggestions
I love piling these haystacks high on a festive platter or in a wide, shallow bowl. They look wonderfully abundant and whimsical. They are the perfect standalone sweet treat for a holiday open house, a baby or wedding shower, or a kid’s party. Their finger-food size and lack of crumbs make them ideal for casual grazing.
For a fun dessert presentation, I sometimes crumble a few haystacks over a bowl of vanilla ice cream or frozen yogurt. The combination of cold, creamy ice cream with the sweet, salty, crunchy clusters is absolutely divine and takes about 10 seconds to assemble.
These also make adorable, easy-to-package gifts. I place a few in a clear cellophane bag, tie it with a ribbon, and add them to holiday cookie boxes or give them as teacher gifts. They transport beautifully and always bring a smile because they’re just so fun to look at and eat.
Variations & Customizations
This recipe is a fantastic canvas. For a different nut, try using cashews, pecans, or almonds instead of peanuts. For a Christmas version, use holiday-colored M&M’s or sprinkles, and maybe even a handful of crushed peppermint candies for a peppermint twist. Just be mindful that add-ins with color coating (like some candies) can bleed into the white chocolate.
If you’re a fan of peanut butter, swirl 2-3 tablespoons of smooth peanut butter into the melted white chocolate before adding the noodles. It creates a marbled effect and doubles down on that beloved flavor. You could also use butterscotch or semi-sweet chocolate chips for a completely different flavor profile.
For a tropical version, replace the peanuts with chopped macadamia nuts and add ½ cup of shredded coconut to the mix. The coconut toasts slightly and adds a wonderful chewy texture and flavor that pairs perfectly with the white chocolate.
How to Store, Freeze & Reheat
Storing these is simple. Once set, I layer them between sheets of parchment paper in an airtight container. They keep perfectly in the refrigerator for up to 2 weeks. The cool temperature maintains their crisp texture. I don’t recommend storing them at warm room temperature for more than a day, as the chocolate can soften and become sticky.
They freeze beautifully for long-term storage. Place the set haystacks in a single layer on a parchment-lined tray to freeze solid, then transfer to a freezer bag or container. They will keep for up to 3 months. You can eat them straight from the freezer—they have a delightful frozen candy bar texture—or let them thaw for 10 minutes.
There’s no need to reheat haystacks. If they’ve been in the fridge and are too cold, let them sit at room temperature for 5-10 minutes before serving to take the chill off. If they’ve accidentally softened, 10 minutes in the fridge will firm them right back up. Never microwave them, as they will melt completely.
Conclusion
White Chocolate Haystacks are proof that the most joyful treats can also be the simplest. They are a celebration of texture, a perfect balance of flavors, and a guaranteed source of happiness for anyone who makes or eats them. I hope this recipe brings a little bit of easy, crunchy, sweet magic to your kitchen and becomes a go-to treat for busy days and happy gatherings. Now, go grab that bag of chow mein noodles and get ready for the easiest, most satisfying kitchen project ever.