Equipment Needed
Step-by-Step Instructions
- We begin with the heart of the truffle: the ganache. I place my finely chopped dark chocolate into a clean, dry heatproof bowl. In a small saucepan, I heat the heavy cream over medium heat until it just begins to simmer—you’ll see small bubbles form around the edges. I learned the hard way not to let it boil vigorously, as it can scorch and separate. The moment it simmers, I pour the hot cream directly over the chopped chocolate. I let this sit, untouched, for a full three minutes. This quiet wait allows the heat to gently penetrate the chocolate, beginning the melting process. Then, starting in the center, I slowly whisk until the mixture becomes a single, glossy, and luxurious dark pool. The transformation is always magical.
- Now, for the flavor that sets these apart. While the ganache is still warm, I whisk in the raspberry jam, the soft butter, and the salt. The butter adds an extra layer of silkiness, and the jam streaks through the dark chocolate like pink marble before blending into a unified, beautiful shade. I whisk until everything is completely smooth and incorporated. Then, I press a piece of plastic wrap directly onto the surface of the ganache—this prevents a skin from forming—and leave it on the counter to cool to room temperature before transferring it to the refrigerator. The first time, I rushed and put it in the fridge hot, which caused condensation and made the ganache slightly grainy. Patience here is your first key to perfection.
- The next step requires a bit of time management. I chill the ganache for at least 2 hours, until it’s very firm and scoopable. Using a small cookie scoop or a teaspoon, I portion out the ganache, rolling it quickly between my palms to form rough balls. A pro tip: if your hands are too warm, the ganache will melt and become sticky. I keep a bowl of ice water nearby to cool my hands if needed. I place these rough balls on a parchment-lined baking sheet and pop them back into the freezer for a firm 30 minutes. This second chill is critical—it ensures the centers are solid enough to be dipped in melted chocolate without losing their shape or melting into the coating.
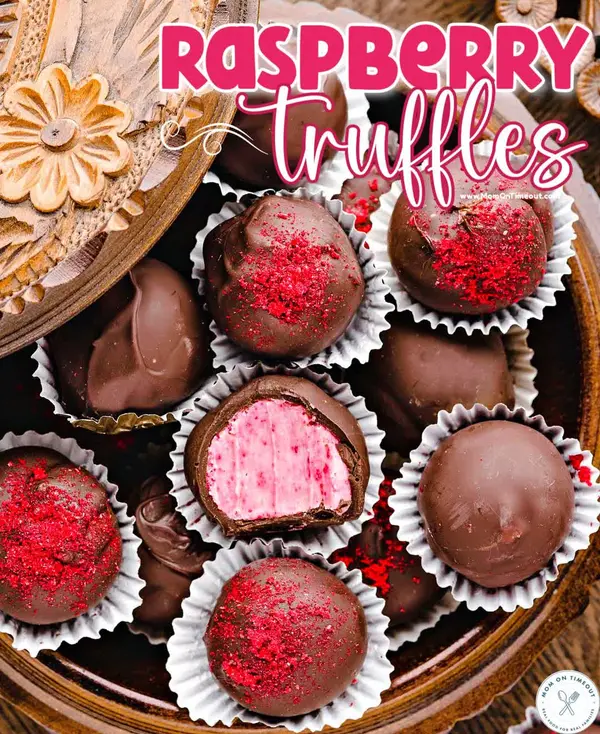
- Finally, the fun of finishing. I melt my coating chocolate or wafers using the double-boiler method or in the microwave at 50% power in short bursts, stirring until smooth. Using two forks, I dip each frozen ganache ball, let the excess chocolate drip off, and return it to the parchment paper. If I’m rolling them in cocoa powder or crushed freeze-dried raspberries, I do that immediately after dipping while the coating is still wet. I then let them set completely at room temperature. That moment when you lift one, see the perfect shell, and take a bite of the cool, creamy, fruity center is the ultimate reward for your careful work.
Pro Tips for Best Results
I tested the chilling process three different ways: fridge-only, freezer-only, and the combo method I now use. Fridge-only made the ganache too soft for clean rolling, freezer-only made it too hard and prone to cracking. The winning method is the one-two punch: chill the whole batch until firm in the fridge, then after rolling into balls, give them a solid 30-minute blast in the freezer. This makes them the perfect temperature for dipping—cold enough to hold shape, but not rock-solid.
Here’s what I learned the hard way about the jam: you must use seedless. In a moment of inspired-but-misguided creativity, I used a gorgeous homemade jam full of seeds. Not only did they get stuck in my teeth, but they also disrupted the sublimely smooth texture of the ganache. A smooth, high-quality seedless raspberry jam gives you pure, unadulterated flavor and that signature velvety mouthfeel. Trust me on this one.
For a flawless chocolate shell when dipping, temperature control is everything. Your coating chocolate should be melted and smooth, but not hot. If it’s too hot, it will melt the frozen ganache center, causing a mess. I always let my melted coating chocolate cool for a few minutes until it’s just warm to the touch. And always work quickly with just a few truffles out of the freezer at a time to keep them cold. This ensures a distinct, snappy shell surrounding the creamy center.
Common Mistakes to Avoid
My first batch was a lesson in ganache graininess. I poured the hot cream over the chocolate and immediately started whisking frantically. This incorporated air and didn’t give the chocolate time to melt evenly, resulting in a slightly grainy, split-looking ganache. Don’t do what I did! The magic is in the rest. Let the hot cream sit on the chocolate for a full three minutes. When you finally whisk, it will come together in a perfectly smooth, emulsified ribbon.
Another early mistake was rolling the truffles with warm hands. The ganache is essentially rich chocolate butter, and it melts on contact with body heat. I ended up with sticky, misshapen blobs instead of neat spheres. Now, I wash my hands in cold water and dry them thoroughly before I start rolling, and I keep that ice water bowl nearby. If the ganache starts to stick, I just dip my fingers in the cold water, dry them, and keep going. It makes the process clean and simple.
Don’t skip the second freeze before dipping. I tried dipping room-temperature ganache balls once, and it was a disaster. They slumped, lost their shape, and created a thick, uneven coating. That 30-minute freeze is non-negotiable. It firms up the exterior just enough so the warm coating chocolate sets quickly around it, creating that perfect, thin shell and preserving the distinct layers of texture.
Finally, avoid storing truffles in an airtight container while they are still the slightest bit warm. Trapped warmth leads to condensation, which can cause the chocolate coating to develop a blotchy, white “bloom” (harmless but unattractive). I always let my finished truffles set completely at cool room temperature for an hour before transferring them to a container. This keeps their beautiful, glossy appearance intact.
Serving Suggestions
I love presenting these truffles in miniature paper candy cups arranged in a beautiful box or on a elegant ceramic platter. They look so professional this way. For a special touch, I might place them in a gift box lined with tissue paper or in a clear glass jar tied with a ribbon. They make the most thoughtful and impressive homemade gift for teachers, neighbors, or hostesses, especially during the holidays.
For a fancy dessert platter, I like to serve a couple of truffles alongside a small glass of dessert wine, a rich port, or a strong cup of espresso. The contrast between the sweet, fruity chocolate and the bitter, aromatic drink is absolutely divine and turns a simple after-dinner treat into a sophisticated culinary experience. It’s a wonderful way to end a special meal.
During the holidays, I incorporate them into my cookie trays for a pop of elegance. Nestled among cookies and brownies, these truffles elevate the entire spread. I sometimes even set up a small “truffle bar” with different coatings—some rolled in cocoa powder, some in powdered sugar, some in crushed nuts—and let guests pick their favorite. It’s always a hit.
Variations & Customizations
This recipe is a wonderful base for experimentation. For an “Orange Raspberry” twist, I’ve added a teaspoon of orange zest to the warm ganache and rolled the finished truffles in a mix of cocoa powder and finely grated orange zest. The citrus brightens the raspberry flavor beautifully. You could also use a different jam altogether—a sharp blackberry or cherry jam works spectacularly well.
For a different coating, skip the extra chocolate dip. Simply roll the set ganache balls in high-quality unsweetened cocoa powder, powdered sugar, or finely chopped toasted nuts like pistachios or almonds. I’m particularly fond of rolling them in a blend of crushed freeze-dried raspberries and a little sanding sugar for an intense berry flavor and a gorgeous, jewel-like pink finish that hints at the flavor inside.
If you love a flavor combination, try adding a liqueur. After mixing the jam into the ganache, you can stir in a teaspoon of Chambord (raspberry liqueur), framboise, or even a little Grand Marnier for depth. Just be mindful that adding more liquid can soften the ganache, so you may need to chill it a bit longer. Start with a small amount and adjust to your taste.
How to Store, Freeze & Reheat
Storing these truffles properly is key. They keep best in a single layer in an airtight container in the refrigerator. The cool temperature keeps the ganache firm and the coating snappy. Stored this way, they will be at their peak for up to two weeks. Bring them to room temperature for about 15 minutes before serving for the best flavor and texture.
For longer storage, these truffles freeze beautifully—a lifesaver for holiday prep. I place the finished, set truffles in a single layer on a baking sheet to freeze solid, then transfer them to a heavy-duty freezer bag or container with parchment between layers. They can be frozen for up to 3 months. This method preserves their texture and flavor perfectly.
There’s no need to reheat truffles. To serve after freezing, I simply transfer the desired number from the freezer to the refrigerator to thaw overnight, or let them sit at room temperature for about 30 minutes. They should never be microwaved, as this will destroy their delicate structure and melt the coatings. The slow thaw is the only way to preserve their perfect, creamy interior.
Conclusion
These Raspberry Truffles are more than just a candy; they are a tiny, handcrafted celebration of flavor and texture. The process of making them is as rewarding as sharing them, filling your kitchen with wonderful scents and your heart with the pride of creating something truly beautiful. I hope this recipe inspires you to don an apron, melt some chocolate, and experience the joy of making—and eating—these little bites of bliss. Happy truffle making