
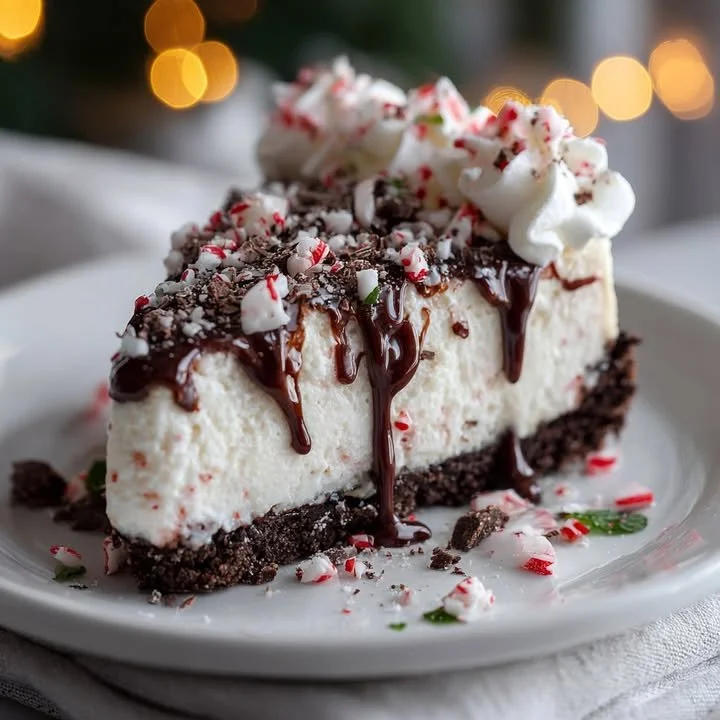
Hi there! Today, I’m excited to share my recipe for a delightful Peppermint Oreo Cheesecake that is perfect for the holiday season or any time you crave a sweet, festive treat. This cheesecake combines the rich, creamy goodness of cheesecake with the crunchy and minty flavor of Oreo cookies, creating a dessert that you can’t resist. Trust me, this recipe has become a favorite in my kitchen, and I can’t wait for you to try it!
Why You’ll Love This Recipe
This Peppermint Oreo Cheesecake is incredibly easy to make, and it never fails to impress my family and friends. The combination of cream cheese, sugar, and crushed Oreos results in a smooth texture that is absolutely heavenly. Plus, the refreshing minty taste gives it a special holiday flair that brings back memories of Christmas every time I take a bite. I think you’ll find that it’s a perfect dessert for any occasion! (See the ingredients in the next page below…)
Ingredients
- 24 Oreo cookies (plus more for garnish)
- 1/2 cup unsalted butter, melted
- 16 oz cream cheese, softened
- 1 cup granulated sugar
- 1 teaspoon vanilla extract
- 3 large eggs
- 1/2 cup sour cream
- 1/2 teaspoon peppermint extract
- 1 cup whipped cream (for topping)
Equipment Needed
- 9-inch springform pan
- Mixing bowls
- Electric mixer or whisk
- Rubber spatula
- Baking sheet
- Parchment paper
- Plastic wrap
Step-by-Step Instructions
To begin, preheat your oven to 325°F (160°C). First, I crush about 24 Oreo cookies using a food processor until they reach a fine crumb consistency, which always gets my kitchen filled with that tempting chocolate aroma. Combine these cookie crumbs with the melted butter, mixing until it has the texture of wet sand. Press this mixture firmly into the bottom of a springform pan to form the crust. This step is crucial for getting that perfect foundation! (See the next page below to continue steps…)
Next, in a large mixing bowl, I beat the cream cheese and sugar together until it’s smooth and creamy. This usually takes about 2-3 minutes. The smell at this point is divine! I then add the vanilla extract and peppermint extract, mixing until well combined. I love how the peppermint adds a festive flair that instantly brightens my mood. Incorporated are the eggs, one at a time, ensuring to mix well after each addition. Integrating the eggs carefully is important for that perfect silky texture.
Now, I pour half of the cheesecake batter over the crust and sprinkle some crushed Oreos on top before adding the remaining batter. This creates delightful little cookie surprise bites throughout the cheesecake. I smooth the top and pop the cheesecake in the oven to bake for about 50-60 minutes, or until the edges are set but the center still has a slight jiggle. My home smells so good at this point, and waiting is definitely the hard part!
Once baked, turn off your oven and crack the door open to let the cheesecake cool slowly for about an hour. This step helps prevent cracks from forming on the surface. After an hour, I refrigerate it for at least four hours, but overnight is best if you can wait! Once it’s chilled, top the cheesecake with whipped cream and additional crushed Oreos for that extra crunchy texture that I love!
Pro Tips for Best Results
One thing I learned from my baking adventures is to always make sure your cream cheese is room temperature. I’ve tested this recipe multiple times, and when the cream cheese is softened, it combines much better and yields a creamier consistency. Believe me, chilling a block of cream cheese on the counter for an hour while I prep everything else makes a world of difference!
Another tip is to use a water bath when baking your cheesecake. I learned this the hard way, and the first cheesecake I made didn’t turn out as beautifully as I hoped. To do this, simply wrap the springform pan in aluminum foil and place it in a larger baking dish filled with hot water. This not only helps in even cooking but also keeps the cheesecake moist.
Lastly, I suggest letting the cheesecake sit in the fridge overnight if you want the best flavor. I’ve tried tasting it just after chilling for a few hours, and while it’s still delicious, the flavors meld and grow richer after a night in the fridge!
Common Mistakes to Avoid
One common mistake is not mixing the batter long enough after adding the eggs. I’ve found that rushing through this step can result in a gritty texture, which no one wants in a creamy cheesecake. Make sure to beat the mixture just until everything is combined smoothly. (See the next page below to continue…)
Another mishap is not cooling the cheesecake properly. If you pull it out too quickly, it might crack as it cools. Patience is key here! Letting it cool gradually in the oven prevents any sudden temperature changes that cause cracks.
Additionally, be careful with the peppermint extract; a little goes a long way! I once added too much, thinking it would be more flavorful, but instead, it became overwhelmingly minty. Stick with half a teaspoon, and trust me, it will be just right!
Lastly, not prepping your pan can lead to serious sticking issues. Make sure to grease the springform pan well and consider lining it with parchment paper at the bottom for easy removal. I’ve struggled with the cheesecake adhering to the pan, and it can ruin an otherwise perfect presentation!
Serving Suggestions
When it comes to serving this Peppermint Oreo Cheesecake, I like to slice it into generous wedges and use a warm plate to enhance the experience. The contrast of the cool cheesecake and the warm plate elevates it further, making it feel extra special. You can even serve each slice with a dollop of whipped cream or a drizzle of chocolate sauce for that gourmet touch!
For gatherings, I find it’s a great idea to have options for toppings. Set out crushed peppermint candies, chocolate shavings, or even some festive sprinkles to allow your guests to customize their slices. This little interactive element adds a fun twist to dessert time.
Finally, a nice cup of hot chocolate or peppermint tea pairs beautifully with the cheesecake. It’s a warm and cozy combination that turns dessert into a mini celebration, perfect for those chilly evenings!
Variations & Customizations
If you’re looking to mix things up a bit, you could easily swap the Oreos for other cookie types! I’ve experimented with gluten-free Oreos for friends who can’t have gluten, and it turned out beautifully. You could also try using ginger snaps or chocolate-covered mint cookies for a new spin on flavors that carry the holiday spirit.
Additionally, consider adding a layer of chocolate ganache on top of the cooled cheesecake. Just melt some chocolate with heavy cream and pour it over the cheesecake before adding whipped cream. The richness of the ganache complements the cheesecake perfectly!
If you want to make mini cheesecakes, this recipe can be adapted for muffin tins. Just adjust the baking time, and you’ll have adorable bite-sized treats that are perfect for parties or gatherings!
How to Store, Freeze & Reheat
This Peppermint Oreo Cheesecake is best stored in the refrigerator covered with plastic wrap for up to 5 days. I like to slice it first so it’s easy to grab a piece whenever I want a sweet snack without fussing around with the whole cheesecake.
If you have leftovers or want to make it in advance, it freezes beautifully! Just wrap individual slices in plastic wrap, then place them in an airtight container to prevent freezer burn. When it’s time to indulge, simply take a piece out and let it thaw in the fridge overnight.
Reheating cheesecake isn’t usually recommended since it can change the texture; however, if you prefer it warm, I suggest warming a slice in the microwave for about 10-15 seconds. This way, you can savor that creamy bliss without it turning rubbery.
Conclusion
I hope you enjoyed this Peppermint Oreo Cheesecake recipe as much as I do! It’s a wonderful blend of flavors and textures that brings joy to any table. Don’t hesitate to make it your own with fun toppings or variations; baking should always be about creativity and love. Happy baking, everyone!