
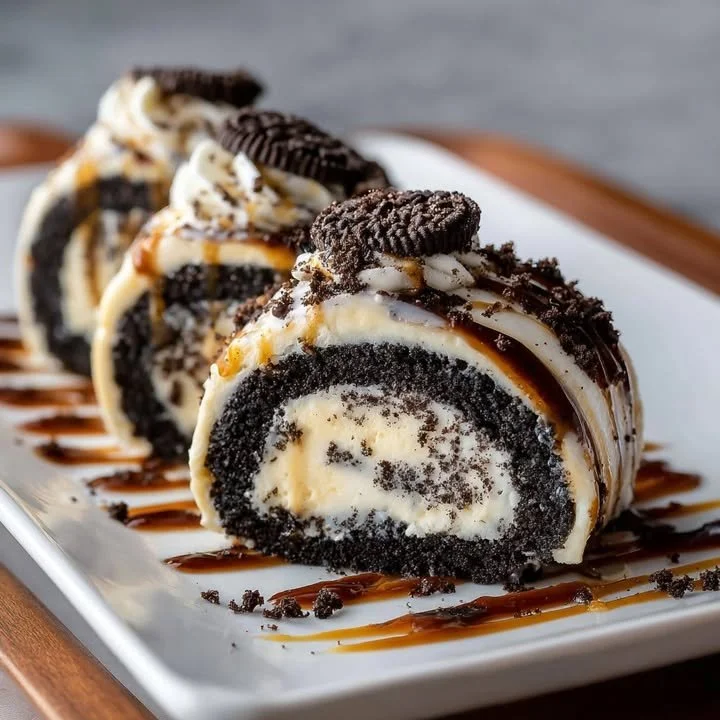
There’s something incredibly fun and creative about making dessert sushi, especially when it involves the classic flavors of Oreos and cream cheese. The Oreo Cream Cheese Cheesecake Sushi Roll has quickly become a favorite treat in my kitchen, combining the creamy, dreamy texture of cheesecake with the playful presentation of sushi. It’s perfect for parties, special occasions, or a cozy night in when you want to treat yourself to something sweet!
Why You’ll Love This Recipe
This dessert is not only visually stunning but also a delicious combination of chocolate and creaminess that satisfies every sweet tooth. The crunchy Oreo crumbs create a lovely texture contrast to the rich cream cheese filling, while the whole sushi concept is sure to impress family and friends. Plus, making it is a fun activity that you can enjoy with kids or friends. You really can’t go wrong! (See the ingredients in the next page below…)
Ingredients
– 1 package of Oreo cookies
– 8 oz cream cheese, softened
– 1/4 cup powdered sugar
– 1 teaspoon vanilla extract
– 1 cup whipped cream
– 1/2 cup rice crispy cereal
– 2 tablespoons chocolate sauce (for drizzling)
– Fresh fruit (like strawberries or banana slices) for garnish
Equipment Needed
– Mixing bowl
– Electric mixer or whisk
– Rolling mat (for sushi)
– Plastic wrap
– Knife for slicing
– Airtight container for storage
Step-by-Step Instructions
To start, I first crushed the Oreo cookies into fine crumbs. I find that a food processor works wonders here, but if you don’t have one, a good old-fashioned rolling pin and a sturdy bag can do the trick, too! Once the Oreos are crumbed, I combined the softened cream cheese, powdered sugar, and vanilla extract in a mixing bowl. Using an electric mixer, I whipped this together until it was smooth and creamy. The aroma of vanilla hints at the deliciousness to come! (See the next page below to continue steps…)
Next, I gently folded in the whipped cream until the mixture was light and fluffy, which made the filling lighter and more decadent. On my sushi rolling mat, I laid down a piece of plastic wrap and spread a thin layer of the Oreo mixture across the surface. It’s important to leave some space at the edges for rolling, as I learned the hard way when my first roll turned into a messy disaster! Then, I sprinkled a little rice crispy cereal over the filling for that extra crunch.
Now, it was time to roll! Carefully, I lifted the edge of the mat and started to roll it away from me, applying gentle pressure to keep everything snug. Once I reached the edge, I sealed the roll with a little bit of the cream cheese filling. With a sharp knife, I sliced the roll into bite-sized pieces, revealing that beautiful inside. The combination of the black and cream colors is always a head-turner, and trust me, they taste even better than they look!
To finish it off, I drizzled a little chocolate sauce on top of each piece and garnished with fresh fruit slices. I love the added freshness of the fruits; it contrasts beautifully with the sweetness of the cheesecake rolls. Now, it was time to serve and enjoy this delightful creation!
Pro Tips for Best Results
I tested this recipe three ways to find the perfect balance of flavors. My first attempt had too much powdered sugar, and it became overly sweet. After reducing the sugar a bit, I found that it allowed the natural flavors of the Oreos and cream cheese to shine through. If you want something slightly tangy, you can even add a splash of lemon juice to the cream cheese mixture!
Another tip I’ve learned is about the rolling technique. If you find that your filling is too runny, chill it in the fridge for about 30 minutes before attempting to roll it. This helps it firm up and makes it easier to work with, ensuring your layers stay together nicely. You want that perfect slice without breaking apart!
Lastly, don’t skip the rice crispy cereal! It adds a delightful crunch to every bite. After trying various crunchy add-ins, I found that the rice crispy cereal provided the best texture without overpowering the dessert’s flavor.
Common Mistakes to Avoid
One of the most common mistakes I’ve made was overfilling the rolls. Trust me, you don’t need too much filling; a thin layer does the trick. If you stuff it too much, the rolls tend to burst open, creating a beautiful mess that might be fun but isn’t what you want when serving guests! (See the next page below to continue…)
It’s also vital to keep everything cold until right before serving. Cream cheese filling can become too soft if it sits out too long, making it hard to slice cleanly. So, if you’re preparing this ahead of time, I recommend storing the rolls in the fridge until just before your guests arrive.
Another mishap to steer clear of is using stale ingredients, especially the Oreos. Always check the expiration date before using them, as stale cookies can affect both flavor and texture. Fresh ingredients make a world of difference in the overall outcome, and trust me, you want this dessert to shine!
Serving Suggestions
When it comes to serving this dessert, I love presenting it on a beautiful platter with some fresh fruits like berries, which not only look gorgeous but also add a refreshing flavor contrast. A sprinkle of powdered sugar on top can also give it a polished look that’s perfect for special occasions.
For an extra touch, consider pairing the rolls with a scoop of vanilla ice cream or whipped cream on the side. This makes for an amazing experience—digging into the creamy cheesecake sushi while savoring the cold, creamy ice cream is truly a treat!
Finally, if you’re serving these at a party, consider providing small plates and forks for easy handling. This way, your guests can enjoy them without the fuss. Everyone will be coming back for seconds, that’s for sure!
Variations & Customizations
One of the best parts about this Oreo Cream Cheese Cheesecake Sushi Roll is how easy it is to customize! If Oreos aren’t your favorite cookie, you can swap them out for any chocolate cookie, like famous chocolate wafers or even graham crackers if you’re after a different flavor.
I also love experimenting with the filling. Sometimes, I’ll mix in peanut butter or Nutella for an extra layer of richness. The sky’s the limit, and each variation brings about a whole new flavor profile that keeps this goodness fresh!
If you’re looking for a healthier twist, try using low-fat cream cheese or Greek yogurt instead. While it might change the flavor slightly, it remains delish and gives you peace of mind. You can also sweeten with honey or agave for a slightly different taste!
How to Store, Freeze & Reheat
Storing leftovers is a breeze! Just place the sushi rolls in an airtight container and store them in the fridge. They should last about 2-3 days, but I doubt they will last that long since they disappear pretty quickly around here!
If you’d like to keep them for a longer period, you can freeze the rolls. To do this, I recommend slicing them first and placing them in a single layer on a baking sheet to freeze completely before transferring them to an airtight freezer bag. They can last in the freezer for up to a month, though I always find they are best when enjoyed fresh.
When it comes to reheating, I suggest simply letting them thaw in the fridge overnight. Avoid using a microwave as it can make the cream cheese filling too soft. Instead, just enjoy them as chilled treats.
Conclusion
I’m so happy to share this delightful recipe for Oreo Cream Cheese Cheesecake Sushi Rolls with you. It’s a fun, indulgent dessert that will surely make your gatherings more festive and enjoyable. Whether you’re a newbie at sushi-making or a pro, this recipe is as rewarding as it is delicious. I hope you enjoy all the sweet flavors and the smiles they bring to your loved ones’ faces just as much as I do! Happy rolling!