
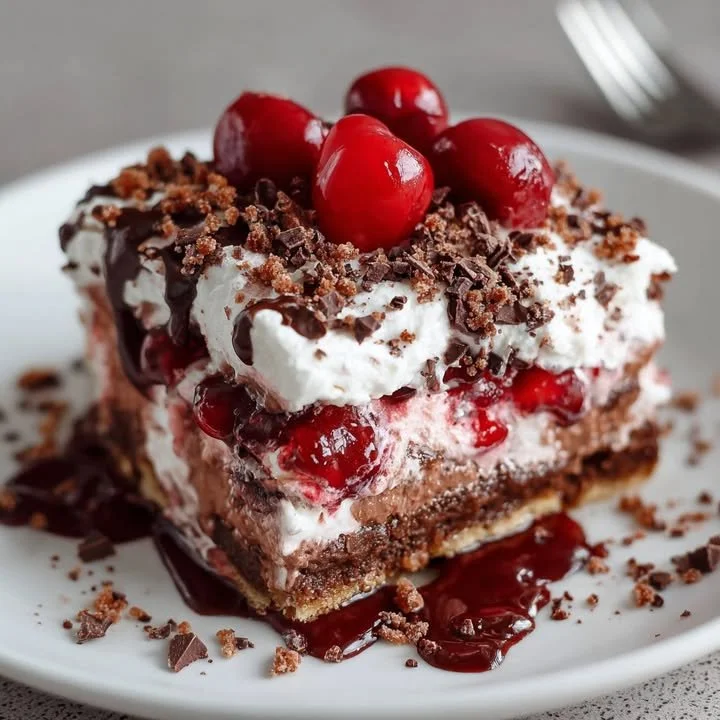
There’s something magical about combining chocolate and cherry, isn’t there? Whenever I whip up my Chocolate Cherry Lush, I can’t help but feel a warm, fuzzy nostalgia for cozy gatherings and sweet celebrations. This dessert is not only delicious but also super easy to make, which makes it a favorite in my kitchen. Whether it’s a family dinner or a potluck, this showstopper never fails to impress!
Why You’ll Love This Recipe
One of the best things about Chocolate Cherry Lush is its impressive layers that create a delightful medley of flavors and textures. The rich chocolate creaminess pairs beautifully with the tart cherries, giving every bite a dance of sweetness with just the right hint of tartness. Plus, it’s no-bake, which means you won’t be sweating over a hot oven! I promise you, once you try a slice, you’ll be hooked. (See the ingredients in the next page below…)
Ingredients
- 1 ½ cups chocolate cookie crumbs
- ½ cup unsalted butter, melted
- 8 oz cream cheese, softened
- 1 cup powdered sugar
- 1 cup whipped topping
- 2 cups chocolate pudding mix (prepared)
- 1 can cherry pie filling
- Additional whipped topping for garnish
- Chocolate shavings or curls for garnish (optional)
Equipment Needed
- Mixing bowls
- 9×13-inch baking dish
- Electric mixer or whisk
- Measuring cups and spoons
- Spatula
- Plastic wrap or aluminum foil
Step-by-Step Instructions
To start, I first grab my trusty mixing bowl and combine the chocolate cookie crumbs with melted butter. The joy of hearing that crunch as the crumbs come together is one of the highlights of this recipe! I mix until the crumbs are evenly coated, then I press this mixture firmly into the bottom of my 9×13-inch baking dish. This forms a perfect crust that’s both rich and satisfying. The scent of chocolate in the air makes my mouth water! (See the next page below to continue steps…)
Next, I take another bowl and whip together the softened cream cheese and powdered sugar until smooth. The cream cheese adds a tangy richness that beautifully balances the dessert. I then fold in the whipped topping gently to keep that airy texture. Once combined, I spread this luscious layer on top of the crust, savoring how the cream cheese and sugar meld into a creamy delight.
For the third layer, I prepare my chocolate pudding according to the directions on the package. There’s just something so nostalgic about chocolate pudding! I pour the prepared pudding over the cream cheese layer and then spread it out evenly. My kitchen smells like a chocolate lover’s dream as I layer everything together. Finally, I spoon the cherry pie filling over the pudding layer, letting it cascade down like a fruity crown, adding a pop of color and flavor.
To finish, I refrigerate my creation for at least four hours—or overnight if I can resist! This sets everything beautifully. When I finally slice into it after waiting, I love to top each piece with a dollop of whipped topping and some fancy chocolate shavings for that extra special touch.
Pro Tips for Best Results
From my experience, the key to an impressive Chocolate Cherry Lush is to make sure your cream cheese is fully softened. I’ve tried mixing when it was just out of the fridge, and let me tell you, it doesn’t create that velvety smooth texture we all desire.
Another tip I learned is to let the dessert chill for enough time. The longer it sets, the better the flavors meld together, and the easier it is to slice. I once dove into it too soon, and while it still tasted divine, it was definitely a messy affair!
Lastly, don’t skip on the chocolate shavings or curls on top. They add not only visual appeal but also a little extra chocolatey goodness. I love the way they melt in my mouth alongside the layers of cherry and cream—pure bliss!
Common Mistakes to Avoid
One common mistake is not pressing the crust firmly enough. I once made this mistake and ended up with a crumbly base when serving. Make sure to pack it down tightly to ensure it holds together nicely! (See the next page below to continue…)
Another pitfall is using low-quality chocolate pudding. I’ve experimented with a few brands and trust me, sticking to a premium mix makes a world of difference. You want that rich, indulgent chocolate taste in every bite, so choose wisely!
Also, keep an eye on the cherries! If you’re tempted to overdo it on the cherry filling, resist the urge. More isn’t always better here; a light layer allows the other flavors to shine through. On one occasion, I went a bit heavy-handed, and the cherry overpowered the chocolate—still delicious, but not quite what I envisioned!
Finally, temperature matters. If your kitchen is too warm when you prepare this, the whipped topping may not hold its shape well. I’ve found that starting preparations when the kitchen is cooler helps maintain that fluffy texture.
Serving Suggestions
When it comes to serving, I love to present this dessert with a flourish. A simple garnish of fresh cherries on top can elevate the dish, both in looks and flavor. You might also consider a light dusting of cocoa powder for a gorgeous, bittersweet contrast.
For gatherings, serve it chilled on a hot summer day—there’s just nothing like enjoying a cool slice of Chocolate Cherry Lush when the sun is shining down! I usually set it on a festive dessert table, and it’s always the first to go.
Lastly, don’t hesitate to create a little dessert bar around it! Set out toppings like crushed nuts or additional cherry pie filling for people to personalize their slices. It’s a fun twist that makes the experience even more memorable.
Variations & Customizations
While I adore the classic Chocolate Cherry Lush, there are many ways to switch things up! For a different flavor, you could swap the chocolate pudding with vanilla or even lemon pudding for a lighter, more refreshing option. I recently tried a lemon version, and the tangy burst paired beautifully with the cherries!
Another twist I like is adding a layer of crushed Oreos in place of the chocolate cookie crust. This gives it a fun new texture and flavor that really surprises everyone at the table. Plus, Oreo lovers will definitely appreciate it!
Finally, consider using fresh cherries instead of canned pie filling if they’re in season. Just pitting and halving them adds a lovely fresh taste to the layers. I’ve done this for special occasions, and it’s a hit every time!
How to Store, Freeze & Reheat
Storing Chocolate Cherry Lush is a breeze. I usually cover it tightly with plastic wrap or aluminum foil and keep it in the refrigerator for up to 4 days. This allows the flavors to continue developing, and it’s nice to have a sweet treat waiting in the fridge!
If you want to freeze it (although it rarely lasts long enough in my house), simply slice it and place the individual pieces in an airtight container or freezer bags. It can last for about 2-3 months in the freezer. Just make sure to layer parchment paper between the slices to prevent sticking.
When it’s time to enjoy it again, thaw it in the fridge overnight. I wouldn’t recommend reheating it, as it’s best served chilled. Trust me; the texture is heavenly that way!
Conclusion
I hope you feel inspired to bring a bit of Chocolate Cherry Lush into your own kitchen! It’s a dessert that breathes joy and comfort while being incredibly easy to prepare. Whether it’s for a celebration or just a treat for yourself, this recipe has a special way of bringing smiles to everyone who tries it. Enjoy making it as much as I do!