
Don’t use warm butter for the crust. If your butter is so hot it’s bubbling, it can make the crust greasy. I melt mine until just liquid, then let it cool for a minute before mixing it in. Also, when pressing the crust, don’t just pat it down. You need to really compact it. My first batch had a crust that crumbled into sandy pieces with every bite because I was too gentle. Press firmly and evenly for a solid base.
Be patient with the setting time. I was once too eager and tried to add the whipped cream after only an hour of chilling. The lemon layer was still too soft, and the weight of the cream made it slump and merge, creating a messy swirl instead of distinct, beautiful layers. The three-hour minimum chill is there for a reason. If you can plan for an overnight chill, the texture and flavor are even better.
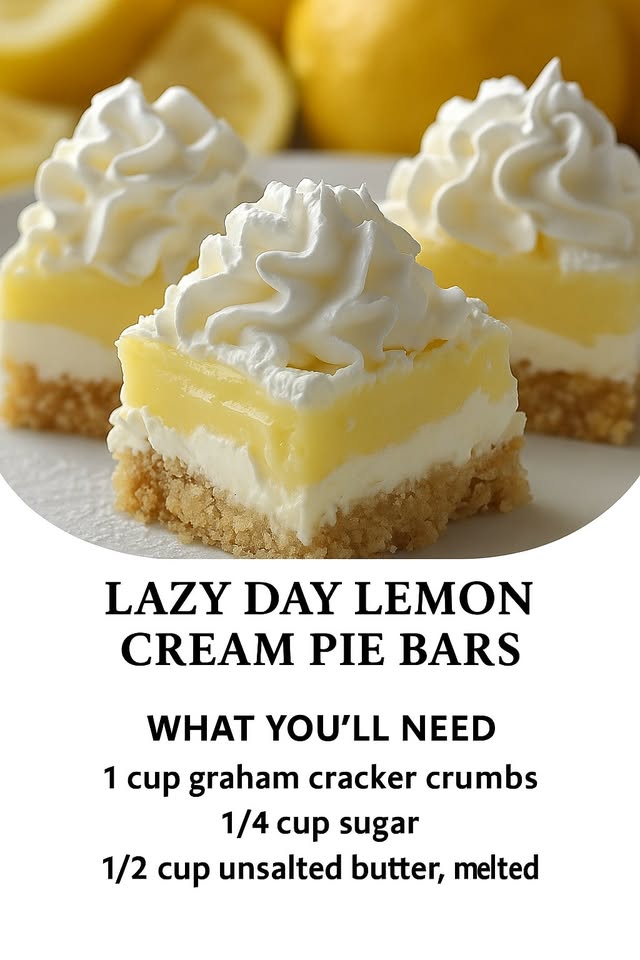
Finally, don’t overwhip your cream. I’ve had a “broken” batch where I walked away for 30 seconds and came back to what looked like cottage cheese floating in yellow liquid. You’ve made butter. The cream should hold a firm peak that stands straight up when you lift the beater. The moment it looks thick and holds its shape, stop the mixer. It’s better to have slightly soft peaks than to ruin it.
Serving Suggestions
I like serving these bars straight from the fridge, cold and firm, on a little dessert plate. A small, elegant mint leaf or a paper-thin slice of lemon on the side makes them look like they came from a fancy bakery. The contrast of the cool, tart bar with a hot cup of coffee or tea is absolutely divine, especially in the afternoon.
For a summer gathering, I’ll sometimes serve them directly from the pan, picnic-style, with a pile of forks. They are the ultimate potluck or BBQ dessert because they travel perfectly in their chilled pan and serve a crowd. I’ve brought these to countless events, and they are always the first dessert to disappear, with people asking for the recipe every single time.
If I’m feeling extra, I’ll serve them with a side of fresh berries—raspberries or blueberries are my favorite. The berries add a burst of juiciness and a pop of color that complements the yellow and white bars beautifully. A light dusting of powdered sugar over the whole platter just before serving adds a lovely, finishing touch of sweetness.
Variations & Customizations
I’ve played with the crust a lot. For a more grown-up, nutty flavor, try replacing half the graham cracker crumbs with finely ground ginger snaps or even vanilla wafer crumbs. I did a ginger snap version once, and the spicy warmth with the lemon was incredible. Just keep the total volume of crumbs and the butter ratio the same.
For a different citrus twist, I’ve successfully made this with lime juice and zest for a “Key Lime Pie Bar.” It’s equally fantastic. I’ve also tried a hybrid with half lemon and half orange juice, which was sweeter and less tart but still delicious. If you try another citrus, just make sure it’s freshly squeezed for the best flavor.
If you want to skip the whipped cream topping for something sturdier, a thin layer of stabilized whipped cream (with a bit of cream cheese or gelatin) works, or even a simple meringue made from the leftover egg whites! I’ve torched a meringue topping on these, and while it’s less “lazy day,” it’s stunningly beautiful and adds a lovely toasted marshmallow flavor.
How to Store, Freeze & Reheat
These bars store beautifully in the refrigerator. Once sliced, I keep them in a single layer in an airtight container, with parchment between layers if I must stack them. They will keep perfectly for 3-4 days. The crust may soften slightly by day four, but the flavor is still wonderful. I do not recommend leaving them out at room temperature for more than an hour, as the whipped cream can weep and deflate.
You can freeze these bars for longer storage, but with a caveat: freeze them without the whipped cream topping. The lemon layer and crust freeze remarkably well for up to 2 months. Wrap the whole pan (or individual bars) tightly in plastic wrap and then foil. Thaw overnight in the fridge. Then, make fresh whipped cream and add it just before serving. Freezing the whipped cream topping leads to a grainy, icy texture upon thawing, so I always add it fresh.
There is no reheating involved—that’s the joy of a no-bake dessert! Simply serve them cold. If you’ve frozen them and they seem a bit too firm straight from the fridge after thawing, let them sit on the counter for just 5-10 minutes to take the extreme chill off. This softens the crust and filling to the perfect creamy consistency.
Conclusion
These Lazy Day Lemon Cream Pie Bars are my go-to proof that the most satisfying treats don’t have to be complicated. They’ve saved me on busy days, delighted my friends, and satisfied my deepest lemon cravings without fail. I hope this recipe brings a little bit of that sunny, effortless joy into your kitchen too. Give it a try, and get ready for the compliments to roll in. Happy baking—or should I say, happy no-baking!