
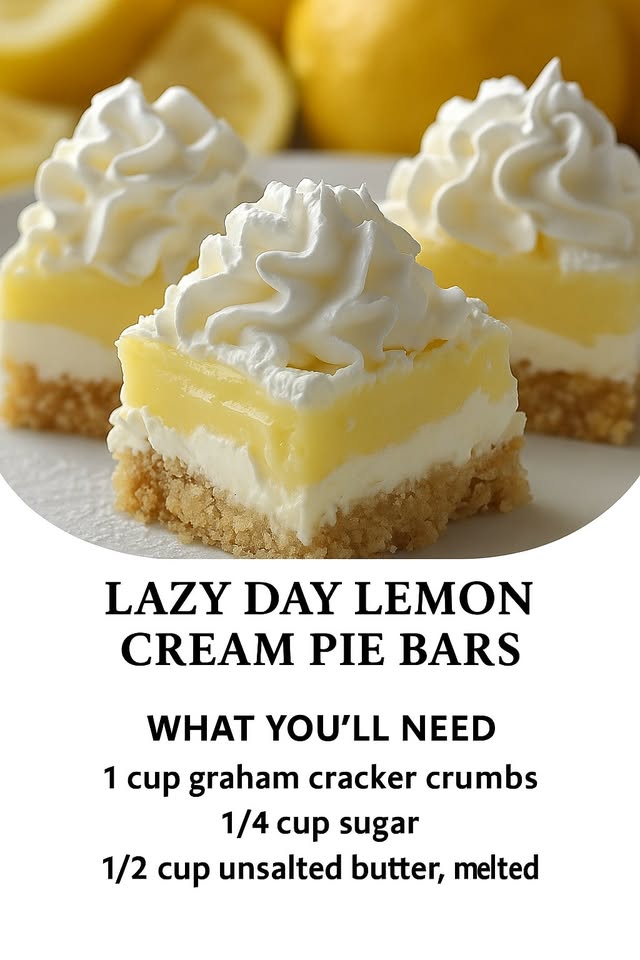
The idea for these bars was born on a sweltering Sunday when turning on the oven felt like a crime, but my craving for lemon pie was relentless. I wanted all the joy of a lemon cream pie—the tangy filling, the buttery crust, the billowy topping—but without the fuss of a pie plate or a long bake. What came out of my kitchen that day was pure magic: a no-bake treat with a press-in graham cracker crust, a lusciously tart lemon layer, and a cloud of whipped cream. The smell of fresh lemon zest and sweet crumbs filled the air, and the first cool, creamy bite was an absolute revelation of ease and flavor.
Why You’ll Love This Recipe
You will love this recipe because it captures every bit of the bright, creamy, dreamy flavor of a classic lemon cream pie but in a fraction of the time and with zero stress. It’s the perfect answer for when you need an impressive dessert but don’t want to fuss with pastry or a water bath. From my experience, these bars are foolproof, incredibly refreshing, and guaranteed to make everyone at your table think you spent hours in the kitchen, when really, you got to be just as lazy as you wanted to be.
Ingredients
- 1 cup graham cracker crumbs
- 1/4 cup sugar
- 1/2 cup unsalted butter, melted
For the Lemon Filling:
- 1 (14 oz) can of sweetened condensed milk
- 1/2 cup fresh lemon juice (about 3-4 lemons)
- 2 teaspoons finely grated lemon zest
- 3 large egg yolks (save the whites for another use!)
- A pinch of salt
For the Topping:
- 1 cup heavy whipping cream, very cold
- 2 tablespoons powdered sugar
- 1/2 teaspoon pure vanilla extract (See the next page below to continue…)
Equipment Needed
- An 8×8-inch square baking pan
- Parchment paper
- A medium mixing bowl and a larger mixing bowl
- A whisk and a rubber spatula
- A hand mixer or stand mixer (for the whipped cream)
- A microplane or fine grater for zesting
Step-by-Step Instructions
We start with the easiest crust you’ll ever make. I line my 8×8 pan with a sling of parchment paper, leaving some overhang on two sides—this is your golden ticket to lifting out perfect, uncut bars later. In a bowl, I stir together the graham cracker crumbs and sugar. Then, I pour in the melted butter. Here’s my tactile tip: mix it with a fork until every single crumb looks damp and holds together when you pinch it. I press this mixture firmly and evenly into the bottom of the pan. I mean it—press it down with the bottom of a measuring cup or glass until it’s compact and smooth. I pop this into the freezer to set solid while I make the filling, which takes about 15 minutes.
Now for the star: the lemon filling. In my larger bowl, I whisk together the egg yolks, fresh lemon juice, lemon zest, and that pinch of salt until it’s just combined. Then, I pour in the entire can of sweetened condensed milk. This is where the magic happens. I switch to a gentler hand and whisk just until the mixture is smooth, thick, and uniformly yellow. Don’t over-whisk here; you’re not trying to incorporate air. The first time I made this, I whisked vigorously and ended up with tiny bubbles on my filling surface. A slow, steady stir is all you need for that signature satiny texture.
Once my crust is firm from the freezer, I pour this glorious lemon mixture over the top. I use my spatula to spread it right to the edges in one smooth, even layer. This is the moment your kitchen smells like a sunny lemon grove. I carefully transfer the pan to the refrigerator, not the freezer, to let the filling set. This is crucial for the right texture. I let it chill for at least 3 hours, though I often let it go overnight. The filling firms up beautifully thanks to the acid in the lemon juice reacting with the proteins in the milk and egg yolks—it’s like a no-bake custard miracle.(See the next page below to continue…)
The final flourish is the whipped cream topping, which I make just before serving. I pour my very cold heavy cream into my clean mixer bowl, add the powdered sugar and vanilla, and beat on medium-high until stiff peaks form. I’ve learned the hard way that over-beating turns cream to butter in seconds, so I watch it like a hawk. When it’s thick and billowy, I spread it over the completely set lemon layer. Sometimes, for a pretty finish, I’ll grate a little extra lemon zest on top. Then, using the parchment paper sling, I lift the whole masterpiece onto a cutting board to slice into clean, beautiful bars.
Pro Tips for Best Results
My number one, cannot-stress-this-enough tip: use fresh lemon juice. I tested this with bottled juice once, and the flavor was flat, tinny, and just sad. The bright, aromatic punch from squeezing your own lemons makes a monumental difference. And when you zest them, do it before you juice them—it’s much easier! Trust me, do not skip this step; it’s the soul of the recipe.
For the crust, I’ve tried three different ways: baking it, just chilling it, and freezing it. Freezing it for that 15 minutes while you make the filling is the absolute winner. Baking can dry it out and adds an extra step, while just chilling in the fridge isn’t firm enough to support the heavy filling when you slice. Freezing gives you a crust that’s solid enough to cut cleanly but still tender to bite into. It’s the perfect texture contrast.
When making the whipped cream topping, ensure everything is cold. I put my mixing bowl and beaters in the freezer for 10 minutes before I start. Cold tools help the cream whip up faster and more voluminously, giving you that perfect, stable cloud. If your kitchen is warm, this is a game-changer. I also add the powdered sugar instead of granulated—it dissolves instantly and helps stabilize the cream a touch without any grittiness.
Common Mistakes to Avoid
The first mistake I made was not lining the pan with parchment. I thought, “It’s just bars, I’ll just cut them in the pan.” What a mess! The knife scraped the metal, the first bar crumbled when I tried to pry it out, and it looked nothing like the neat squares I envisioned. The parchment paper sling is non-negotiable for pristine presentation. It feels like an extra step, but it saves so much frustration.(See the next page below to continue…)
Don’t use warm butter for the crust. If your butter is so hot it’s bubbling, it can make the crust greasy. I melt mine until just liquid, then let it cool for a minute before mixing it in. Also, when pressing the crust, don’t just pat it down. You need to really compact it. My first batch had a crust that crumbled into sandy pieces with every bite because I was too gentle. Press firmly and evenly for a solid base.
Be patient with the setting time. I was once too eager and tried to add the whipped cream after only an hour of chilling. The lemon layer was still too soft, and the weight of the cream made it slump and merge, creating a messy swirl instead of distinct, beautiful layers. The three-hour minimum chill is there for a reason. If you can plan for an overnight chill, the texture and flavor are even better.
Finally, don’t overwhip your cream. I’ve had a “broken” batch where I walked away for 30 seconds and came back to what looked like cottage cheese floating in yellow liquid. You’ve made butter. The cream should hold a firm peak that stands straight up when you lift the beater. The moment it looks thick and holds its shape, stop the mixer. It’s better to have slightly soft peaks than to ruin it.
Serving Suggestions
I like serving these bars straight from the fridge, cold and firm, on a little dessert plate. A small, elegant mint leaf or a paper-thin slice of lemon on the side makes them look like they came from a fancy bakery. The contrast of the cool, tart bar with a hot cup of coffee or tea is absolutely divine, especially in the afternoon.
For a summer gathering, I’ll sometimes serve them directly from the pan, picnic-style, with a pile of forks. They are the ultimate potluck or BBQ dessert because they travel perfectly in their chilled pan and serve a crowd. I’ve brought these to countless events, and they are always the first dessert to disappear, with people asking for the recipe every single time.
If I’m feeling extra, I’ll serve them with a side of fresh berries—raspberries or blueberries are my favorite. The berries add a burst of juiciness and a pop of color that complements the yellow and white bars beautifully. A light dusting of powdered sugar over the whole platter just before serving adds a lovely, finishing touch of sweetness.
Variations & Customizations
I’ve played with the crust a lot. For a more grown-up, nutty flavor, try replacing half the graham cracker crumbs with finely ground ginger snaps or even vanilla wafer crumbs. I did a ginger snap version once, and the spicy warmth with the lemon was incredible. Just keep the total volume of crumbs and the butter ratio the same.
For a different citrus twist, I’ve successfully made this with lime juice and zest for a “Key Lime Pie Bar.” It’s equally fantastic. I’ve also tried a hybrid with half lemon and half orange juice, which was sweeter and less tart but still delicious. If you try another citrus, just make sure it’s freshly squeezed for the best flavor.
If you want to skip the whipped cream topping for something sturdier, a thin layer of stabilized whipped cream (with a bit of cream cheese or gelatin) works, or even a simple meringue made from the leftover egg whites! I’ve torched a meringue topping on these, and while it’s less “lazy day,” it’s stunningly beautiful and adds a lovely toasted marshmallow flavor.
How to Store, Freeze & Reheat
These bars store beautifully in the refrigerator. Once sliced, I keep them in a single layer in an airtight container, with parchment between layers if I must stack them. They will keep perfectly for 3-4 days. The crust may soften slightly by day four, but the flavor is still wonderful. I do not recommend leaving them out at room temperature for more than an hour, as the whipped cream can weep and deflate.
You can freeze these bars for longer storage, but with a caveat: freeze them without the whipped cream topping. The lemon layer and crust freeze remarkably well for up to 2 months. Wrap the whole pan (or individual bars) tightly in plastic wrap and then foil. Thaw overnight in the fridge. Then, make fresh whipped cream and add it just before serving. Freezing the whipped cream topping leads to a grainy, icy texture upon thawing, so I always add it fresh.
There is no reheating involved—that’s the joy of a no-bake dessert! Simply serve them cold. If you’ve frozen them and they seem a bit too firm straight from the fridge after thawing, let them sit on the counter for just 5-10 minutes to take the extreme chill off. This softens the crust and filling to the perfect creamy consistency.
Conclusion
These Lazy Day Lemon Cream Pie Bars are my go-to proof that the most satisfying treats don’t have to be complicated. They’ve saved me on busy days, delighted my friends, and satisfied my deepest lemon cravings without fail. I hope this recipe brings a little bit of that sunny, effortless joy into your kitchen too. Give it a try, and get ready for the compliments to roll in. Happy baking—or should I say, happy no-baking!