
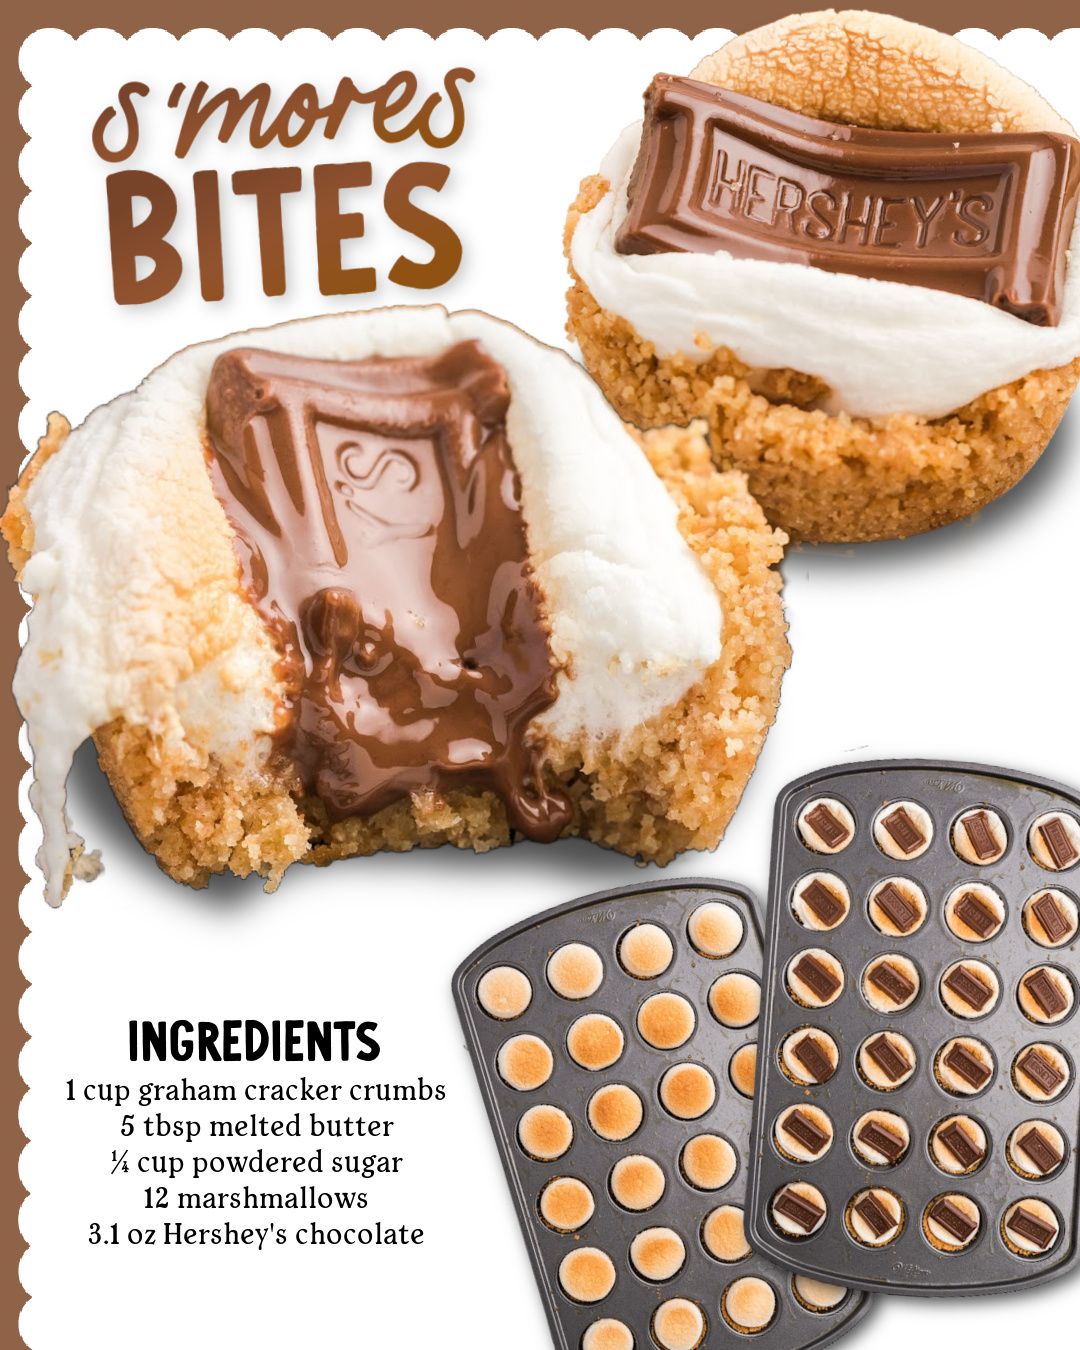
The craving for a s’more hit me on a rainy Tuesday—no campfire in sight. I wanted that perfect combination of graham, chocolate, and toasted marshmallow, but in a neat, bite-sized form I could make in my kitchen. That’s how these S’mores Bites were born. As I pressed the buttery graham cracker crust into the pan, the sweet, honey-like scent filled the air. Placing a square of Hershey’s chocolate and a fluffy marshmallow on each one felt like building tiny edible campfires. When they came out of the oven, the marshmallows had puffed into perfect golden domes. That first bite, warm and gooey with melted chocolate, was pure, nostalgic magic without a single mosquito bite.
Why You’ll Love This Recipe
You will adore this recipe because it captures the entire messy, wonderful experience of a classic s’more and transforms it into a tidy, adorable, and effortless treat. There’s no need for a fire, no sticky fingers from wrestling with melted marshmallows, and every single bite has the perfect ratio of crust, chocolate, and marshmallow. They come together in minutes, bake in just a few more, and are guaranteed to bring smiles to faces of all ages. They’re the perfect solution for a party dessert, a fun after-school snack, or whenever you need a little taste of summer camp, any time of year.
Ingredients
- 1 cup graham cracker crumbs (from about 8 full sheets)
- 5 tablespoons unsalted butter, melted
- ¼ cup powdered sugar
- 12 regular-sized marshmallows
- 3.1 oz (one standard bar) Hershey’s milk chocolate, broken into 12 equal squares
Let’s talk ingredients. Making your own graham cracker crumbs is easy and worthwhile—just pulse whole sheets in a food processor or seal them in a bag and roll with a rolling pin. Store-bought crumbs work, but fresh crumbs have a better texture. The melted butter binds the crust; using unsalted lets you control the saltiness. Don’t skip the powdered sugar in the crust—it’s what gives it that sweet, tender, cookie-like quality that mimics the flavor of a real graham cracker. For authenticity, Hershey’s milk chocolate is the classic choice, but any good milk chocolate will do. And for the marshmallows, standard-sized ones are perfect. Don’t use minis; they’ll melt into nothing.(See the next page below to continue…)
Equipment Needed
- A 12-cup standard muffin tin
- Paper or foil muffin liners
- A medium mixing bowl
- A small measuring cup or spoon for pressing crust
- A knife for cutting chocolate
Step-by-Step Instructions
First, we create our portable “graham cracker.” Preheat your oven to 350°F (175°C) and line your muffin tin with 12 paper liners. This is crucial—the marshmallow and chocolate will stick without them. In your mixing bowl, combine the graham cracker crumbs, powdered sugar, and melted butter. Stir until the mixture resembles wet sand and holds together when you pinch it. It should smell sweet and buttery.
Divide this crumb mixture evenly among the 12 muffin cups—it’ll be about a heaping tablespoon per cup. Now, here’s the key to a solid base: firmly press the crumbs into the bottom and slightly up the sides of each liner. I use a small, flat-bottomed measuring cup or the back of a spoon to really pack it down. This creates a firm “crust” that will hold the toppings. A loose press will result in a crumbly mess when you try to eat the bite. Bake this crust layer alone for 5 minutes. This quick bake sets the shape and gives it a toasty flavor.
While the crust bakes, prepare your toppings. Cut your Hershey’s bar into 12 equal squares—I find scoring it first with a knife makes it easier to break neatly. Once you pull the warm crusts from the oven, immediately place one square of chocolate in the center of each hot crust. The residual heat will start melting it, which is exactly what you want. Then, place one marshmallow directly on top of each chocolate square. They’ll look like little snowy hats.(See the next page below to continue…)
Return the muffin tin to the oven and bake for an additional 7-8 minutes. Watch them closely! You’re looking for the marshmallows to puff up significantly and turn a beautiful, toasty golden brown on top. They will be very soft and gooey. Remove the tin from the oven and let the bites cool in the pan for at least 15-20 minutes. The marshmallows will deflate slightly and set as they cool. This rest is important—trying to eat one straight from the oven is a sure way to get a molten sugar burn, as I learned the hard way.
Pro Tips for Best Results
For the most stable, neatest crust, I always line my muffin tin with foil liners instead of paper. Paper liners can sometimes stick to the warm marshmallow, but foil peels away cleanly every time. If you only have paper, a very light spritz of cooking spray inside each liner helps immensely.
To achieve that classic, evenly toasted marshmallow top without a broiler, position your oven rack in the center. If your marshmallows aren’t browning to your liking in the last minute or two, you can switch the oven to broil for 30-60 seconds, but DO NOT walk away! They can go from golden to charred in an instant. I find the 7-8 minutes at 350°F usually gives a perfect light gold.
If you want a more intense chocolate flavor or a thicker layer, use two squares of chocolate per bite. You can also try a different variety, like Hershey’s Special Dark for a bittersweet contrast. The heat from the crust and marshmallow will melt it perfectly.
Common Mistakes to Avoid
The most common mistake is not pressing the crust firmly enough. A loosely packed crust will collapse when you add the toppings and when you try to peel the liner, leaving you with a pile of crumbs rather than a neat bite. Take the time to really compact it with a tool. I learned this on my first batch, which were delicious but impossible to eat neatly.(See the next page below to continue…)
Don’t overbake the marshmallows. While you want them golden, baking them too long will cause them to completely melt into a liquid syrup that seeps everywhere and then hardens into a sticky cement. The 7-8 minute window is usually perfect for a puffed, toasted exterior and a molten interior.
Avoid using marshmallow fluff or cutting the marshmallows. A whole marshmallow provides structure and that iconic, pillowy texture. Marshmallow fluff will just run and bubble over, and a cut marshmallow won’t puff up as impressively. Trust the process and use whole ones.
Finally, don’t skip the initial cool-down in the pan. The chocolate and marshmallow need this time to set up slightly. If you try to move them to a cooling rack immediately, the molten marshmallow will ooze out and make a mess. Let them rest. They’ll be just as gooey inside, but much easier to handle.
Serving Suggestions
I love serving these bites slightly warm or at room temperature, arranged on a simple platter. They are the ultimate finger food for parties, game nights, or movie marathons. For a fun twist, I’ll sometimes insert a short pretzel stick into the top of each warm bite to mimic a roasting stick.
For a decadent dessert, serve a bite alongside a scoop of vanilla ice cream. The contrast of the cold ice cream with the warm, gooey s’mores bite is absolutely heavenly. Drizzle with a little extra melted chocolate or caramel sauce for a truly over-the-top treat.
These are fantastic for kids’ parties or as a lunchbox surprise (once fully cooled). They pack easily and are a guaranteed hit. You can even set up a “s’mores bite bar” with toppings like a drizzle of peanut butter, a sprinkle of sea salt, or a few crushed peanuts for guests to customize.
Variations & Customizations
For a “cookie dough” twist, add 2 tablespoons of mini chocolate chips to the graham cracker crust mixture before pressing it into the cups. You can also add a tiny dollop of peanut butter or a caramel square underneath the marshmallow for a surprise inside.
If you love different chocolates, try using a Reese’s Peanut Butter Cup half in place of the chocolate square, or a square of a flavored chocolate bar like cookies & cream or toffee. You can also use a large marshmallow for an extra-puffy top, though you may need to adjust the baking time slightly.
For a grown-up version, after removing the bites from the oven, you can brush the toasted marshmallow top with a tiny bit of bourbon or whiskey using a pastry brush. The alcohol will cook off, leaving just a wonderful, sophisticated flavor behind.
How to Store, Freeze & Reheat
These bites are best enjoyed the day they are made, as the marshmallow will start to firm up and lose its gooey texture over time. However, you can store leftovers in an airtight container at room temperature for up to 2 days. The crust may soften a bit from the marshmallow’s moisture.
You can freeze the unbaked crusts in the muffin tin, then transfer them to a freezer bag. When ready to bake, place the frozen crusts back in the lined tin, add toppings, and add 1-2 minutes to the baking time. I do not recommend freezing the fully assembled and baked bites, as the marshmallow texture does not thaw well.
To reheat, place a bite on a microwave-safe plate and microwave for 5-8 seconds only. This will gently rewarm the chocolate and marshmallow center. Be careful—overheating will cause the marshmallow to explode. The oven is not ideal for reheating a single bite.
Conclusion
These S’mores Bites are a tiny, perfect package of campfire nostalgia, made simple for everyday enjoyment. They’ve brought so much fun and deliciousness to my kitchen, proving you don’t need a fire to capture that magical flavor. I hope this recipe inspires you to make a batch, whether for a crowd or just for yourself. So crush those graham crackers, melt that butter, and get ready to make miniature magic. You’re about to create the most adorable, irresistible taste of summer, any time of year.