
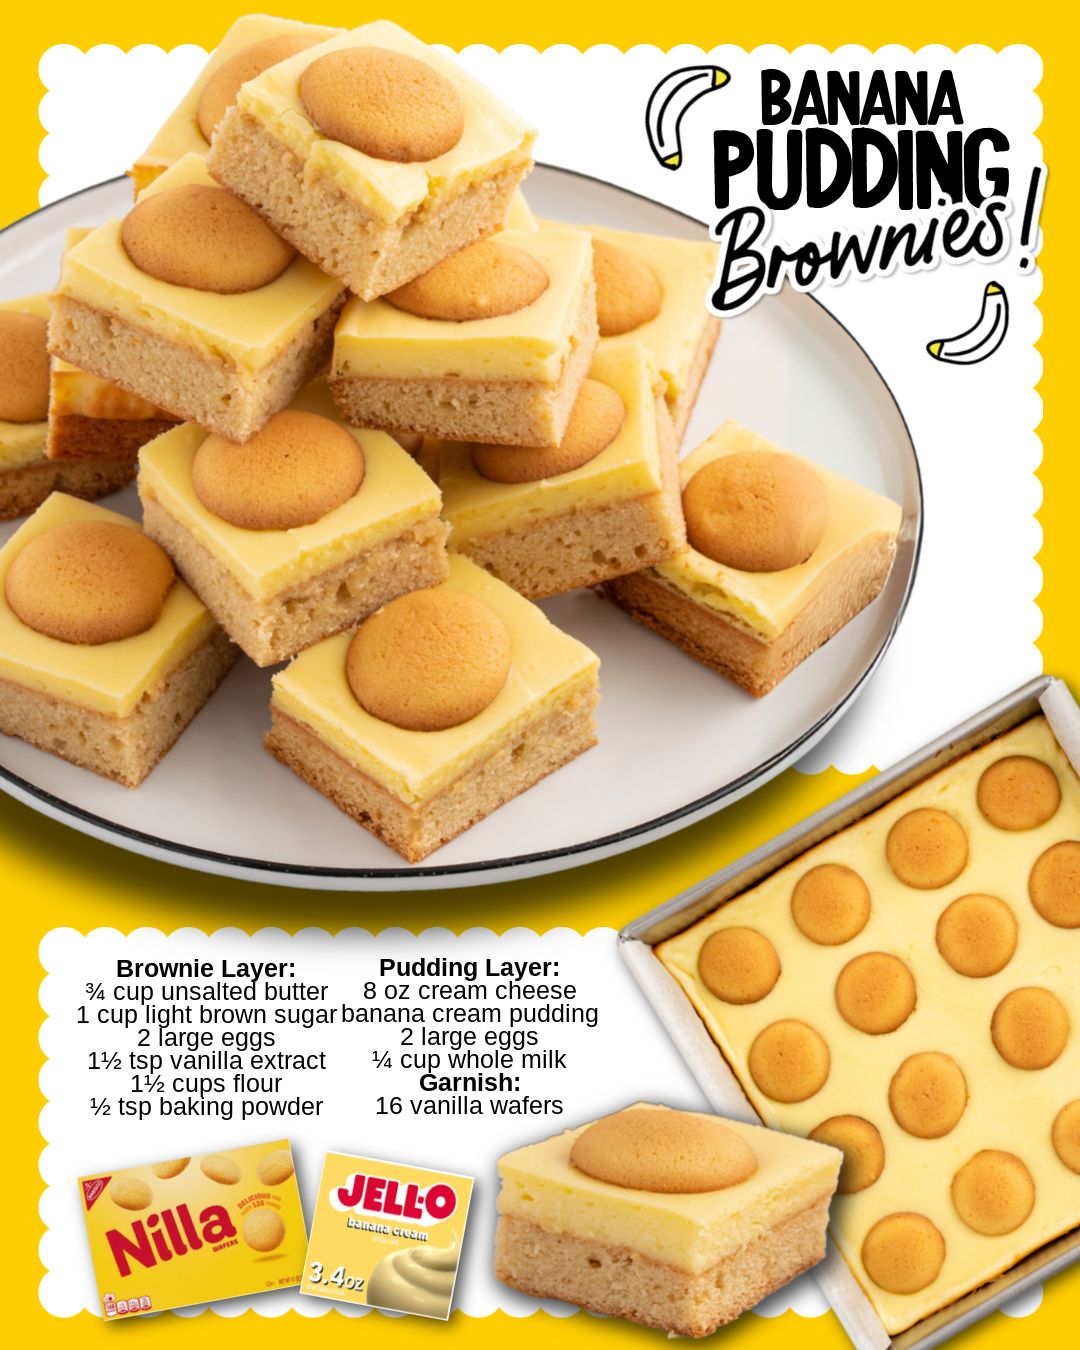
It all started with a dilemma: my family couldn’t decide between a pan of fudgy brownies or a bowl of cool, creamy banana pudding for dessert. So I decided to combine them. The idea of Banana Pudding Brownies seemed like a wild experiment, but as I baked, the rich, chocolatey aroma of the brownie base gave way to the sweet, comforting scent of banana cream pudding and vanilla wafers. When I pulled the pan from the oven, I saw two distinct, beautiful layers fused together. That first square was a revelation—a dense, fudgy brownie topped with a soft, pudding-like cake studded with vanilla wafer crumbs. It was the ultimate comfort food mashup, and it instantly became a family legend.
Why You’ll Love This Recipe
You will adore this recipe because it brilliantly solves the “which dessert?” debate by giving you two iconic treats in one incredible bite. The bottom layer is a classic, rich brownie, while the top bakes into a moist, banana-pudding-infused cake with pockets of vanilla wafer crunch. It’s surprisingly easy to make, visually striking with its distinct layers, and delivers an unforgettable combination of chocolate and banana flavors that somehow tastes both nostalgic and excitingly new. It’s the perfect dessert for potlucks, parties, or when you just want to bake something uniquely delicious.
Ingredients
For the Brownie Layer:
- 1 cup (2 sticks) unsalted butter, melted
- 2 cups granulated sugar
- ¾ cup unsweetened cocoa powder
- 2 large eggs
- 1 ½ teaspoons pure vanilla extract
- 1 ½ cups all-purpose flour
- ½ teaspoon baking powder
- ½ teaspoon salt
For the Pudding Layer:
- 1 (8 oz) package cream cheese, softened
- 1 (3.4 oz) box instant banana cream pudding mix (dry powder)
- 2 large eggs
- ¼ cup whole milk
- 16 vanilla wafers, coarsely crushed
Let’s talk ingredients. For the brownie layer, using melted butter and a good quality cocoa powder is key for that fudgy texture and deep chocolate flavor. Do not substitute oil. For the pudding layer, the instant banana cream pudding mix is used dry—you are not making pudding. This is crucial! The powder flavors and sweetens the cream cheese layer. The cream cheese must be softened to room temperature to blend smoothly without lumps. The vanilla wafers are non-negotiable for that authentic banana pudding texture and taste; don’t skip them. Trust me, they make a huge difference.(See the next page below to continue…)
Equipment Needed
- A 9×13 inch baking pan
- Parchment paper
- Two mixing bowls (one medium, one large)
- Electric hand mixer or stand mixer
- Spatula
Step-by-Step Instructions
We begin with the brownie base, which acts as our foundation. Preheat your oven to 350°F (175°C). Line your 9×13 pan with parchment paper, letting it overhang on the long sides for easy lifting later. In a large mixing bowl, whisk together the melted butter, sugar, and cocoa powder until smooth and glossy. The mixture will be thick and grainy, which is normal. Let it cool for a minute if it’s very hot, then whisk in the 2 eggs and vanilla extract until fully combined.
In a separate bowl, whisk together the flour, baking powder, and salt for the brownie layer. Gradually add these dry ingredients to the wet chocolate mixture, stirring with a spatula just until combined. Do not overmix! The batter will be thick. Pour and spread this brownie batter evenly into the bottom of your prepared pan. It will be a thin layer, and that’s perfect. Set this aside while we make the magical pudding layer.
Now, for the creamy, banana-y top. In a medium bowl, using an electric mixer, beat the softened cream cheese on medium speed until it’s completely smooth and creamy, about 2 minutes. Scrape down the sides. Add the dry banana cream pudding powder and beat until fully incorporated. The mixture will be thick and fragrant. Add the 2 eggs and the milk, and beat again on medium speed until you have a smooth, uniform, pale yellow batter. It will be much thinner than the cream cheese was initially.(See the next page below to continue…)
Here comes the fun part. Gently pour the pudding layer batter over the unbaked brownie layer in the pan. Use your spatula to spread it carefully to cover the brownie batter completely. Don’t worry if they mix a tiny bit at the edges; it will bake together beautifully. Take your coarsely crushed vanilla wafers and sprinkle them evenly over the entire top. I like to leave some bigger chunks for texture. Carefully place the pan in the oven.
Pro Tips for Best Results
For the cleanest layers, make sure your brownie batter is spread smoothly and evenly before adding the pudding layer. I use an offset spatula to get it perfectly level. When pouring the pudding layer, pour it slowly and try to cover the surface area as much as possible before spreading, to minimize disturbance of the brownie layer underneath.
To prevent overbaking, I start checking for doneness at the 35-minute mark. The top should be golden brown, the edges should be set, and a toothpick inserted into the center should come out with moist crumbs (not wet batter). The top will puff up and may crack slightly—this is normal and gives it a lovely rustic look. Overbaking will dry out the pudding layer.
For the best vanilla wafer experience, don’t crush them into a fine dust. I put them in a zip-top bag and give them a few whacks with a rolling pin, aiming for a mix of fine crumbs and pea-sized pieces. This gives you wonderful pockets of crunch and flavor throughout the creamy top layer.
Common Mistakes to Avoid
The first mistake I made was using cold cream cheese. It left little lumps throughout my pudding layer that wouldn’t blend out no matter how long I mixed. Your cream cheese needs to sit out for at least an hour until it’s truly soft to the touch. This is the single most important tip for a smooth, luxurious top layer.(See the next page below to continue…)
Don’t try to make the pudding layer with prepared pudding. You must use the dry powder from the box. The instant pudding mix contains thickeners and stabilizers that are designed to set with liquid and heat, which is what gives the top layer its perfect cakey-pudding texture. Using already-made pudding will result in a runny, wet layer that won’t bake properly.
Avoid overmixing the brownie batter once you add the flour. Stir just until the last streaks of flour disappear. Overmixing develops gluten, which can make the brownie base tough and cakey instead of dense and fudgy. A few small flour streaks are okay; they’ll incorporate as you spread it in the pan.
Finally, don’t skip the parchment paper. These bars are dense and moist, and trying to remove them from the pan without a liner is a recipe for disaster. The parchment “sling” allows you to lift the entire slab out onto a cutting board for clean, easy slicing and beautiful presentation.
Serving Suggestions
I love serving these at room temperature or slightly chilled, cut into generous squares. The contrast of the dark brownie and the golden pudding layer is beautiful on a plate. For a special touch, I’ll dust the top with a little powdered sugar or add a dollop of freshly whipped cream just before serving.
These bars are a fantastic make-ahead dessert for parties or picnics. They hold their shape perfectly, are easy to transport in the pan, and feed a crowd. They’re always a conversation starter—people are intrigued by the layers and then won’t stop eating them.
For an over-the-top treat, warm a square in the microwave for about 10 seconds and serve it à la mode with a scoop of vanilla ice cream. The warm brownie and cool ice cream with the banana pudding flavor is an absolutely heavenly combination.
Variations & Customizations
If you’re not a banana fan, you can use cheesecake or vanilla instant pudding mix for a different flavor. You could also add ½ cup of chocolate chips to the brownie batter or sprinkle some on top of the pudding layer with the vanilla wafers for extra chocolate intensity.
For a nutty crunch, add ½ cup of chopped toasted pecans or walnuts to the vanilla wafer topping. The nuts toast in the oven and add a wonderful flavor and texture that pairs beautifully with both the banana and chocolate.
For a fun twist, use different cookies in the topping. Crushed Nilla Wafers are classic, but graham cracker crumbs, crushed biscoff cookies, or even crushed peanut butter cookies would be delicious and add their own unique flavor profile.
How to Store, Freeze & Reheat
Once completely cooled, cover the pan tightly with plastic wrap or foil, or transfer cut squares to an airtight container. They will keep at room temperature for up to 2 days, but I prefer to store them in the refrigerator where they will stay fresh for up to 5 days. The texture actually improves after a day in the fridge.
You can freeze these brownies for longer storage. Wrap the whole uncut slab or individual squares tightly in plastic wrap and then foil. They will keep for up to 2 months. Thaw overnight in the refrigerator. The texture holds up remarkably well to freezing.
To reheat, I recommend only warming individual servings. Microwave a square for 8-12 seconds to slightly warm the brownie base and soften the pudding layer. Do not reheat the whole pan, as it can dry out the edges and make the pudding layer rubbery.
Conclusion
Banana Pudding Brownies are a joyful, delicious experiment that turned into a permanent favorite in my recipe box. They’ve brought so much surprise and delight to my dessert table, proving that sometimes the best things happen when you dare to mix two classics. I hope this recipe inspires you to play in the kitchen and create your own new tradition. So melt that butter, soften that cream cheese, and get ready to bake a pan of pure, layered happiness. You’re about to create a dessert that’s truly greater than the sum of its parts.