
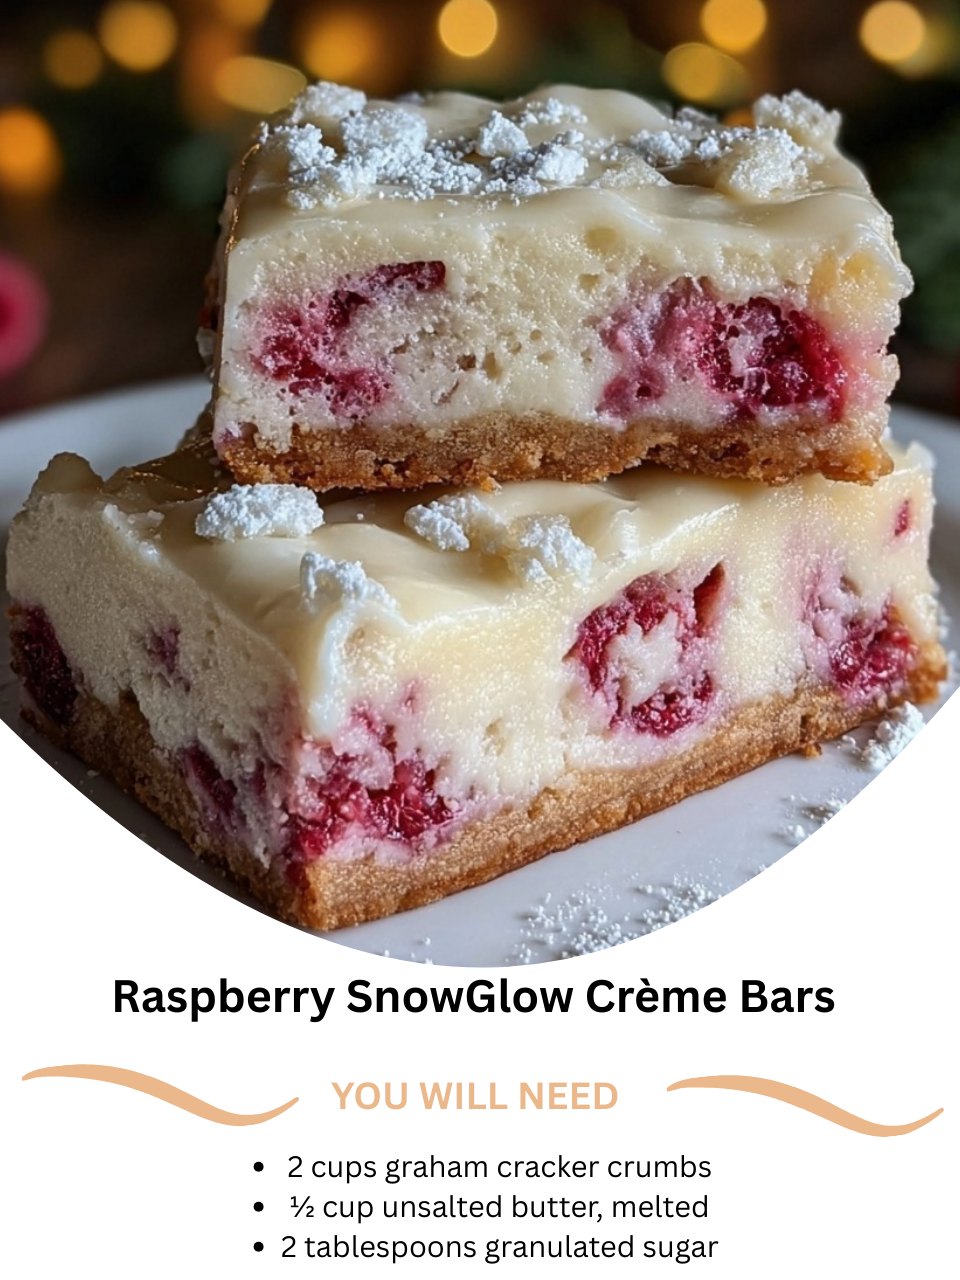
I created these Raspberry SnowGlow Crème Bars on a quiet, frosty morning, wanting to capture the feeling of a snow-blanketed berry patch in a dessert. The moment the buttery graham cracker crust began toasting in the oven, my kitchen filled with a warm, cozy, and nostalgic scent. Layering on the bright, tart raspberry jam and the cloud-like vanilla crème felt like painting a winter scene. When I pulled the finished pan from the oven, the top was delicately golden, and the raspberry layer glowed like stained glass. That first bite—the crunch, the sweet-tart jam, the smooth, creamy filling—was pure, blissful harmony. It was an instant masterpiece of simplicity and elegance.
Why You’ll Love This Recipe
You are going to fall head-over-heels for this recipe because it transforms just a few humble ingredients into a stunning, layered bar cookie that looks and tastes like it came from a fancy bakery. It strikes the perfect balance: a buttery, crisp crust, a vibrant layer of tangy raspberry, and a soft, vanilla-kissed crème topping that bakes into a delicate, golden glow. They’re incredibly easy to make, require no special equipment, and are as perfect for a holiday cookie tray as they are for a sweet afternoon treat with a cup of tea. They’re a little bit fancy, a whole lot delicious, and deceptively simple.
Ingredients
For the Crust:
- 2 cups graham cracker crumbs (from about 16 full sheets)
- ½ cup (1 stick) unsalted butter, melted
- 2 tablespoons granulated sugar
For the Raspberry Layer:
- 1 cup high-quality raspberry jam or preserves
For the SnowGlow Crème Topping:
- 1 (8 oz) package full-fat cream cheese, softened to room temperature
- 1 large egg, at room temperature
- ⅓ cup granulated sugar
- 2 tablespoons all-purpose flour
- 1 teaspoon pure vanilla extract
- ¼ teaspoon almond extract (optional, but wonderful)
For Garnish (Optional):
- Powdered sugar for dusting
- Freeze-dried raspberries, crushed (See the next page below to continue…)
Equipment Needed
- 8×8 inch or 9×9 inch square baking pan
- Parchment paper
- Food processor or zip-top bag and rolling pin (for making crumbs)
- Medium mixing bowl
- Hand mixer or stand mixer (can also mix by hand with a whisk)
- Rubber spatula
- Measuring cups and spoons
Step-by-Step Instructions
My process always starts with the crust, because a solid foundation is everything. I line my 8×8 inch pan with parchment paper, leaving an overhang on two sides for easy lifting—a trick I learned after struggling to pry out my first batch. In my food processor, I pulse the graham crackers into fine, even crumbs. If I don’t feel like cleaning the processor, I put the crackers in a sturdy zip-top bag and crush them with a rolling pin until they’re sandy. In a bowl, I mix the crumbs with the melted butter and two tablespoons of sugar until it resembles wet sand. I press this mixture firmly and evenly into the bottom of the prepared pan. I mean firmly—I use the bottom of a measuring cup to really pack it down. This prevents a crumbly crust that falls apart when you take a bite.
While the crust bakes in a preheated 350°F oven for 10 minutes (just until it’s fragrant and set), I prepare the other layers. For the raspberry layer, I stir the jam in its jar to loosen it up. Using a jam with seeds gives a lovely texture and authentic fruitiness, but seedless works too. As soon as the warm crust comes out of the oven, I carefully spread the jam over it in an even layer, leaving a tiny border around the edge. The warmth of the crust helps the jam spread smoothly like a dream. I let this cool for about 10 minutes while I make the crème topping. This brief cool-down is important; adding the cold cream cheese mixture to a scalding hot crust can cause it to curdle or separate.
Now, for the magical “SnowGlow” topping. In my mixing bowl, I beat the softened cream cheese until it’s completely smooth and creamy, with no lumps. This is crucial—lumpy cream cheese will bake into lumps. Then, I beat in the sugar, flour, vanilla, and almond extract (if using) until combined. Finally, I add the egg and beat on low just until the mixture is silky and uniform, about 30 seconds. Over-beating the egg can incorporate too much air and cause the topping to puff and crack excessively. I pour this creamy, pale mixture over the cooled raspberry layer and gently spread it to the edges with a spatula.(See the next page below to continue…)
The pan goes back into the 350°F oven for 25-30 minutes. The topping won’t brown much; it’s done when the edges are just barely starting to turn a light golden tan and the center is set but still has a slight, gentle jiggle when I nudge the pan. I learned the hard way that over-baking makes the topping dry and rubbery. I let the bars cool completely in the pan on a wire rack—this takes a few hours. Then, I cover and refrigerate them for at least 4 hours, or ideally overnight. This chill is non-negotiable; it allows the layers to fully set and fuse together, making for clean, perfect slices.
Pro Tips for Best Results
My first pro tip is about the cream cheese: it must be truly softened. I take it out of the fridge at least an hour ahead. If it’s still cold, you’ll have lumps no matter how long you beat it. I tested this with cold cream cheese once and had a lumpy, uneven topping. Room-temperature cream cheese blends into a perfectly smooth, luxurious base for the crème layer.
Second, don’t skip the flour in the crème topping. It’s just two tablespoons, but it acts as a gentle stabilizer, giving the topping structure so it bakes into a soft, set layer instead of a runny custard that weeps into the jam. I tried omitting it once, and the topping never fully set, creating a messy, albeit tasty, bar.
Finally, use good jam. Since the raspberry layer is a star, the flavor of your jam matters. A high-quality preserve with real fruit tastes infinitely better than an overly sweet, gelatinous jelly. I love using a seedless raspberry jam for a smooth layer, or one with seeds for more texture and visual interest. Either way, a good jam makes all the difference.
Common Mistakes to Avoid
The most common mistake is not pressing the crust firmly enough. A loosely packed crust will crumble into sandy bits when you try to cut or eat the bars. I press it down with the flat bottom of a glass or measuring cup, really compacting it into a solid, even layer. This creates a crisp base that holds up to the soft layers above.(See the next page below to continue…)
Don’t spread the crème topping onto a hot crust and jam layer. The residual heat can start to “cook” the egg in the cream cheese mixture on contact, leading to a grainy texture. Letting the jammed crust cool for 10-15 minutes ensures your topping stays smooth and creamy. I made this error in a hurry, and my topping baked with tiny, unpleasant curds.
Avoid over-baking. The crème topping should look set at the edges but still have a slight, delicate jiggle in the very center when you take it out. It will continue to set as it cools. If you bake it until it’s completely firm in the center, it will be overcooked and lose its lovely, soft texture. Use the jiggle test, not just the timer.
Finally, don’t skip the long chill. I know it’s tempting to cut into them after they’ve cooled, but if the bars are even slightly warm, the layers will squish and smear when cut. The refrigerator chill firms everything up, allowing you to get those beautiful, clean layers in every slice. Patience is the final, crucial ingredient.
Serving Suggestions
I love serving these bars chilled, cut into neat squares. Just before serving, I dust the tops lightly with powdered sugar through a fine-mesh sieve—it looks like a fresh dusting of snow. For an extra festive touch, I’ll sprinkle a few pinches of crushed freeze-dried raspberries over the top for a pop of color and a burst of tart fruit flavor.
These bars are a gorgeous addition to any holiday dessert table or cookie exchange. Their beautiful red and white layers make them stand out. I arrange them on a tiered stand or a simple white platter. They’re rich, so small squares are perfect, allowing people to sample other treats too.
For an elegant dessert, I’ll plate a single square with a dollop of lightly sweetened whipped cream and a few fresh raspberries on the side. A cup of hot coffee or a glass of cold milk is the perfect accompaniment. They also pack well for picnics or as a special lunchbox treat.
Variations & Customizations
For a different fruit flavor, the raspberry jam can be swapped for any berry jam you love. Blackberry, strawberry, or even apricot preserves are all fantastic. I’ve made a version with salted caramel spread instead of jam for a decadent, salty-sweet twist—just reduce the sugar in the crème topping by a tablespoon.
To make them even more decadent, sprinkle ½ cup of white chocolate chips or chopped nuts (like sliced almonds) over the jam layer before adding the crème topping. The chips will stay soft and creamy after baking. You can also add a teaspoon of lemon zest to the crème topping for a bright, citrusy note that pairs wonderfully with the berries.
For a festive holiday version, after dusting with powdered sugar, drizzle the tops with a simple white icing and add red and green sprinkles. You can also use a star-shaped cookie cutter to cut them into fun shapes for a holiday party, though you will have some scraps (the cook’s treat!).
How to Store, Freeze & Reheat
These bars store beautifully. I keep them covered in the refrigerator for up to 5 days. The chilled environment keeps the layers firm and the flavors fresh. They are best served cold or just slightly cool. Let them sit out for 5-10 minutes before serving to take the deep chill off.
They freeze exceptionally well for longer storage. I place the uncut slab or individual squares on a parchment-lined baking sheet to freeze solid, then wrap them tightly in plastic wrap and place in a freezer bag. They will keep for up to 2 months. Thaw overnight in the refrigerator.
There is no need to reheat these bars. They are meant to be enjoyed cold, straight from the fridge. The texture of the crème topping can become loose and odd if warmed. If you prefer a less cold treat, simply let them sit on the counter for 15 minutes before serving to soften slightly.
Conclusion
These Raspberry SnowGlow Crème Bars are more than just a dessert to me; they’re a little edible winter wonderland, a testament to how beautiful layers of flavor can be. They have become my signature treat for holiday gatherings and cozy weekends, always earning compliments and recipe requests. I hope this recipe brings a touch of sweet, layered magic to your kitchen, creating moments of simple, delicious joy. Now, go grab that jar of jam—a pan of snowy, berry-filled bliss is waiting to be made.