
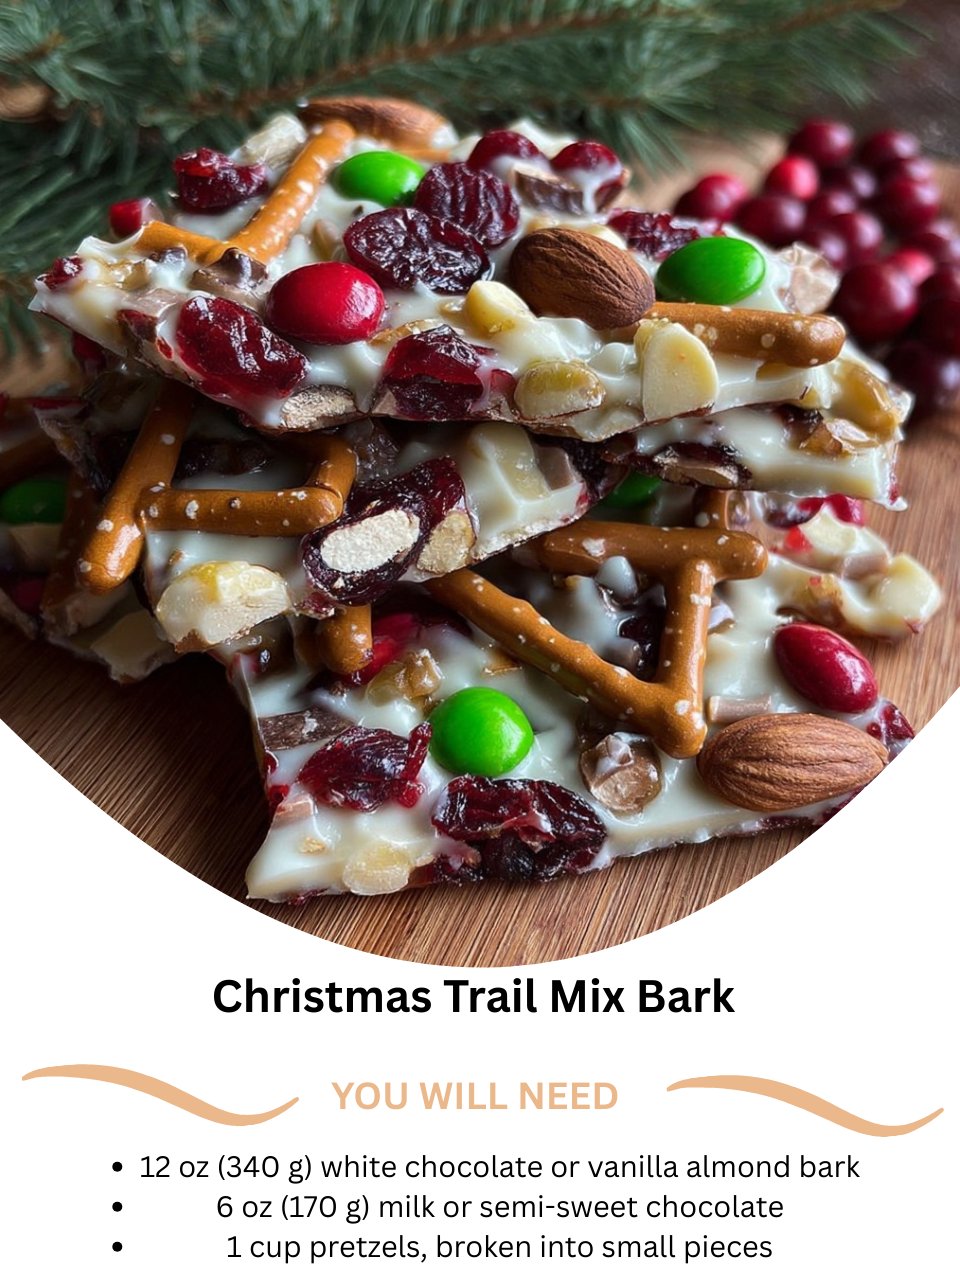
I dreamed up this Christmas Trail Mix Bark one snowy afternoon, staring at a pantry full of holiday baking leftovers—bits of pretzels, nuts, and lonely chocolate chips. I wanted to make something festive, easy, and perfect for sharing. As the white chocolate melted into a smooth, ivory pool in my bowl, my kitchen filled with a sweet, vanilla-scented promise. Swirling in dark chocolate and sprinkling on a blizzard of colorful mix-ins felt like creating a delicious winter landscape. When I broke the first piece, the satisfying snap gave way to a perfect bite of sweet, salty, crunchy, and chewy. It was an instant holiday classic, born from simplicity and joy.
Why You’ll Love This Recipe
You are going to absolutely adore this recipe because it’s the ultimate no-bake, no-fuss holiday treat that looks spectacular and comes together in under 20 minutes. It’s incredibly forgiving, endlessly customizable based on what you have in your cupboard, and it makes a huge amount for gifting or parties. The combination of creamy white chocolate, rich dark chocolate, salty pretzels, and festive mix-ins creates a symphony of textures and flavors in every piece. It’s the perfect project to do with kids, a lifesaver for last-minute hostess gifts, and a guaranteed crowd-pleaser that requires zero baking skills.
Ingredients
- 12 oz (340 g) white chocolate chips or vanilla almond bark
- 6 oz (170 g) milk or semi-sweet chocolate chips
- 1 cup small pretzel twists or sticks, broken into small pieces
- 1/2 cup roasted, salted peanuts or almonds
- 1/2 cup dried cranberries
- 1/3 cup shelled, roasted pepitas (pumpkin seeds) or sunflower seeds
- 1/4 cup holiday sprinkles or red & green M&M’s
- Optional: Flaky sea salt for finishing (See the next page below to continue…)
Equipment Needed
- Large, heatproof mixing bowl (for melting chocolate)
- Medium, heatproof bowl (for second chocolate)
- Rimmed baking sheet (12×18 inch half-sheet pan is ideal)
- Parchment paper or a silicone baking mat
- Spatula or spoon for swirling
- Microwave or double boiler setup
Step-by-Step Instructions
My first step is all about setting the stage. I line my large baking sheet with parchment paper, making sure it lies flat. This is non-negotiable for easy bark removal later. Then, I prep all my mix-ins. I break the pretzels into small, bite-sized pieces in a zip-top bag using a rolling pin—it’s therapeutic! I measure out the nuts, dried cranberries, and seeds. Having everything ready in small bowls is crucial because once the chocolate is melted, you need to move quickly before it starts to set. I learned this the hard way when my first batch of chocolate hardened while I was still hunting for sprinkles.
Now, for the chocolate. I melt the white chocolate first, as it’s more delicate. I place it in my large heatproof bowl. Whether using a microwave (in 30-second bursts at 50% power, stirring vigorously between each) or a double boiler, the goal is gentle, gradual melting. The moment it’s about 90% melted, I remove it from the heat and stir until the residual heat melts the last few chunks. This prevents overheating, which can cause white chocolate to seize into a grainy mess. Once smooth, I pour it onto the prepared baking sheet and use a spatula to spread it into a thin, even layer, about 1/4 inch thick.
Immediately after, I melt the milk or semi-sweet chocolate using the same gentle method. While it melts, I quickly sprinkle about three-quarters of my trail mix ingredients—the pretzels, nuts, cranberries, and seeds—evenly over the white chocolate base, gently pressing them in. Then, I drizzle the melted dark chocolate all over in zig-zags and loops. Using a knife or toothpick, I gently swirl the two chocolates together, creating a beautiful marbled effect. I don’t over-swirl; I want distinct ribbons of each chocolate. Finally, I scatter the remaining mix-ins and the festive sprinkles over the top, along with a tiny pinch of flaky sea salt if I’m using it.(See the next page below to continue…)
And then… I walk away. I carefully transfer the entire baking sheet to a level spot in my refrigerator. I let it chill, undisturbed, for at least 45 minutes to an hour, until the chocolate is completely firm and set. I tried letting it set at room temperature once, but my kitchen was too warm and it stayed tacky. The fridge is your friend here. Once it’s hard, I lift the entire sheet of bark out using the parchment paper, place it on a cutting board, and use my hands to break it into rustic, irregular pieces. The chaotic, glittering pile is a thing of beauty.
Pro Tips for Best Results
My first pro tip is to use a baking sheet with a rim. A flat cookie sheet is a recipe for a chocolate avalanche onto your fridge floor. The rim contains everything. Also, if you’re using almond bark (vanilla flavored coating), it sets harder and faster than real white chocolate, which can be a benefit for quick gifting. I’ve tested both, and while real white chocolate tastes creamier, almond bark is more forgiving for beginners.
Second, don’t skip the gentle melt. Chocolate, especially white chocolate, is temperamental. Microwaving on full power or overheating over direct steam will cause it to seize—turning into a thick, clumpy disaster. Low, slow, and patient stirring is the only way. If it does seize, try stirring in a teaspoon of vegetable oil or shortening; it can sometimes bring it back to a pourable consistency.
Finally, press your heavier mix-ins in gently. When you sprinkle the pretzels and nuts onto the first layer of chocolate, give them a very light press with your hand or the back of a spoon. This ensures they’ll be anchored in the bark and won’t fall off when you break it. But don’t push them all the way through to the parchment paper.
Common Mistakes to Avoid
The most common mistake is adding wet ingredients. Do not use fresh fruit or anything with moisture, like marshmallows, directly into the melted chocolate. The moisture can cause the chocolate to seize almost instantly. I made this mistake with a mini marshmallow once and had white chocolate cement. If you want to add marshmallows, wait until the very end and just press them onto the top where they won’t melt into the warm chocolate.(See the next page below to continue…)
Don’t spread the chocolate layer too thin. If you try to stretch it over too large an area, the bark will be fragile and crack into tiny shards instead of nice, hearty pieces. A thickness of about 1/4 inch is perfect. It’s okay if the layer isn’t a perfect rectangle; rustic edges are part of the charm.
Avoid a warm kitchen for setting. If your house is toasty for the holidays, the chocolate may never properly harden at room temperature, remaining bendy and soft. The refrigerator is the most reliable environment for a perfect, snappy set. Just be sure to let the bark come to room temperature for a few minutes before serving, as cold chocolate can taste less flavorful.
Finally, don’t use cheap, waxy chocolate chips if you can help it. The quality of your chocolate is the flavor of your bark. A good quality baking bar or chips will taste infinitely better. For the white chocolate, I prefer Ghirardelli or Guittard brand chips over generic ones for a much creamier, less cloyingly sweet result.
Serving Suggestions
I love piling this bark high in a large, festive bowl at holiday parties. It’s a dazzling centerpiece that guests can casually grab throughout the night. For a cookie exchange, I’ll pack individual portions into clear cellophane bags tied with a red and green ribbon—it’s a wonderful non-cookie offering that always stands out.
This bark is my favorite edible gift. I layer pieces in decorative tins lined with parchment paper or arrange them in gift boxes with tissue paper. It’s personal, looks professional, and because it’s so easy to make, I can whip up several batches for teachers, postal workers, and friends without spending a whole day in the kitchen.
For a fun holiday dessert, I’ll break larger pieces and serve them alongside a cheese board with sharp cheddar and fruit, or crumble it over bowls of vanilla ice cream. The sweet-salty-crunchy combo makes it a versatile treat that goes beyond just snacking.
Variations & Customizations
For a “Everything But the Christmas Tree” version, use whatever you have! Substitute the peanuts with chopped pecans or pistachios. Swap cranberries for chopped dried apricots or cherries. Use goldfish crackers or cheerios instead of pretzels. The formula is 1 part chocolate, 2 parts mix-ins—the combinations are endless.
To make it more decadent, after swirling the chocolates, drizzle melted peanut butter or caramel sauce over the top before adding the final sprinkles. For a minty version, add 1/4 teaspoon of peppermint extract to the white chocolate as it melts, and use crushed candy canes as your main “sprinkle.”
For a kid-friendly version, use all milk chocolate and mix-ins like mini marshmallows (pressed on at the very end), rainbow sprinkles, and crushed graham crackers to mimic a s’mores bark. Let the kids do the sprinkling—it’s a fantastic, easy holiday activity.
How to Store, Freeze & Reheat
This bark stores beautifully. I keep it in an airtight container at cool room temperature for up to 10 days. Layering between sheets of parchment paper prevents the pieces from sticking together. If your kitchen is warm, store it in the refrigerator to keep it perfectly snappy.
It freezes extremely well for long-term storage. Place the pieces in a single layer on a parchment-lined sheet to freeze solid first (about an hour), then transfer them to a freezer bag or container. This prevents them from freezing into a solid block. It will keep for 2-3 months. Thaw at room temperature for 15-20 minutes before serving.
There is no need to reheat this bark. Its magic is in its solid, snappy texture. If it gets too warm and soft, simply pop the container in the fridge for 15 minutes to firm it back up. Microwaving will melt it completely.
Conclusion
This Christmas Trail Mix Bark is more than just a holiday recipe to me; it’s a celebration of simplicity, creativity, and sharing. It has become my signature December treat, a project that fills my kitchen with joy and my pantry with gifts. I hope this recipe brings the same sparkle to your holiday season, giving you an easy, delicious way to spread a little edible cheer. Now, go raid your pantry—a batch of festive, crunchy bliss is waiting to be made.