
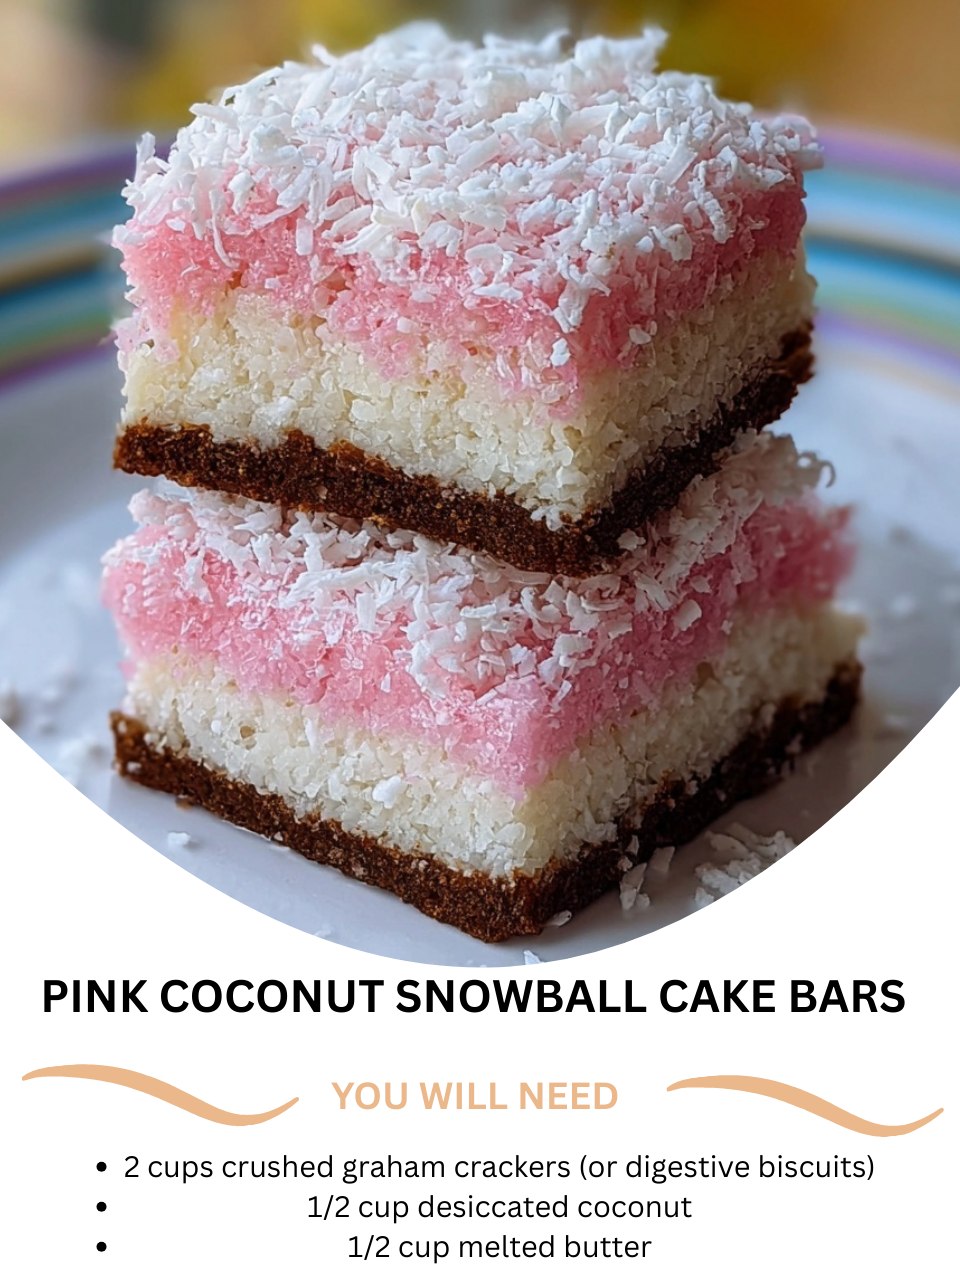
The first time I made Pink Coconut Snowball Cake Bars, it felt like creating edible magic. I was looking for a no-bake treat that could bring a burst of joyful color to a dreary winter day, and this recipe felt like finding a secret portal to a whimsical, sugary wonderland. As I mixed the sweetened condensed milk into the bowl, watching the coconut and cookie crumbs transform into a pliable, pink-dusted dough, my kitchen filled with the nostalgic, tropical scent of coconut. Pressing that vividly pink base into the pan and showering it with a snowy blanket of white coconut was pure, childlike delight. These bars aren’t just a dessert; they’re a bite of pure, playful happiness, and they never fail to make everyone who tries them grin from ear to ear.
Why You’ll Love This Recipe
You will absolutely adore this recipe because it’s the ultimate in simple, satisfying, no-fuss baking. There’s no oven required, no intricate techniques, and the result is a treat that looks spectacularly festive but comes together in under 20 minutes of hands-on time. It’s forgiving, wonderfully customizable, and delivers a perfect combination of chewy, creamy, and crunchy textures that both kids and adults find irresistible. If you’ve ever wanted to make something that looks like it came from a fancy bakery with the effort level of a simple snack mix, this is your recipe.
Ingredients
- 2 cups finely crushed graham crackers (about 14-16 full sheets) or digestive biscuits
- 1/2 cup desiccated coconut (unsweetened or sweetened, based on your preference)
- 1/2 cup (1 stick) unsalted butter, melted
- 1 (14 oz) can full-fat sweetened condensed milk (don’t use evaporated milk—it makes a huge difference!)
- 1 teaspoon pure vanilla extract
- A pinch of fine sea salt
- 1-2 teaspoons of beet powder OR 5-8 drops of pink food gel (I prefer beet powder for a natural color)
- 1 1/2 cups sweetened shredded coconut, for coating (See the next page below to continue…)
Equipment Needed
- An 8×8 inch square baking pan
- Parchment paper (for easy removal)
- Food processor or a large zip-top bag and a rolling pin
- Large mixing bowl
- Rubber spatula
- Small bowl for toasting coconut (optional)
- Measuring cups and spoons
Step-by-Step Instructions
My journey with these bars always starts with the satisfying crunch of turning graham crackers into crumbs. I place the whole sheets in my food processor and pulse until I have fine, even crumbs—you want them to resemble coarse sand. In a large mixing bowl, I combine these fragrant crumbs with the 1/2 cup of desiccated coconut. I pour the melted, still-warm butter over this dry mixture and use my spatula to stir until every last bit is evenly moistened. The smell at this stage is already incredible: toasty, buttery, and sweet. I then firmly press this mixture into the bottom of my parchment-lined 8×8 pan, creating a solid, even crust. I use the flat bottom of a measuring cup to really compact it; this base needs to be sturdy to support the creamy layer.
Now, for the magical pink layer. In the same mixing bowl (no need to wash it!), I pour in the entire can of sweetened condensed milk. To this, I add the vanilla extract and that tiny pinch of salt, which I’ve learned is crucial for balancing the intense sweetness. Here’s where the fun begins: I add my color. If I’m using beet powder, I start with one teaspoon and whisk it in vigorously until fully dissolved and the milk is a uniform pastel pink. I can always add more for a bolder color. If using food gel, I add drops one at a time, stirring well between each.
This is the step where patience is key. I pour this vibrantly pink, creamy mixture over the prepared crust in the pan. Using my spatula, I gently spread it into a perfectly smooth, even layer, making sure it reaches all the way to the corners. This mixture is thick and luxurious, and spreading it smoothly is a strangely therapeutic process. Once it’s level, I pop the entire pan into the refrigerator. I let it chill for at least one hour, but I’ve learned that two hours is the sweet spot. This firming-up time is non-negotiable for clean cutting later.(See the next page below to continue…)
While the base is setting, I prepare the “snow.” I take my sweetened shredded coconut and spread it in a thin layer on a small baking sheet. I toast it under the broiler for just 60-90 seconds, watching it like a hawk and stirring frequently, until it’s just kissed with golden edges. This toasting step elevates the flavor from simple sweetness to a deep, nutty, aromatic coconut that makes the bars truly special. Once cooled, I sprinkle this toasted coconut generously and evenly over the completely set pink layer, gently pressing it down so it adheres.
Pro Tips for Best Results
First, let’s talk about the crust texture. I tested this three different ways: coarse crumbs, fine crumbs, and a mix with some added oats. Finely ground crumbs, almost like powder, created the most cohesive and easy-to-cut base. If your crumbs are too coarse, the crust will be crumbly and fall apart when you try to lift a bar out of the pan. A few extra pulses in the food processor makes all the difference.
For the pink color, I highly recommend trying beet powder if you can find it. It provides a gorgeous, natural dusty-rose hue and doesn’t add any distinct flavor. I’ve tried using liquid food coloring, and it can sometimes thin the condensed milk mixture slightly or create streaks. The gel or powder food coloring is more concentrated and stable. Start with less color than you think you need—you can always add more, but you can’t take it away.
The toasting of the final coconut topping is a step you should not skip. I’ve made these both with plain shredded coconut and with toasted, and the flavor difference is night and day. The toasted coconut adds a necessary depth and a slight crunch that contrasts beautifully with the sweet, creamy middle. Just remember, coconut goes from perfectly golden to burnt in a heartbeat under the broiler, so do not walk away!
Common Mistakes to Avoid
The most common mistake is not pressing the base layer firmly enough into the pan. The first time I made these, I just kind of patted it down, thinking it was fine. When I went to cut and serve them, the crust completely crumbled and separated from the pink layer. Now, I press with serious conviction, using that measuring cup to apply even pressure across the entire surface. A solid, compact base is your foundation for success.(See the next page below to continue…)
Another error is trying to cut the bars before they are fully set. I know it’s tempting to peek after just 30 minutes in the fridge, but if the pink layer is still soft or sticky, you’ll make a mess. The condensed milk layer needs that full chilling time to become sliceable. I made this mistake and ended up with sticky, gooey squares that smeared everywhere. Wait the full two hours if you can—it’s worth the patience for perfect, clean cuts.
Don’t use a substitute for the sweetened condensed milk. I’ve seen recipes suggest using coconut cream or regular milk, and it simply will not work the same way. The sweetened condensed milk is thick, sticky, and sweet, and it sets up to a perfect, sliceable consistency when chilled. Evaporated milk is thinner and unsweetened, and your bars will never firm up properly. Trust me, do not swap this ingredient.
Finally, be cautious with your food coloring. It’s easy to get carried away and add too much, resulting in a neon pink that can be off-putting. I aim for a soft, gentle pink—it looks more like a “snowball” and less like a cartoon. Remember, you can always add more color, drop by drop or pinch by pinch, but you can’t remove it. Start small and build up to your desired shade.
Serving Suggestions
I love serving these bars cut into small, elegant squares on a stark white or pale blue platter, which makes their pink and white colors truly pop. For a winter party, I might dust the platter with a little extra untoasted coconut or even a light sprinkle of edible glitter to enhance the “snowy” effect. They look incredibly festive and are always the first treat to disappear from the table.
For a more casual, fun presentation, I sometimes cut them into larger rectangles and serve them on a bed of wax paper in a rustic wooden box, like little precious parcels. They pair wonderfully with a cup of hot chocolate or a lightly sweetened herbal tea, like peppermint or chamomile. The creamy sweetness of the bar is perfectly balanced by a warm, slightly bitter beverage.
If I’m feeling extra, I’ll turn them into a deconstructed dessert. I’ll crumble a bar over a scoop of vanilla or coconut ice cream, add a drizzle of dark chocolate sauce, and top with a fresh raspberry. It feels incredibly luxurious and turns a simple bar into a restaurant-worthy dessert plate with minimal extra effort.
Variations & Customizations
The flavor possibilities here are endless! For a tropical twist, I’ve added 1/3 cup of finely chopped dried pineapple or mango to the crust mixture. The fruity chew plays so well with the coconut. I’ve also swapped the vanilla extract for 1/2 teaspoon of coconut extract to really double down on that island flavor, and it was a huge hit with my coconut-loving friends.
For a different visual and flavor, try using other natural colorants. A bit of matcha powder creates beautiful green “mossy” bars, perfect for spring. Unsweetened cocoa powder (about 2 tablespoons) mixed into the condensed milk layer makes a fantastic chocolate-coconut version—just be sure to reduce the beet powder! I’ve even seen a friend swirl raspberry jam into the pink layer before chilling for a pretty marbled effect.
You can also play with the crust. While graham crackers are classic, using crushed vanilla wafers or even gingersnap cookies creates a completely different personality. A gingersnap crust with the pink coconut topping is a stunning and delicious combination for the holidays. Feel free to get creative with what you have on hand.
How to Store, Freeze & Reheat
Once cut, I store these bars in a single layer in an airtight container in the refrigerator. I place parchment paper between layers if I need to stack them. They will keep beautifully for up to 5 days this way. The chilled environment helps maintain their structure and prevents the coconut topping from becoming greasy. I do not recommend storing them at room temperature for more than a few hours, as the condensed milk layer can become too soft.
Yes, these bars freeze exceptionally well! I freeze them in a single layer on a parchment-lined sheet until solid, then transfer the frozen bars to a freezer-safe bag or container. They will keep for up to 2 months. To thaw, I simply move the desired number to the refrigerator for a few hours or let them sit at room temperature for about 30 minutes. The texture remains perfect.
“Reheating” isn’t applicable here, as they are meant to be served chilled or cool. However, if your bars have been in the fridge for a few days and the coconut topping seems less crisp, you can briefly flash them under the broiler for 15-20 seconds before adding the topping if you’re making them fresh. For already-assembled bars, just enjoy them as is—the contrast of textures is part of their charm, and a slightly softer topping is still delicious.
Conclusion
These Pink Coconut Snowball Cake Bars are my go-to recipe when I need a guaranteed dose of kitchen joy. They remind me that baking doesn’t have to be complicated to be beautiful, and that a little bit of color can lift everyone’s spirits. I hope you’ll give them a try, maybe playing with the colors and flavors to make them your own. There’s something so wonderfully satisfying about creating a treat that looks this magical with such simple steps. Happy no-bake baking