
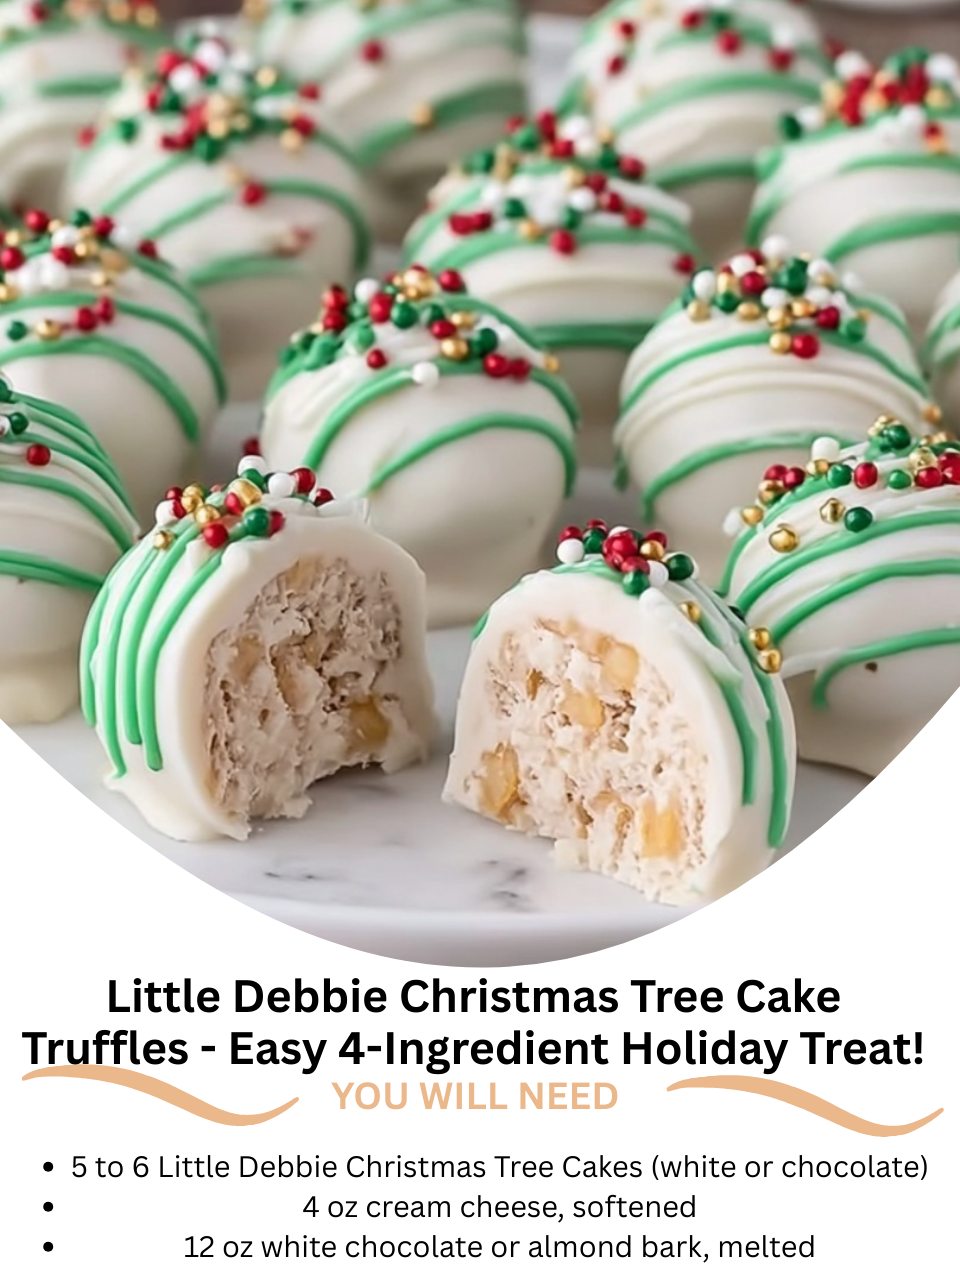
I stumbled upon the idea for these truffles in the most nostalgic way possible: staring at a box of Little Debbie Christmas Tree Cakes in my pantry, feeling a wave of childhood holiday excitement. I wondered what would happen if I transformed that iconic, spongy, cream-filled treat into something even more decadent. The moment I combined the crumbled cakes with the cream cheese, a magical thing happened—it felt like playdough, but it smelled like pure Christmas morning. Rolling those truffle balls, dipping them in glossy white chocolate, and watching them set into elegant little snowballs was a pure joy. My kitchen smelled like sweet cream and vanilla, and I knew I’d created a new, irresistibly fun holiday tradition.
Why You’ll Love This Recipe
You will absolutely love this recipe because it turns a beloved, store-bought snack into a stunning homemade-looking confection with almost zero effort. It’s the perfect project for when you want to make something impressively festive but don’t have the time or energy for complicated baking. With just four simple ingredients, you create a treat that is creamy, sweet, and filled with that unmistakable Christmas Tree Cake flavor, all wrapped up in a beautiful chocolate shell. They’re a guaranteed conversation starter and will make you look like a holiday dessert wizard.
Ingredients
- 5 to 6 Little Debbie Christmas Tree Cakes (the classic white & green or chocolate variety both work!)
- 4 oz (half a block) full-fat cream cheese, truly softened at room temperature
- 12 oz high-quality white chocolate baking bars or almond bark, chopped
- 1 teaspoon coconut oil or vegetable shortening (this makes a huge difference for dipping)
- Optional for decorating: Green sanding sugar, red sprinkles, or crushed freeze-dried strawberries (See the next page below to continue…)
Equipment Needed
- Food processor or a large bowl and your hands
- Large mixing bowl
- Baking sheet
- Parchment paper or a silicone baking mat
- Small, deep microwave-safe bowl
- Fork or dipping tools
- Spoon or cookie scoop
Step-by-Step Instructions
I start by unwrapping the Christmas Tree Cakes—and yes, I might sneak a bite of one! I break them apart into chunks and add them to my food processor. I pulse them until they’re reduced to fine, even crumbs. You want a texture like soft sand; if there are any big chunks, the truffle centers won’t be smooth. If you don’t have a processor, you can place them in a sturdy zip-top bag and roll them with a rolling pin until finely crushed, which is a wonderfully therapeutic (if slightly messy) process. I dump these fragrant, sweet crumbs into a large mixing bowl.
Next comes the secret ingredient: the cream cheese. It must be softened to the point where you can easily press your thumb through it. I add the entire 4-ounce block to the bowl of crumbs. Now, I get in there with clean hands. I squeeze and knead the mixture together until it’s completely uniform, with no white streaks of cream cheese remaining. It will come together into a soft, pliable dough that holds its shape when squeezed. This part is messy, fun, and smells amazing. I cover the bowl and pop it into the refrigerator to chill for at least 30 minutes. This firming-up step is crucial; a cold dough is much easier to roll neatly.
Once the dough is chilled, I line a baking sheet with parchment paper. Using a small cookie scoop or a tablespoon, I portion out the dough and roll it between my palms into smooth, tight balls, about 1-inch in diameter. I place each ball on the prepared sheet. When they’re all rolled, I put the entire tray back into the freezer for a solid 15-20 minutes. This is my non-negotiable trick for perfect dipping. A frozen truffle center prevents it from melting or falling apart when submerged in the warm chocolate.(See the next page below to continue…)
For the coating, I chop my white chocolate bar finely and melt it with the teaspoon of coconut oil in a deep, microwave-safe bowl. I melt it in 30-second bursts, stirring vigorously between each, until it’s completely smooth and fluid. Using a fork, I drop a frozen truffle ball into the chocolate, swirl it to coat, lift it out, tap off the excess, and gently slide it back onto the parchment paper. I immediately add any sprinkles before the shell sets, which happens quickly because the center is so cold. The sight of those glossy, white truffles lining up on the tray is incredibly satisfying.
Pro Tips for Best Results
First, the cream cheese texture is everything. I tested this with cold cream cheese, room-temperature, and over-softened. Truly room-softened (left out for 1-2 hours) incorporates seamlessly into the crumbs without overworking the dough. If it’s too cold, you’ll have lumps; if it’s too warm, the dough will be overly sticky. Aim for that perfect, spreadable consistency for the easiest mixing.
For the chocolate shell, I strongly recommend using a high-quality white chocolate baking bar (like Ghirardelli or Baker’s) over white chocolate chips. Chips contain stabilizers that make them harder to melt smoothly for dipping. The coconut oil or shortening is also critical—it thins the chocolate just enough to create a thin, crisp shell that doesn’t overwhelm the delicate center. I’ve tried skipping it, and the coating was always too thick and gloppy.
The freezing step is your best friend. I know it adds time, but I tried dipping with just chilled centers versus frozen centers. The chilled ones lost their shape, warmed the chocolate too quickly, and created a messy puddle. The frozen ones gave me a clean, quick-dipping experience and a perfect, round final product. Set a timer and don’t skip this rest in the freezer.
Common Mistakes to Avoid
The biggest mistake is not crushing the cakes finely enough. My first batch had a few larger, chewy bits of cake and cream, and it made the truffle centers grainy and difficult to roll smoothly. Take the extra minute to ensure you have a fine, uniform crumb. It creates that signature melt-in-your-mouth truffle texture we’re after.(See the next page below to continue…)
Don’t try to rush the melting chocolate in the microwave. High heat is the enemy of chocolate. If you blast it for too long, it will seize up into a grainy, unworkable mass. Low and slow, with frequent stirring, is the only way. If it does seize, you can sometimes save it by stirring in an extra teaspoon of coconut oil, but prevention is much easier than the cure.
Another error is dipping truffles that aren’t cold enough. If your hands warm them up as you roll, or if you skip the freezer step, they will start to soften immediately in the chocolate. This can cause the coating to crack as it sets, or worse, the truffle can fall right off the fork back into the bowl. A rock-solid, frozen center is your insurance policy for a flawless finish.
Finally, avoid decorating on wet chocolate. This sounds obvious, but if you drizzle another color or add sprinkles even a few seconds too late, the shell will have started to set and nothing will stick. Have all your sprinkles and tools ready to go before you start dipping, and decorate each truffle the moment it touches the parchment paper, while the chocolate is still wet and shiny.
Serving Suggestions
I love presenting these truffles in festive mini paper candy cups arranged on a vintage holiday platter or in a rustic wooden box. They look like precious, edible ornaments. For a party, I’ll sometimes create a “truffle tree” by stacking them in a pyramid shape on a cake stand—it’s a stunning centerpiece that always draws oohs and aahs.
They are the perfect sweet ending to a rich holiday meal. I like to serve a small plate of them alongside after-dinner coffee or a glass of champagne. The creamy, sweet bite is just enough dessert without being too heavy. They also make fantastic additions to a holiday cookie swap box, offering a different texture and style among all the traditional baked goods.
For a truly whimsical touch, I’ll package them in clear cellophane bags tied with a red or green ribbon as take-home favors for guests. I might even stick a mini holiday pick or tag on them. They travel well and are such a personal, homemade gift that showcases a clever and nostalgic twist.
Variations & Customizations
The flavor fun doesn’t stop with the original cakes! I’ve made a fantastic version using the chocolate-covered Christmas Tree Cakes. For those, I like to dip the truffles in dark or milk chocolate and then sprinkle with crushed peppermint candies for a chocolate-peppermint explosion. It’s a richer, deeper flavor that chocolate lovers adore.
You can also play with the coating. Instead of all white chocolate, try dipping half in white and half in green candy melts for a more “tree-like” appearance. For a simple, elegant look, I sometimes just drizzle a little melted dark chocolate over the white shells once they’re set. It looks professional and adds a slight bitterness that cuts the sweetness beautifully.
Feel free to mix in add-ins to the truffle center for texture. A tablespoon or two of finely chopped pecans or crushed pretzels added to the cake-cream cheese mixture creates a wonderful salty-sweet contrast. I’ve also seen friends roll the finished, dipped truffles in crushed graham crackers or even more cake crumbs for a different finish.
How to Store, Freeze & Reheat
Once set, I store these truffles in a single layer in an airtight container in the refrigerator. They keep perfectly for up to 5 days. The cold environment ensures the cream cheese center stays firm and the chocolate shell remains crisp. Let them sit at room temperature for about 10 minutes before serving for the best texture and flavor.
These truffles freeze magnificently for long-term storage. I place them in a single layer on a parchment-lined tray to freeze solid, then transfer them to a freezer-safe bag or container. They’ll keep for up to 2 months. Thaw them overnight in the refrigerator before serving. The texture remains impeccable, making them a fantastic make-ahead holiday treat.
“Reheating” isn’t applicable, but if your kitchen is very warm and the truffles seem soft, simply pop the container back in the fridge for 30 minutes to firm up. Never microwave them, as the chocolate will melt and the cream cheese center will become a mess. These are strictly a cool-weather, chilled delight.
Conclusion
These Little Debbie Christmas Tree Cake Truffles are my favorite kind of kitchen hack—taking something familiar and loved and turning it into a new, shareable celebration. They capture the pure, uncomplicated joy of the season in one creamy, chocolatey bite. I hope you’ll give them a try and experience the fun of making them, maybe with a little holiday music playing in the background. They’re proof that the most delightful holiday memories can start with the simplest of ingredients and a dash of creativity. Happy truffle-making