
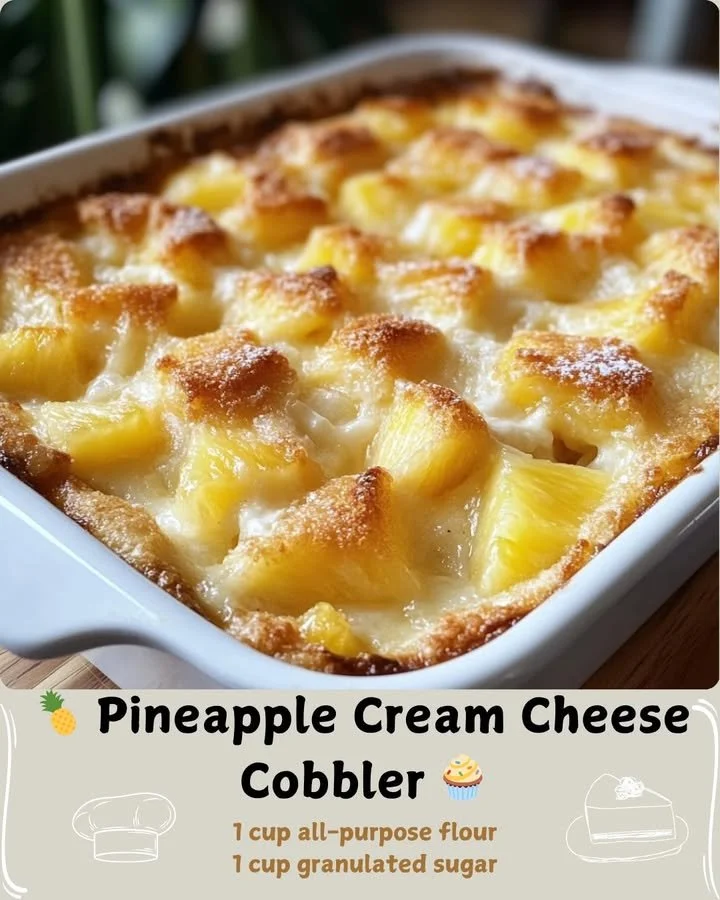
I have a soft spot for desserts that evoke memories and warm feelings, and Pineapple Cream Cheese Cobbler is one of those treats that takes me back to family gatherings and sunny afternoons. The combination of sweet pineapple and creamy cheese is a match made in heaven. It’s not just your ordinary cobbler; it’s like a warm hug on a plate. Today, I’ll take you through my cherished recipe, one that has become a staple in my kitchen!
Why You’ll Love This Recipe
This Pineapple Cream Cheese Cobbler is a delightful blend of textures and flavors that always leaves my guests asking for seconds. The crunchy top pairs perfectly with the luscious, creamy filling and the bright, tangy notes from the pineapple. It’s incredibly easy to prepare, requires minimal ingredients, and is perfect for any occasion. I guarantee you will find yourself going back for another slice! (See the ingredients in the next page below…)
Ingredients
– 1 can (20 oz) crushed pineapple, drained
– 1 package (8 oz) cream cheese, softened
– 1 cup sugar
– 1 cup all-purpose flour
– 1 cup whole milk
– 1/2 cup unsalted butter, melted
– 2 tsp baking powder
– 1/4 tsp salt
– 1 tsp vanilla extract
– Optional: whipped cream or vanilla ice cream for serving
Equipment Needed
– Mixing bowls
– Electric mixer or whisk
– 9×13 inch baking dish
– Measuring cups and spoons
– Spatula
Step-by-Step Instructions
To start, preheat your oven to 350°F (175°C). This is a crucial step that I always remind myself about because you want that cobbler to bake evenly and become beautifully golden brown. In a mixing bowl, combine the softened cream cheese and sugar. Use an electric mixer or whisk to whip these together until they’re smooth and creamy. If you’re like me, you’ll love the sweet aroma that fills your kitchen! (See the next page below to continue steps…)
Next, add in the flour, baking powder, salt, and vanilla extract to the cream cheese mixture. Gradually mix in the whole milk while continuing to beat the mixture until it’s well blended. The batter should be thick but pourable, and the smell at this stage will make your mouth water. Pour this batter into a greased 9×13 inch baking dish.
Now, it’s time to add the star ingredient: the crushed pineapple. Spoon the drained pineapple over the batter, letting it settle into the mixture. I love how the pineapple creates a beautiful, vibrant layer on top. Finally, pour the melted butter over the entire dish. Don’t be afraid; it will soak in and create a delightful texture as it bakes!
Place the baking dish in your preheated oven and bake for 45-50 minutes, or until the top is golden and a toothpick inserted in the center comes out clean. Your kitchen will start to smell divine, and trust me, the wait will be worth it!
Pro Tips for Best Results
I tested this recipe three ways to find the best balance of flavors, and I learned that using fresh pineapple truly elevates the dish. It adds a brightness that canned pineapple just doesn’t provide. If you decide to go that route, you’ll want to chop it into small pieces for even distribution throughout the cobbler.
Also, I recommend letting the cobbler cool for about 15-20 minutes before serving. This not only helps it set but also makes it easier to slice. Trust me; the creamy filling will be less likely to run all over the place when you cut into it!
And if you really want to impress your guests, I often serve it with a dollop of whipped cream or a scoop of vanilla ice cream. The contrast between the warm cobbler and the cold toppings creates a symphony of textures and flavors that is simply irresistible.
Common Mistakes to Avoid
One mistake I made in the past was not draining the crushed pineapple enough. I thought a little extra moisture wouldn’t hurt, but it led to a soggy bottom that we all know is not desirable. So, trust me on this one: make sure to drain your pineapple thoroughly for the best results! (See the next page below to continue…)
Another common pitfall is overbaking. I recommend checking the cobbler around the 45-minute mark, as all ovens can vary. If you wait too long, you might end up with a dry dessert, and we definitely don’t want that!
Also, be careful not to skip the vanilla extract; it adds an essential depth of flavor that ties everything together. I once forgot it in a batch, and the difference was noticeable.
Lastly, if you find that your batter looks lumpy, that’s perfectly okay! It’s all part of the rustic charm of this cobbler. Just remember not to overmix—gentle mixing is key here.
Serving Suggestions
When it comes to serving Pineapple Cream Cheese Cobbler, the options are endless! I often serve it warm right out of the oven with a scoop of vanilla ice cream on top. It creates a delightful contrast that everyone loves. If I’m in the mood for something more decadent, I drizzle chocolate sauce over the cobbler, and oh my goodness, it’s heavenly!
Another fun idea is to serve it at a brunch gathering. It pairs wonderfully with a cup of coffee or a refreshing glass of iced tea. I’ve had friends rave about how it perfectly complements the savory dishes when served as a part of a brunch spread.
And don’t hesitate to dress it up a bit; a sprinkle of powdered sugar or a few mint leaves on top can make your dessert look even more appealing. Presentation matters, and I love putting in that little extra effort to make it beautiful!
Variations & Customizations
One of the reasons I adore this recipe is its versatility. If you’re feeling adventurous and want to switch things up, you can easily add in different fruits. Strawberry, peach, or berries can all work beautifully in place of pineapple. Just keep an eye on the moisture content since some fruits release more juice than others.
For those who prefer a healthier version, I’ve played around with using Greek yogurt instead of cream cheese. It provides a tangy flavor that pairs well with the fruit and cuts down on the richness. You could also use a sugar substitute if you want to reduce the sweetness—just keep in mind that this may affect the texture.
Lastly, I’ve experimented with spices like cinnamon or nutmeg, adding a warm, cozy flavor to the cobbler. A teaspoon of cinnamon can change the entire profile of the dish, especially in the cooler months!
How to Store, Freeze & Reheat
If you happen to have leftovers (which is rare in my house!), you can store Pineapple Cream Cheese Cobbler in an airtight container in the refrigerator for up to three days. Just remember that the longer it sits, the more the textures can change. I like to reheat individual portions in the microwave for a quick treat!
If you want to freeze it, first let the cobbler cool completely. Wrap it tightly with plastic wrap and then foil, and it should keep well for up to three months. When you’re ready to enjoy it again, simply let it thaw in the refrigerator overnight and then reheat it in the oven at 350°F until warmed through.
Reheating the cobbler can bring back that freshly baked taste. I usually cover it with foil for the first part to avoid burning, then remove it to crisp the top back up!
Conclusion
I truly believe that this Pineapple Cream Cheese Cobbler is one of those recipes that embody love and comfort. It’s so simple yet incredibly satisfying, making it perfect for sharing with family and friends. I hope you’ll give it a try in your own kitchen and create some lovely memories along the way. Enjoy every delicious bite!