
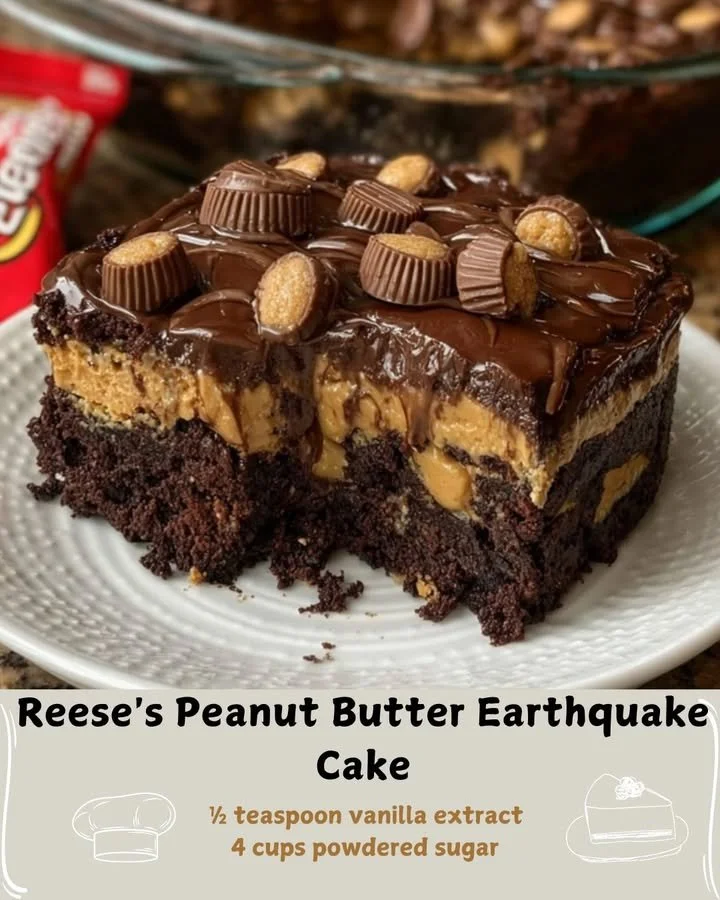
Hey there! Today, I am beyond excited to share a recipe that is close to my heart—and my taste buds. Reese’s Peanut Butter Earthquake Cake has become a staple in my kitchen, not just for its stunning appearance but also for its incredible flavors. Imagine a rich chocolate cake layered with creamy peanut butter and melted chocolate, all topped with a luscious peanut butter drizzle. Trust me, your loved ones will be begging for seconds!
Why You’ll Love This Recipe
This cake is the ultimate dessert for anyone who loves the delicious combination of peanut butter and chocolate. The simplicity of the ingredients and the ease of preparation make it perfect for both novice bakers and seasoned pros like myself. Every bite is a mouthful of delight with the fudgy chocolate cake, creamy peanut butter filling, and an explosion of sweetness. Plus, it’s great for celebrations or simply as a sweet treat for yourself! You won’t regret diving into this dessert. (See the ingredients in the next page below…)
Ingredients
- 1 box chocolate cake mix
- 1 cup water
- 1/3 cup vegetable oil
- 3 large eggs
- 1 cup creamy peanut butter
- 1 cup chocolate chips
- 1 cup powder sugar
- 1/3 cup milk
- 1/2 teaspoon vanilla extract
- Optional: crushed peanuts for topping
Equipment Needed
- Mixing bowls
- Electric mixer or whisk
- 9×13 inch baking pan
- Spatula
- Measuring cups and spoons
- Parchment paper (optional)
Step-by-Step Instructions
First things first, preheat your oven to 350°F (175°C). In my experience, preheating is a crucial step to ensure even baking. Next, grab a mixing bowl and pour in your chocolate cake mix, water, vegetable oil, and eggs. Mix these ingredients until they’re well combined—don’t be surprised if your kitchen starts to smell incredible already! Once your batter is smooth, pour half of it into your greased baking pan. Spread it out evenly and make sure it’s all settled nicely. (See the next page below to continue steps…)
Next, let’s create that scrumptious peanut butter layer! In a separate bowl, blend together the creamy peanut butter, powdered sugar, milk, and vanilla extract. This mixture is heavenly; I could eat it right out of the bowl! Spoon dollops of the peanut butter mix over the chocolate layer in your baking pan, and then pour the remaining chocolate batter on top. Finally, sprinkle chocolate chips all over—it makes the cake so rich and indulgent.
Bake this goodness in the preheated oven for about 30–35 minutes. Keep an eye on it, as the edges should start to pull away from the sides of the pan, and a toothpick inserted into the center should come out clean, with a few moist crumbs attached. Once baked, remove the cake and let it cool completely in the pan before trying to remove it. It’s a must to have patience here, as the cake firms up nicely after cooling!
After your cake has cooled, it’s time for the pièce de résistance: drizzle the melted peanut butter over the top. This adds a decadent finish that will have everyone swooning. If you’re feeling adventurous, sprinkle some crushed peanuts for an added crunch. And voila! You now have a Reese’s Peanut Butter Earthquake Cake that is sure to impress.
Pro Tips for Best Results
I tested this cake a few different ways to find out the perfect ratio of chocolate to peanut butter. For a slightly richer chocolate flavor, you can substitute the water in the cake mix for brewed coffee. It adds a wonderful depth without altering the taste too drastically! When it comes to baking, I always recommend using room-temperature ingredients; they incorporate better and lend to a fluffier texture.
Another great tip I have is to make sure you don’t overmix the cake batter. Overmixing can lead to a denser cake, which is not what we’re after here. Mixing just until everything is combined gives you that delightful, moist crumb we love in cake. Lastly, if you’re short on time, using a store-bought chocolate frosting instead of melting peanut butter makes for a quick and delicious alternative!
Common Mistakes to Avoid
One of the biggest mistakes I’ve made in the past is forgetting to preheat the oven. If you throw your cake in the oven without preheating, it can bake unevenly and make a huge difference in the final product. Trust me, this cake deserves that extra warmth right from the get-go! Another pitfall is using cold eggs directly from the fridge; they mix better at room temperature and help achieve a lighter texture.(See the next page below to continue…)
When measuring your peanut butter, be cautious not to pack it too tightly. Doing so can alter the balance of wet to dry ingredients, resulting in a drier cake. I learned the hard way that the consistency matters—it can mean the difference between a delightful treat and a dense disaster! Finally, do not skip the cooling period. If you cut into your cake too early, it may crumble and fall apart. Patience is indeed a virtue in baking!
Serving Suggestions
This cake is indulgent enough to be served on its own, but I love to pair it with a scoop of vanilla ice cream for a delightful contrast in flavors. The creaminess of the ice cream balances out the richness of the cake perfectly, enhancing the overall experience. Another great option is to serve it with a dollop of whipped cream, which adds airy lightness and a touch of elegance to your presentation.
For a fun twist, you can garnish your slice with chocolate sauce or extra peanut butter drizzle to enhance that lusciousness further. I also enjoy serving this cake at gatherings with desserts in a tasting format, allowing guests to sample a slice alongside other treats—it’s always a hit!
Let’s not forget about packaging! This cake not only tastes incredible, but it also looks gorgeous when plated. I often top my slices with crushed peanuts and a sprinkle of powdered sugar, making it visually appealing for guests.
Variations & Customizations
While the classic Reese’s combo is simply magical, there are plenty of ways to mix things up. For a fun twist, consider swapping out chocolate cake for a vanilla cake mix. The combination with peanut butter is still divine and allows that creamy peanut butter flavor to shine even more. You could also experiment with different flavored chocolate chips—like mint or caramel—for an exciting spin!
If you’re feeling particularly adventurous, why not try adding some chopped Reese’s Peanut Butter Cups into the batter? It creates little pockets of gooey goodness throughout the cake, making each bite a delightful surprise. You could also substitute almond butter or sunflower seed butter for an allergen-friendly version while still keeping that lovely nutty flavor.
For a more refined presentation, consider layering the cake into smaller, individual dessert cups after baking and cooling. Each layer of cake and peanut butter can be topped with whipped cream and garnished with chocolate shavings for a delightful twist that’s just as delicious but a bit more elegant.
How to Store, Freeze & Reheat
If you find yourself with leftovers (although I doubt it!), you can store the cake in an airtight container at room temperature for up to three days. If your kitchen is warm or humid, refrigerating it may help it last a bit longer! Just be sure to bring it back to room temperature before serving for optimal taste.
For longer-term storage, you can freeze this cake! I recommend cutting it into slices, wrapping each slice tightly in plastic wrap, and then placing them in a freezer-safe container. It can stay like this for up to three months. When you’re ready to indulge, just allow it to thaw in the fridge overnight and then bring it out to enjoy.
Reheating is super easy, too! If you want to warm up a slice, pop it in the microwave for about 10 to 15 seconds (just long enough to take the chill off). I love serving it warm, making the chocolate and peanut butter extra gooey—so delicious!
Conclusion
I hope you find as much joy in baking this Reese’s Peanut Butter Earthquake Cake as I do in my kitchen! It’s truly a crowd-pleaser, and every bite is filled with the comforting flavors of home. Whether you’re celebrating a special occasion or simply indulging yourself, this cake will undoubtedly bring smiles to your table. Happy baking, friends!