
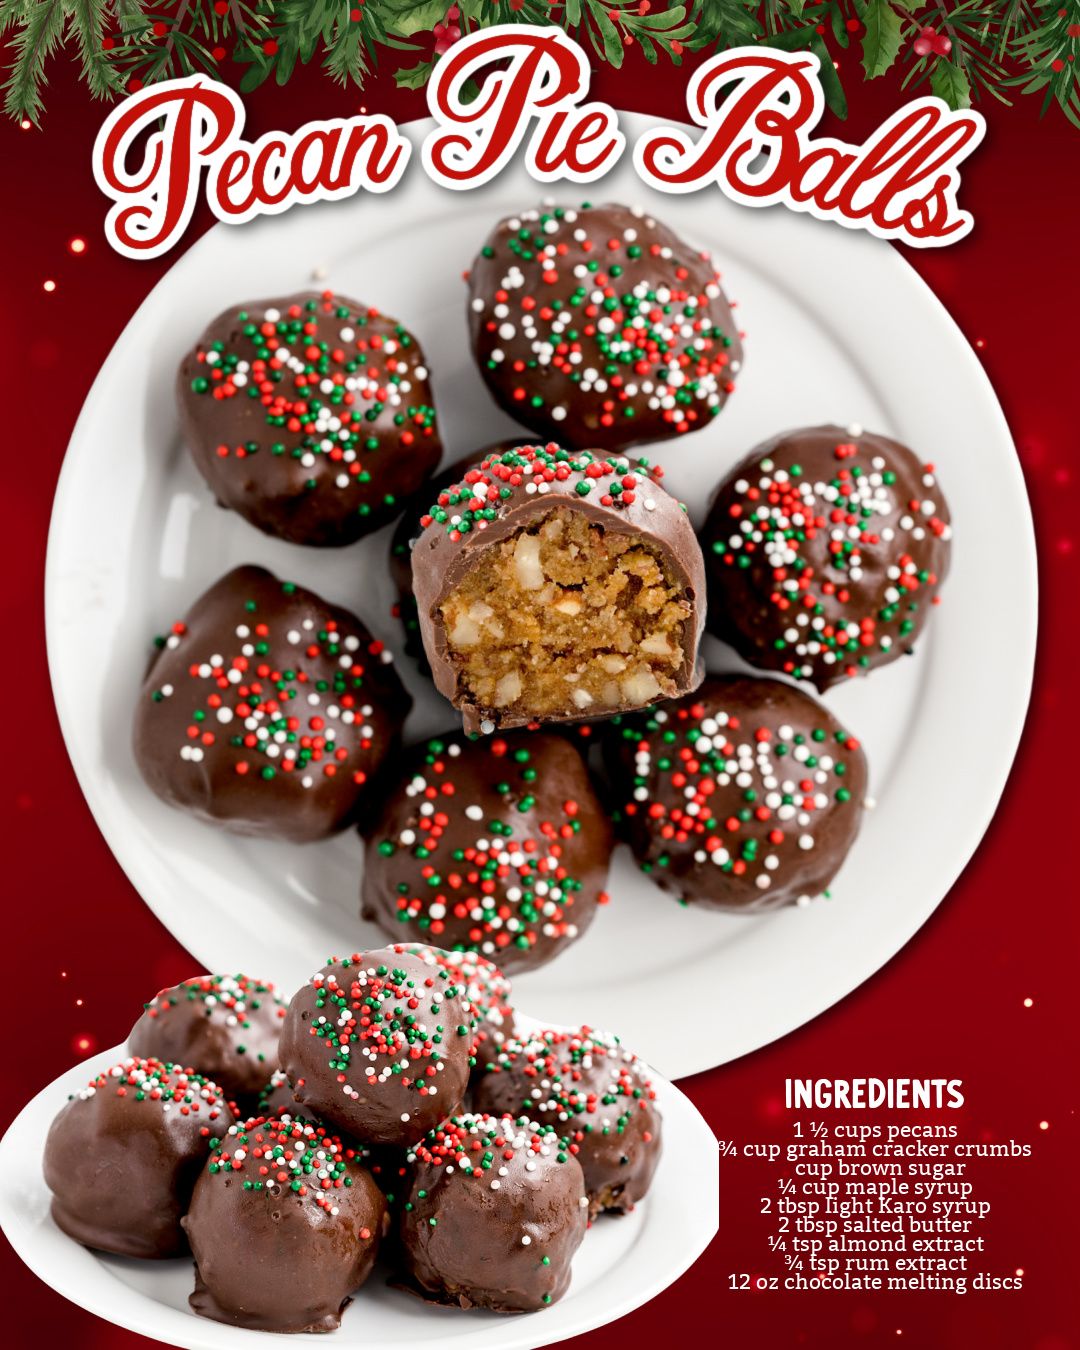
The idea of capturing the entire decadent experience of pecan pie in a single, no-bake bite seemed too good to be true. I discovered this recipe while searching for a holiday treat that was impressive but didn’t require wrestling with pie crust. As I toasted the pecans in my kitchen, their rich, buttery aroma began to set the stage. Then, cooking the brown sugar, maple syrup, and butter created a fragrant, bubbling caramel that smelled like the soul of a pie filling. Rolling that sticky, nutty mixture into balls and dipping them in chocolate felt like wrapping little gifts. That first taste—the snap of chocolate giving way to the chewy, nutty, rum-kissed center—was an absolute revelation. It was all the coziness of Thanksgiving dessert, perfectly portable.
Why You’ll Love This Recipe
You will absolutely love this recipe because it delivers the iconic, crave-worthy flavor of pecan pie without any of the baking anxiety. There’s no worrying about a soggy bottom or an under-set filling. These little balls are surprisingly simple to make, they’re stunningly beautiful, and they pack an incredible punch of flavor and texture in every bite. They’re the perfect make-ahead treat for holiday parties, a luxurious homemade gift, or a special treat to keep for yourself when you need a moment of pure, unadulterated pecan pie joy.
Ingredients
- 1 ½ cups pecans, toasted and finely chopped
- ¼ cup graham cracker crumbs
- 1 cup packed light brown sugar
- ¼ cup pure maple syrup
- 2 tbsp light corn syrup (Karo syrup)
- 2 tbsp salted butter
- ¼ tsp almond extract
- ¾ tsp rum extract
- 12 oz chocolate melting discs or chocolate chips
Let’s talk about these ingredients. Toasting the pecans is the non-negotiable first step. It awakens their oils and deepens their flavor exponentially—raw pecans simply won’t give you that authentic pie taste. The combination of maple syrup and light corn syrup is perfect; the maple adds real flavor while the corn syrup ensures the filling stays smooth and chewy instead of grainy. Don’t be tempted to skip the rum and almond extracts. They are the secret flavor agents that mimic the complex, almost buttery depth of a real pecan pie filling. Trust me, they make a huge difference. For the chocolate, melting discs (candy melts) are ideal as they set with a firm, glossy shell, but good quality chocolate chips work too.(See the next page below to continue…)
Equipment Needed
- Medium saucepan
- Baking sheet
- Parchment paper or wax paper
- Food processor or sharp knife and cutting board
- Mixing bowl
- Spatula
- Microwave-safe bowl or double boiler
- Fork or dipping tools
Step-by-Step Instructions
We start by building our flavor foundation: toasting the pecans. Spread the pecans on a baking sheet and toast them in a 350°F oven for 6-8 minutes, until they’re fragrant. Let them cool completely. This is crucial, as adding hot nuts will melt your filling later. Once cool, I pulse them in my food processor until they are finely chopped, but not powdery—you want some texture. In a bowl, combine the chopped pecans and graham cracker crumbs. The crumbs are a genius addition; they give the filling a bit of structure and a hint of that “crust” flavor.
Now, for the magical, sticky glue that holds it all together. In your medium saucepan, combine the brown sugar, maple syrup, corn syrup, and salted butter. Cook this over medium heat, stirring constantly, until the mixture comes to a boil. Once boiling, let it bubble for exactly one minute while you keep stirring. I set a timer because this precision matters. Undercook it, and your balls won’t hold shape; overcook it, and they’ll be rock-hard. After one minute, remove the pan from the heat and immediately stir in the almond and rum extracts. The kitchen fills with an incredible, buttery-caramel scent that’s absolutely intoxicating.
Working quickly but carefully (the sugar is very hot!), pour the bubbling syrup mixture over the pecan and crumb mixture. Stir everything together with a sturdy spatula until all the dry ingredients are thoroughly coated. It will look like a very sticky, clumpy granola. Let this mixture cool for about 15-20 minutes, just until it’s cool enough to handle but still warm and pliable. If it cools completely, it will harden and be impossible to roll. I use a small cookie scoop to portion the mixture, then roll it firmly between my palms into 1-inch balls. Place them on a parchment-lined tray. They will seem a bit soft, but they firm up as they cool completely.(See the next page below to continue…)
Once all the balls are rolled and have set at room temperature for at least an hour (I sometimes pop the tray in the fridge to speed this up), it’s time for the chocolate cloak. Melt your chocolate according to package directions. Using a fork or dipping tool, dip each pecan ball, let the excess drip off, and place it back on the parchment paper. If you want to be fancy, you can use another fork to create a swirl pattern on top. Let the chocolate set completely at room temperature. The transformation from sticky ball to elegant confection is so satisfying.
Pro Tips for Best Results
The single most important tip is to let the syrup mixture boil for the full, timed minute. I tested this three different ways: 30 seconds, 1 minute, and 90 seconds. At 30 seconds, the filling was too soft and wouldn’t hold a ball shape at room temperature. At 90 seconds, it set into a hard, difficult-to-chew candy. The 1-minute mark is the sweet spot for a perfect, chewy-but-firm texture that mimics real pecan pie filling. Use a timer!
For the smoothest dipping experience, ensure your pecan balls are completely cool and firm before they meet the chocolate. If they are even slightly warm, they can start to melt or lose their shape in the warm chocolate. I chill my tray of rolled balls for 30 minutes before dipping. A cold center also helps the chocolate shell set faster and more cleanly.
If you want to guarantee a professional-looking finish with no “foot” (the puddle of chocolate at the base), use a dipping fork or two regular forks. After dipping, gently tap the fork on the edge of the bowl to remove excess chocolate, then slide the ball onto the parchment paper with a swift, fluid motion. The first few might be messy, but you’ll quickly get the hang of it.
Common Mistakes to Avoid
The first mistake I made was not toasting the pecans. I was in a hurry and used them raw. The flavor of the finished candy was flat and one-dimensional, missing that deep, roasted nuttiness that is the hallmark of pecan pie. That 8 minutes in the oven is an investment you will taste in every single bite. Don’t skip it.(See the next page below to continue…)
Do not attempt to roll the balls when the mixture is too hot or too cold. If it’s scalding hot, you’ll burn your fingers. If it’s completely cold, it will be a solid, crumbly mass. The sweet spot is when it’s still warm and pliable, like a stiff cookie dough. I let it cool in the bowl for about 15-20 minutes, stirring occasionally, before I start scooping. This was a messy lesson learned on my first attempt.
Avoid using pure chocolate bars meant for eating (like baking chocolate) for dipping without adding a little shortening. These chocolates aren’t formulated for coating and can set with streaks or a dull finish. Chocolate melting discs or “candy coating” is formulated to melt smoothly and set with a perfect snap and shine. If you only have chocolate chips, add a teaspoon of coconut oil or shortening to the bowl when melting to improve the viscosity and shine.
Finally, don’t rush the setting process. Let the chocolate harden completely at room temperature. Putting them in the fridge to set can cause condensation, which can lead to sugar “bloom” (those white, dusty spots) on the chocolate. They are prettiest and have the best texture when allowed to set slowly on the counter. Patience is key for that perfect, glossy shell.
Serving Suggestions
I love presenting these on a festive platter, perhaps on a bed of crushed pecans or gold foil liners. They look incredibly elegant and store-bought, in the best possible way. For a holiday party, I’ll mix them in with other homemade candies like peppermint bark and fudge for a stunning dessert spread.
These make the most wonderful homemade gift. I pack them in small, clear treat bags tied with a rustic ribbon or in a decorative holiday tin. They are always met with amazement—people can’t believe you captured pecan pie in a candy. A little tag with the name “Pecan Pie Balls” adds a charming touch.
For a truly over-the-top dessert experience, I’ll sometimes serve them slightly warmed (just a few seconds in the microwave) alongside a scoop of vanilla ice cream or a dollop of bourbon whipped cream. The warm, soft center with the cold cream is an incredible combination that feels deeply indulgent.
Variations & Customizations
For a deeper, more grown-up flavor, add a tablespoon of bourbon to the syrup mixture when you add the extracts. Let it boil for an extra 30 seconds to cook off most of the alcohol, leaving just the wonderful flavor. You can also roll the finished, chocolate-dipped balls in a little bit of flaky sea salt or a sprinkle of cinnamon for a gourmet finish.
If you’re a fan of texture, try mixing in a handful of toffee bits or crushed pretzel pieces along with the pecans and graham crumbs. The sweet and salty contrast is phenomenal. You could also use a blend of nuts, like pecans and walnuts, for a different flavor profile.
For a different coating, you can use white chocolate or even a dark chocolate with orange zest mixed in. Instead of a full dip, you can also simply drizzle lines of chocolate over the tops of the set balls for a simpler, but still beautiful, look. The pecan filling is so flavorful it can stand up to almost any chocolate partner.
How to Store, Freeze & Reheat
Once set, store these candies in an airtight container at cool room temperature. They will keep beautifully for up to 2 weeks. I do not recommend storing them in the refrigerator, as the humidity can cause the chocolate to sweat and develop sugar bloom. If your kitchen is very warm, you can store them in the fridge, but let them come to room temperature before serving for the best texture and shine.
These freeze exceptionally well! Place the finished, set balls in a single layer on a tray to flash-freeze for an hour, then transfer them to a freezer-safe bag or container. They will keep for up to 3 months. Thaw them in the container at room temperature for about an hour before serving. This is my secret for getting a head start on holiday baking without any stress.
There’s no need to reheat these, as they are meant to be enjoyed at room temperature or cool. However, as mentioned, a 5-10 second burst in the microwave can gently warm the center for a more “fresh-from-the-oven-pie” experience, but be careful as the chocolate can melt quickly.
Conclusion
These Pecan Pie Balls are a little miracle of confectionery alchemy. They’ve become my secret weapon for bringing the taste of a beloved, complicated dessert to any occasion with ease and elegance. I hope this recipe brings as much joy to your kitchen as it has to mine, creating delicious moments to share with the people you love. So toast those pecans, boil that syrup, and get ready to roll up some happiness. You’re about to make everyone’s favorite pie, in the most delightful, pop-able form.