
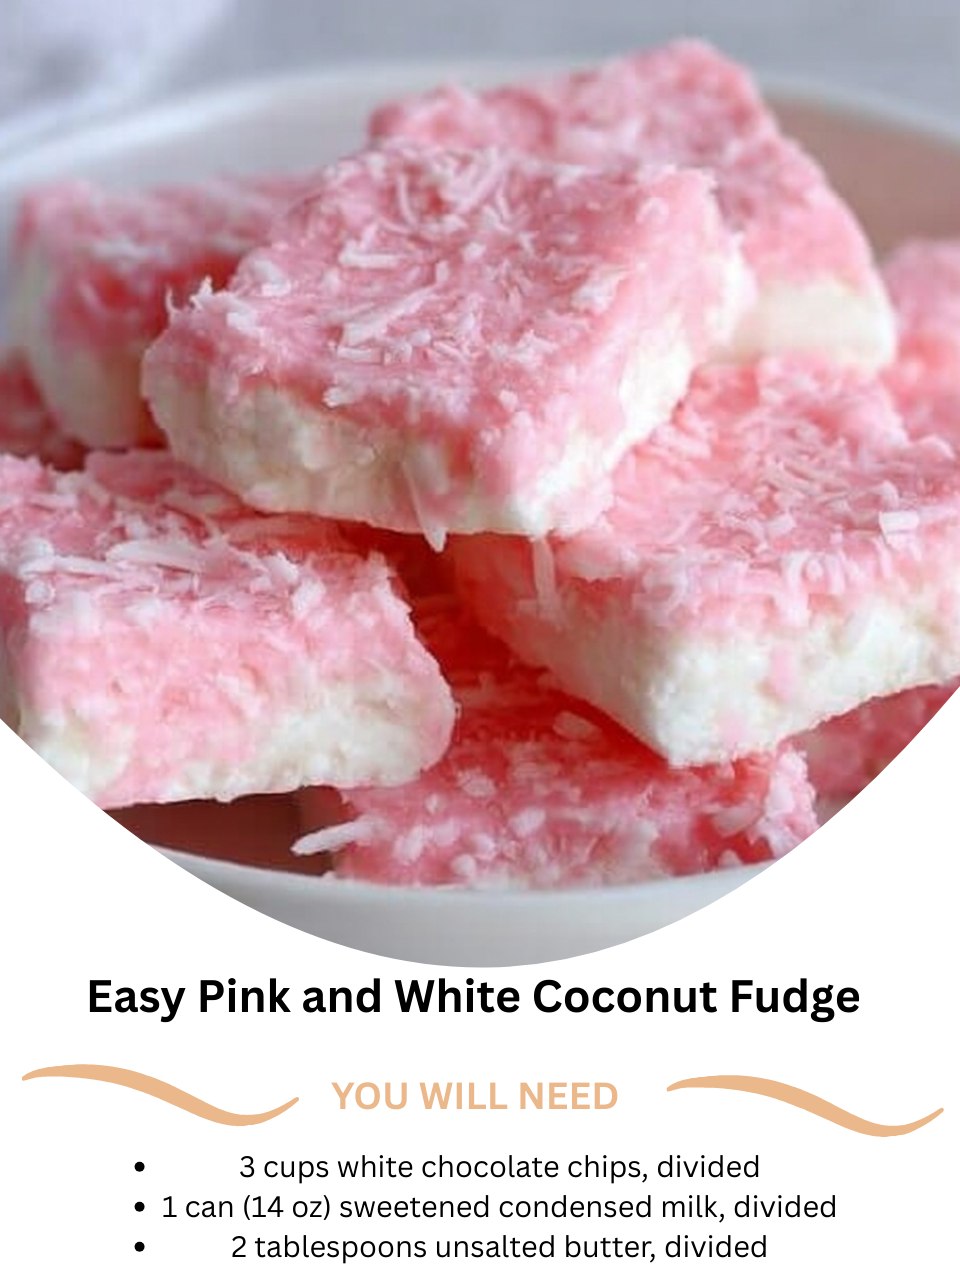
I dreamt up this Easy Pink and White Coconut Fudge for a baby shower, wanting a treat that was as beautiful as it was delicious. As I melted the first batch of white chocolate, swirling in coconut extract and a whisper of pink gel color, my kitchen filled with the sweet, tropical scent of a summer island. Then came the pure white layer, a creamy blanket over the pink, and the final sprinkle of coconut felt like topping a perfect, edible cloud. The moment I sliced it, revealing that stunning pink stripe, I knew I had created something magical—a fudge that’s as fun to make as it is to eat, and it’s brought joy to every celebration since.
Why You’ll Love This Recipe
You are going to adore this recipe because it looks like it came from a fancy bakery but is deceptively simple to create. The stunning layered effect is so impressive, yet it’s just two easy fudge batches stacked together. The flavor is a creamy, dreamy coconut that’s not overly sweet, and that pop of pink makes it perfect for birthdays, holidays, Valentine’s Day, or just because you need a little extra cheer. From my experience, this is the dessert that makes everyone reach for their camera before they reach for a square—it’s a total showstopper.
Ingredients
- 3 cups high-quality white chocolate chips, divided
- 1 (14 oz) can full-fat sweetened condensed milk, divided
- 2 tablespoons unsalted butter, divided
- 2 teaspoons pure coconut extract, divided
- 1 teaspoon pure vanilla extract
- A pinch of fine sea salt
- Pink gel food coloring (a tiny drop!)
- 1 ½ cups sweetened shredded coconut, toasted and divided
(See the next page below to continue…)
Equipment Needed
- An 8×8 inch baking pan
- Parchment paper
- Two medium-sized, heavy-bottomed saucepans (or one, washed in between)
- Rubber spatula
- Baking sheet (for toasting coconut)
- Small bowls for dividing ingredients
Step-by-Step Instructions
First, let’s set the stage for our beautiful layers. I always line my 8×8 inch pan with parchment paper, leaving generous overhangs on two sides—this sling is our ticket to perfect, intact slices later. Next, I toast 1 cup of the shredded coconut on a baking sheet at 350°F for 5-7 minutes until golden and fragrant, then let it cool. This toasting step is crucial; it transforms the coconut from chewy to crisp and intensifies the flavor. I’ll save the remaining ½ cup of untoasted coconut for the snowy topping.
Now, we make the first layer. In my first saucepan, I combine 1 ½ cups of white chocolate chips, half the can of sweetened condensed milk (about ¾ cup + 2 tablespoons—I just eyeball it!), and 1 tablespoon of butter. I melt this over the lowest possible heat, stirring constantly until it’s velvety smooth. Off the heat, I stir in 1 teaspoon of the coconut extract and a tiny drop of pink gel coloring. Gel is key here—liquid coloring can make the fudge seize. I stir until I have a beautiful, uniform pastel pink. I quickly fold in ¾ cup of the cooled, toasted coconut, then pour and spread this pink layer into the bottom of my prepared pan.
Time for the white layer! I wash and dry my saucepan (or use a second one) and repeat the process with the remaining 1 ½ cups white chocolate chips, sweetened condensed milk, and 1 tablespoon butter. Over that same low heat, I melt it to smooth perfection. Off the heat, I stir in the remaining 1 teaspoon coconut extract, the vanilla extract, and a pinch of salt. This time, I fold in the remaining ¼ cup of toasted coconut. Now, here’s the important part: I let this white mixture cool for about 5 minutes, stirring occasionally. If it’s too hot when poured, it can melt the pink layer beneath.(See the next page below to continue…)
Once the white fudge has cooled slightly but is still pourable, I gently pour it over the set pink layer in the pan. I use my spatula to spread it carefully into an even top layer. Working quickly, I sprinkle the top with the reserved ½ cup of untoasted, white shredded coconut and gently press it in. I then let the whole pan cool completely on the counter before covering it and transferring it to the refrigerator to chill and set firmly for at least 4 hours, or better yet, overnight. The wait is tough, but it ensures those clean, defined layers.
Pro Tips for Best Results
I tested the layer method three different ways: letting the first layer chill completely, letting it chill partially, and pouring the second layer immediately. Here’s the sweet spot: let the first (pink) layer sit at room temperature for 10-15 minutes until a skin forms on top. It should be set enough that your finger doesn’t leave a mark, but not rock-hard from the fridge. This gives the second layer a firm base to sit on without the two blending into a swirled mess. I’ve tried this step both ways, and trust me, this one works better for sharp layers.
Here’s what I learned the hard way about the coconut: toasting most of it for inside the fudge is non-negotiable for flavor, but using untoasted coconut for the topping is a must. I once used all toasted coconut on top, and it looked dry and over-browned against the creamy white fudge. The soft, snowy-white untoasted flakes give it that perfect, pristine, cloud-like finish that makes it so visually appealing. It’s a small detail with a big visual payoff.
For the pink layer, less is more with the coloring. Gel food coloring is highly concentrated. I start with a toothpick dipped in the gel, stir it in, and only add more if needed. You’re aiming for a soft pastel pink, not a neon magenta. Also, ensure both your fudge mixtures are thick and not runny when you pour them. If they seem thin, let them cool and thicken slightly in the pan off the heat before pouring. Thicker mixtures create more defined, beautiful layers.
Common Mistakes to Avoid
The biggest mistake is rushing the melting process with high heat. White chocolate scorches and seizes in a heartbeat. I made this mistake the first time—don’t do what I did! I had grainy, lumpy fudge that was a lost cause. Both layers must be melted over the lowest possible heat with constant stirring. If you’re nervous, a double boiler is your safest bet for perfectly smooth fudge every single time.(See the next page below to continue…)
Don’t skip toasting the coconut for the inside of the fudge. Untoasted coconut inside will be bland and chewy, and you’ll miss out on that deep, nutty flavor that makes this fudge so special. That toasting step is what elevates it from simply sweet to truly gourmet. It makes a huge difference in the overall taste experience.
Another error is pouring the second layer while it’s too hot. My first attempt, I poured the steaming white fudge directly onto the pink layer, and it melted right through, creating a messy, marbled middle instead of a clean stripe. Letting the second mixture cool for 5 minutes is the key to preserving that stunning visual contrast. Patience here is everything.
Finally, don’t skimp on the setting time. I’ve been tempted to cut it after just two hours, but the layers will still be soft and will smush together when sliced. A full four-hour chill is the minimum, but overnight is truly non-negotiable for the perfect, firm texture that allows you to cut through both layers cleanly, revealing that perfect pink line in every single square.
Serving Suggestions
I love serving this fudge chilled, straight from the fridge. The cold makes it extra creamy and helps the layers hold their perfect shape when cut. I arrange the squares on a white or light pink platter to really make the colors pop. For a baby shower or bridal shower, I’ll even tie little ribbons around each square for an extra-special touch.
For a delightful pairing, I like to serve it with a cup of fruity herbal tea, like raspberry or peach, or a light coffee. The flavors complement the coconut without overpowering it. It’s also fantastic with a glass of sparkling rosé or champagne for a truly celebratory feel—the pink and white theme carries right through the menu.
When gifting, I place the squares in a clear cellophane bag or a pretty pastel box. I always add a tag that says “Pink & White Coconut Fudge” because the surprise of the hidden pink layer is half the fun. It’s a gift that feels incredibly thoughtful, handmade, and perfect for bringing a smile to someone’s face.
Variations & Customizations
For different holidays, simply change the food coloring! For Christmas, make a green layer and a white layer. For the Fourth of July, do a red layer, a white layer, and a blue layer (using a natural blue color like butterfly pea powder). The coconut flavor works beautifully with any color theme, making it a wonderfully versatile base recipe.
You can create a “Pina Colada” fudge by adding a different flavor to each layer. To the pink layer, add ¼ teaspoon of rum extract along with the coconut. To the white layer, add a tablespoon of crushed freeze-dried pineapple along with the coconut. The pink becomes the “cherry” or “strawberry” accent, and the white gets a subtle tropical pineapple twist.
For a “Confetti” or “Funfetti” version, keep both layers white. Fold a handful of rainbow sprinkles into the bottom layer before pouring it, and fold a different color of sprinkles into the top layer. The coconut adds texture, and the sprinkles add a festive, party-ready burst of color and fun throughout.
How to Store, Freeze & Reheat
For storing, I keep the fudge in an airtight container in the refrigerator, with sheets of parchment paper between the layers to protect the delicate coconut topping. It stays fresh and maintains its perfect layered texture for up to two weeks. The fridge is essential for keeping it firm and the coconut crisp.
This fudge freezes exceptionally well, which is great for making ahead for events. I wrap the whole block (or individual squares) very tightly in plastic wrap, then seal them in a heavy-duty freezer bag. It will keep beautifully for up to 2-3 months. The texture and flavor remain perfect after a slow thaw.
To thaw, I transfer the wrapped fudge from the freezer directly to the refrigerator and let it thaw slowly overnight. This prevents any condensation from forming on the surface, which can make the coconut topping soggy and cause the colors to run. There’s no need to reheat it. Once thawed, it’s ready to serve, looking and tasting as fresh as ever.
Conclusion
This Easy Pink and White Coconut Fudge is more than just a dessert to me; it’s a little edible work of art that never fails to spread joy. The process of creating those perfect layers is so satisfying, and the delighted reaction it gets is the best reward. I hope this recipe brings a splash of color and a lot of sweetness to your kitchen, creating beautiful memories one creamy, coconutty square at a time. Now, grab that gel coloring—your own batch of layered, tropical magic is waiting to be made.