
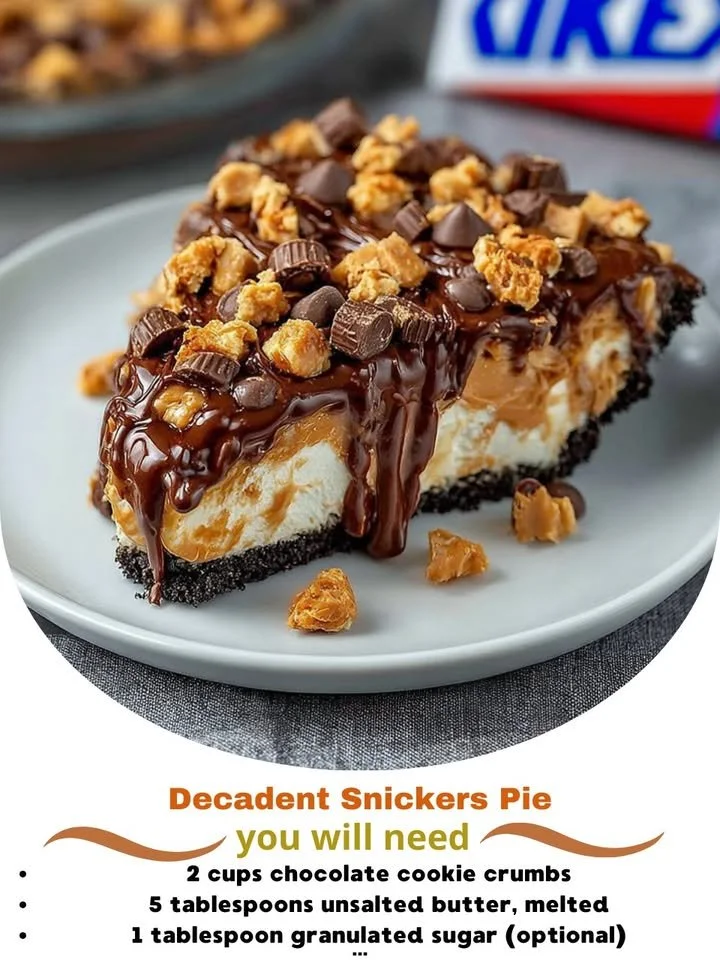
Have you ever had a dessert that makes you feel like you’re on cloud nine? That’s exactly how I feel every time I take a bite of my Decadent Snickers Pie. This treat is a glorious fusion of rich chocolate, smooth caramel, crunchy peanuts, and creamy peanut butter, all perfectly layered in a luscious pie. Every time I serve this dish, smiles light up the room, and that joy is infectious. Let me take you through the journey of making this unforgettable pie in my kitchen.
Why You’ll Love This Recipe
This Snickers Pie is the kind of dessert that celebrates life’s sweetest moments. It’s super easy to make, which is always a win. I love how it can bring together friends and family for a delightful treat after dinner or serve as the perfect surprise for any gathering! The combination of flavors and textures is simply irresistible. Whether you’re a chocolate lover or a peanut butter fan, this pie has something to offer everyone. And trust me, once you serve this beauty, you’ll be getting requests for the recipe! (See the ingredients in the next page below…)
Ingredients
– 1 pre-made graham cracker crust
– 1 cup creamy peanut butter
– 8 oz cream cheese, softened
– 1 cup powdered sugar
– 1 cup whipped topping (like Cool Whip)
– 1 cup chocolate chips
– 1 cup caramel sauce
– 1 cup crushed peanuts
– 1 tsp vanilla extract
– Pinch of salt
Equipment Needed
– Mixing bowls
– Mixer (hand or stand)
– Rubber spatula
– Measuring cups and spoons
– Pie dish (for serving)
– Refrigerator for chilling
Step-by-Step Instructions
Let’s dive right into making this pie! The first thing I do is get all my ingredients out and organized; it makes the process smoother and so much more enjoyable. In a large mixing bowl, I combine softened cream cheese and peanut butter until everything is beautifully blended and creamy. Then, I gradually add in the powdered sugar, mixing until it’s fully incorporated. The smell of that sweet peanut butter mixture is enough to make anyone want to dive right in! I also fold in the whipped topping, ensuring everything is nice and silky. It’s important at this stage to make sure the texture is just right, so it’s light and fluffy. (See the next page below to continue steps…)
Next, I gently pour the mixture into my pre-made graham cracker crust. Spreading it evenly is key, and I often use a rubber spatula for this; it works like a charm! After I’ve smoothed it out, I pop it in the refrigerator to chill. This allows the flavors to meld, making each bite even more delightful. Meanwhile, I melt the chocolate chips in a microwave-safe bowl, stirring them every 30 seconds until perfectly smooth and glossy. I love how the richness of the chocolate just reminds me of those classic Snickers bars!
Once the pie has chilled for about two hours, I remove it from the fridge and drizzle that luscious chocolate over the top. Next comes the caramel sauce; I don’t hold back here! The combination of chocolate and caramel is heavenly, and I intuitively sprinkle the crushed peanuts on top for that extra crunch. Once it’s all assembled, I give it another half hour in the refrigerator to set before serving. Trust me, good things come to those who wait!
Pro Tips for Best Results
I tested this three ways to get the perfect creaminess in the filling. One batch I tried with more whipped topping, and while it was lighter, it lost some of the rich, peanut buttery flavor. The balance I settled on has become a staple in my kitchen. Also, be sure to let your cream cheese soften completely; it makes all the difference in achieving that smooth texture. Little things can impact the result, and nobody wants a lumpy filling!
Another pro tip is to chill the pie for a bit longer than two hours if you can. This gives it time to truly set and makes for easier slicing. If the pie is too soft, it may collapse when you cut into it, and no one wants that! Finally, I use high-quality chocolate and caramel sauces — trust me, splurging here is worth every penny for that rich flavor.
Lastly, I find that letting the pie sit at room temperature for about 10-15 minutes before serving makes it easier to cut and serve. The flavors truly come alive at that perfect temperature, so don’t skip this step!
Common Mistakes to Avoid
One common mistake I see is not letting the cream cheese soften enough before mixing. If it’s cold, you’ll end up with a lumpy filling that just won’t satisfy. I made this mistake early on, and it nearly ruined my pie! Be patient and let it sit out for at least 30 minutes before you start mixing. (See the next page below to continue…
Another pitfall to avoid is over-melting the chocolate. Is there anything worse than burnt chocolate? I’ve done this too! Always start with shorter increments in the microwave and keep an eye on it for that beautiful melted consistency. Stirring well at each interval is vital so the residual heat can help it melt fully.
Lastly, don’t skip the chilling time! I once got impatient and served it too soon, resulting in a sloppy mess on the plate. The flavors hadn’t melded, and it simply didn’t resemble the glorious pie I was going for. So, take my advice: chill thoroughly before digging in!
Serving Suggestions
When it comes to serving this Decadent Snickers Pie, I love to keep it simple. A dollop of extra whipped topping on each slice is always a hit, and for an extra flourish, I often add a drizzle of caramel and chocolate sauce over the top. It adds that finishing touch and makes each slice pop with an inviting look!
I also enjoy serving this treat with a side of fresh fruit, like strawberries or raspberries. The tartness of the berries contrasts beautifully with the rich sweetness of the pie, and it brightens up the dish visually as well. It’s like a little burst of freshness to complement the heaviness of the dessert!
Lastly, if I’m feeling extra fancy, I’ll dish it out alongside a scoop of vanilla ice cream. There’s something about that cold ice cream melting onto the warm flavors of the pie that creates an unforgettable experience with each bite.
Variations & Customizations
One of the best things about this pie is how versatile it can be! While the classic Snickers flavor is undeniably delicious, you can customize it to fit other tastes. For instance, if you love a bit of crunch, try adding a layer of crushed pretzels in the filling for added texture and a salty touch.
If you’re a fan of flavored chocolate, consider swapping out the milk chocolate chips for dark chocolate or even white chocolate. Each variation gives the pie its unique flavor profile while still remaining that rich, decadent dessert we all love. I’ve even tried different nut butters, like almond or cashew, for a fun twist!
Lastly, if you’re looking for a healthier option, you can experiment with sugar alternatives or low-fat versions of the ingredients. While they might change the taste slightly, it opens the door for those who want to indulge guilt-free.
How to Store, Freeze & Reheat
Storing this pie is a breeze. I always cover it tightly with plastic wrap or aluminum foil and keep it in the fridge, where it stays fresh for about 5-7 days — if it lasts that long! Just keep in mind that the longer it sits, the more the texture may change as it absorbs moisture from the crust.
If you’d like to freeze it, you can absolutely do that too! Slice the pie into pieces and wrap them individually in plastic wrap, then place them in a zip-top bag or an airtight container. It can last for up to three months in the freezer. Just be sure to thaw it in the refrigerator overnight before serving.
As for reheating, since this pie is best served cold, I recommend just letting it sit at room temperature for a while or placing a slice in the microwave for about 10-15 seconds if you want it slightly soft and gooey. But honestly, it’s delicious straight from the fridge!
Conclusion
I hope you’ve enjoyed this journey with me to make a Decadent Snickers Pie! It’s a sweet treat that delights the senses and brings joy to every gathering. Every time I make it, I’m reminded of the smiles it brings. I can’t wait for you to try it! Happy baking, and may your kitchen be filled with warmth and laughter!