
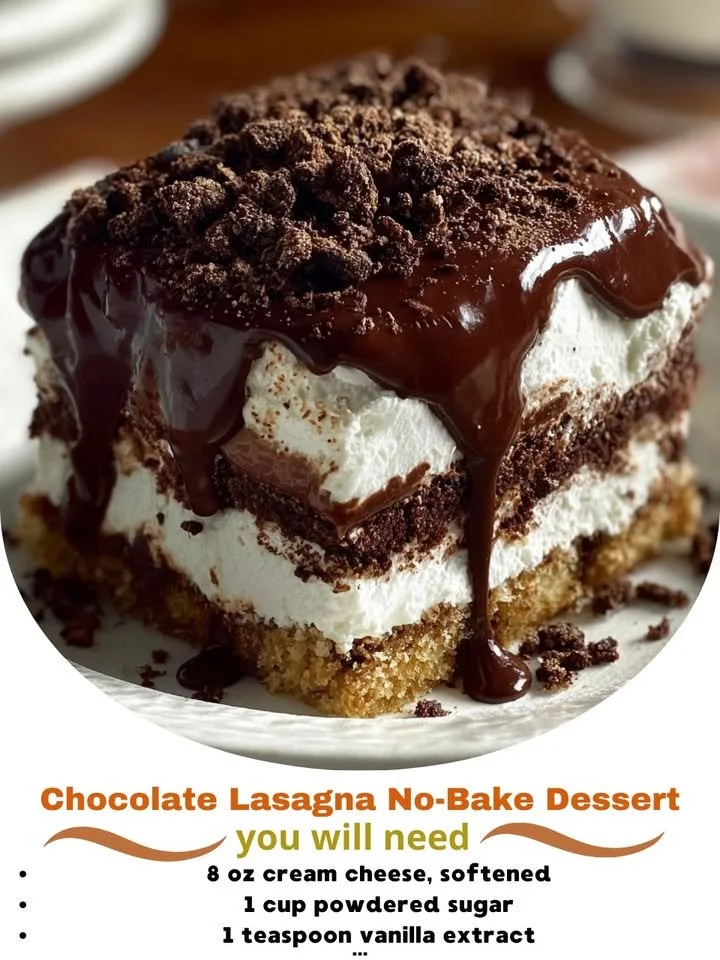
I’ve always had a soft spot for no-bake desserts, especially when they involve chocolate. On one particular rainy afternoon, I was in the mood for something sweet and indulgent, so I set out to create my version of Chocolate Lasagna. Trust me, this dessert is as delightful as it sounds—layers of rich chocolate, creamy filling, and a crunchy crust come together to create a perfect harmony of flavors. Not only is it a big crowd-pleaser, but it also requires no baking at all, making it a go-to recipe for any occasion.
Why You’ll Love This Recipe
You’re going to love this Chocolate Lasagna because it’s creamy, decadent, and unbelievably easy to whip up! Each bite is a blend of textures—the smooth filling, the crunchy crust, and the rich chocolate that will leave you wanting more. Plus, it’s a make-ahead dessert, which means you can spend more time enjoying yourself and less time in the kitchen! This no-bake wonder is always a hit, whether I serve it at holiday gatherings or summer picnics. (See the ingredients in the next page below…)
Ingredients
- 1 package of Oreo cookies (about 36 cookies)
- ½ cup unsalted butter, melted
- 2 packs (8 oz each) cream cheese, softened
- 1 cup powdered sugar
- 1 cup whipped topping (like Cool Whip)
- 2 packages (3.9 oz each) instant chocolate pudding mix
- 3 ½ cups milk
- 1 cup more whipped topping for topping
- Chocolate shavings or mini chocolate chips for garnish (optional)
Equipment Needed
- 9×13 inch baking dish
- Mixing bowls
- Electric mixer
- Measuring cups and spoons
- Spatula
- Plastic wrap
Step-by-Step Instructions
To start, I crushed the Oreo cookies into fine crumbs. If you have kids around, this is a fun task for them! Just toss the cookies in a zip-top bag and let them go to town with a rolling pin. Once crushed, I mixed the crumbs with melted butter until they resembled damp sand. Press the mixture evenly into the bottom of a 9×13 inch baking dish to form the crust. Set aside to let it firm up a bit in the fridge. (See the next page below to continue steps…)
Next, I whipped up the cream cheese layer. I used my electric mixer to blend the softened cream cheese with powdered sugar until it was smooth and creamy. Then, I gently folded in one cup of whipped topping, making sure not to deflate it. This layer is so dreamy and creamy that I could hardly resist sneaking a spoonful! Spread this mixture over the chilled crust layer; it’s like a little slice of heaven.
Moving on, I prepared the pudding layer by whisking together the instant chocolate pudding mix and milk in a large bowl. It’s best to let it sit for about five minutes to thicken up. Afterward, pour this luscious chocolaty layer over the cream cheese mixture. I like to use a spatula to spread it evenly and help it mingle with the previous layer.
Finally, I topped off the dessert with the last cup of whipped topping and a sprinkle of chocolate shavings or mini chocolate chips, if I’m feeling fancy. Cover it with plastic wrap and refrigerate for at least four hours, or overnight if you can wait that long. Trust me, letting it sit allows all those delicious flavors to meld together nicely!
Pro Tips for Best Results
One thing I highly recommend is using room-temperature cream cheese. I’ve made the mistake of mixing in cold cream cheese before, and it just doesn’t blend well—lumpy cream cheese is not what you want! Letting it sit on the counter for about 30 minutes will make a world of difference in achieving that smooth layer.
I also tested this recipe with different chocolate puddings, and I found that the instant variety works best. It sets up nicely, making it easy to slice and serve. If you prefer, you could also try using white chocolate pudding for a different flavor profile; it adds a nice twist!
Lastly, don’t skip the chilling time before serving. I know the temptation to dig in right away is real, but letting it chill for at least four hours really allows the layers to meld, resulting in a much tastier dessert. Your patience will be rewarded, trust me!
Common Mistakes to Avoid
One mistake I’ve made in the past is not pressing the crust down firmly enough. This can lead to a crumbly base when you try to slice the lasagna, making for a messy presentation. Make sure to really pack those crumbs down with the back of a measuring cup or your fingers to create a sturdy foundation. (See the next page below to continue…)
Another pitfall is choosing the wrong whipped topping. I’ve experimented with various brands, and I’ve found that some don’t whip up as nice or hold their shape well. Be sure to use a quality whipped topping that’s light and airy for the best texture.
Also, be careful with the layering. I once poured the pudding layer too quickly and disturbed the cream cheese layer below. Take your time and pour it gently to avoid mixing those beautiful layers together. It’s all about presentation when you serve this chocolate delight!
Lastly, don’t skip the cooling time, as I mentioned before. I know waiting can be hard, but it’s vital for the texture to set up perfectly. If you cut into it too soon, you’ll end up with a delicious mess instead of those pretty layers!
Serving Suggestions
When it comes to serving Chocolate Lasagna, I like to slice it into generous squares and top each piece with a dollop of additional whipped topping. It adds an extra layer of creaminess that pairs beautifully with the chocolate. You could also drizzle some chocolate syrup or caramel sauce over the top for an added flair.
If you want to impress your guests, consider serving it alongside fresh fruit like strawberries or raspberries. The tartness of the fruit breaks through the richness of the dessert and enhances the overall flavor—it’s a match made in dessert heaven!
Lastly, this dessert pairs wonderfully with coffee or a glass of ice-cold milk. After all, what’s a chocolate dessert without a little milk to wash it down? If you’re serving it at a gathering, I recommend offering different beverage options to complement the sweetness of the lasagna.
Variations & Customizations
This recipe is extremely versatile, and I love experimenting with it. For instance, you can swap out the Oreos for any kind of cookie you love—Heath bars, peanut butter cookies, or even gingersnaps for a unique spin! Each cookie brings its own flavor that can completely transform the dessert.
If you’re feeling adventurous, you can also make a berry chocolate lasagna. Just mix in some fresh berries into the cream cheese layer or replace some of the chocolate pudding with a berry-flavored alternative. It’s a great way to add some fruitiness to balance the creaminess!
For the chocolate lovers out there, you could enhance the chocolate flavor by adding chocolate chips between the layers or folding some melted chocolate into the cream cheese mixture. This creates an even richer chocolate experience!
How to Store, Freeze & Reheat
Once you’ve made your Chocolate Lasagna, you’ll want to store it in the fridge for up to five days. Just be sure to cover it tightly with plastic wrap or aluminum foil to keep it fresh. Trust me; it’ll be hard not to sneak a piece every time you open the fridge!
If you’re prepping ahead of time, this dessert freezes beautifully! I like to slice it into squares and place parchment paper between the layers before wrapping in plastic. When you’re ready to enjoy, just let it thaw overnight in the fridge, and it’s ready to go again.
As for reheating, there’s really no need since this dessert is best served chilled. However, if you do happen to have any leftovers—lucky you!—they can be enjoyed directly from the fridge for a cool treat. Just remember to avoid microwaving it, as it can alter the texture of the layers.
Conclusion
I hope you enjoy making and sharing this Chocolate Lasagna No-Bake Dessert as much as I do! It’s a sweet addition to any gathering and is sure to bring smiles and satisfaction to everyone who enjoys it. With its simple ingredients and no-bake convenience, it’s a recipe I keep coming back to time and time again. Happy baking (or, in this case, no-baking)!