
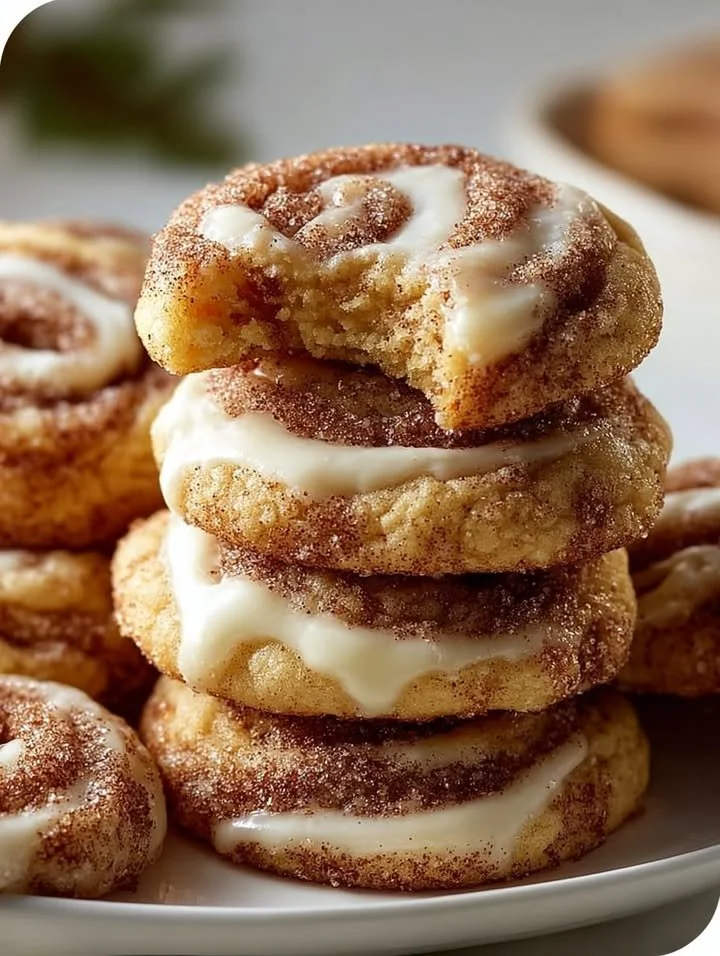
I have a special treat for you all today! Being in my kitchen often feels like a cozy hug, and there’s nothing that warms it up quite like the smell of fresh cinnamon rolls baking in the oven. But what if I told you that you can combine that heartwarming scent with the irresistibly creamy goodness of cheesecake and turn it into cookies? That’s right! I’m excited to share my recipe for Cinnamon Roll Cheesecake Cookies, a delightful creation that blends the best of both worlds.
Why You’ll Love This Recipe
These Cinnamon Roll Cheesecake Cookies are not only incredibly delicious but also super easy to make! They have a soft and chewy texture, layered with creamy cheesecake filling and topped with an irresistible cinnamon sugar swirl. And let’s be honest; who doesn’t love a good cookie that tastes like a cinnamon roll? Plus, they are perfect for any occasion—whether it’s a cozy family dinner, a potluck, or just a sweet afternoon snack with a cup of coffee. You’re going to want to add this recipe to your baking repertoire! (See the ingredients in the next page below…)
Ingredients
- 1 cup unsalted butter, softened
- 1 cup cream cheese, softened
- 1 cup granulated sugar
- 1 teaspoon vanilla extract
- 2 cups all-purpose flour
- 1 teaspoon baking powder
- 1/2 teaspoon salt
- 1 tablespoon cinnamon
- 1 cup powdered sugar (for frosting)
- 2 tablespoons milk (for frosting)
- Extra cinnamon and sugar mixture for topping
Equipment Needed
- Mixing bowls
- Hand mixer or stand mixer
- Baking sheet
- Parchment paper
- Cookie scoop
- Small bowl for cinnamon sugar mixture
- Spatula
Step-by-Step Instructions
First, start by preheating your oven to 350°F (175°C). It’s always a good idea to get that oven warmed up so you can enjoy the cookies fresh out the oven when they’re ready! In a large mixing bowl, use a hand mixer or stand mixer to beat the softened butter and cream cheese together until they are light and fluffy. This should take about 2 to 3 minutes. Next, add the granulated sugar and vanilla extract, then beat for another couple of minutes until everything is well combined. This fluffy mixture will be the base of our delightful cookies! (See the next page below to continue steps…)
Now, in a separate bowl, whisk together the all-purpose flour, baking powder, salt, and cinnamon. Gradually add this dry mixture into the wet ingredients until everything is blended well. The dough should be soft but manageable. At this point, you can get creative—feel free to taste the dough (I won’t tell!). Now, take your cookie scoop and begin to portion the dough onto a parchment-lined baking sheet. Give them some space to spread out during baking.
Before you pop them in the oven, let’s prepare the topping! In a small bowl, mix together some sugar and cinnamon—around 2 tablespoons of sugar with 1 tablespoon of cinnamon should do the trick—and sprinkle it generously on each cookie before they go into the oven. Bake for 10-12 minutes or until the edges are lightly golden. The smell wafting through your kitchen during this time will make you feel like you’re in a bakery!
Once the cookies are out of the oven, allow them to cool on the baking sheet for about 5 minutes before transferring them to a wire rack. While they cool, let’s whip up that luscious frosting! In a small bowl, mix your powdered sugar with milk until it reaches a drizzle-able consistency. Drizzle it over your cooled cookies, and voilà! Your Cinnamon Roll Cheesecake Cookies are ready to be enjoyed.
Pro Tips for Best Results
I tested this recipe three different ways to find the perfect balance between cheesecake filling and cookie dough. Make sure your cream cheese is at room temperature so it blends well without lumps in your frosting! This makes for a silky, smooth topping that perfectly complements the cookie’s texture.
Don’t skimp on the cinnamon-sugar topping! I found that a generous sprinkle gives these cookies that classic cinnamon roll flair that takes them over the top. It’s what makes the first bite a warm hug, enveloping your taste buds in a sweet embrace!
Lastly, I suggest letting the cookies cool fully before adding the icing. This is a step I rushed once when I couldn’t wait to dive in, and I ended up with a mess! Letting them cool allows the icing to set nicely and keeps everything perfectly intact for that Instagram-worthy shot when you’re ready to share.
Common Mistakes to Avoid
One common mistake I made during my early baking days was overmixing the dough. Overmixing can lead to tough cookies instead of soft and chewy ones. So, make sure to mix just until combined; you want that ideal cookie texture. (See the next page below to continue…)
Another thing to watch out for is baking time. It’s tempting to leave them in for a few extra minutes just to be safe, but cookies continue to bake as they cool on the pan. Pull them out as soon as the edges are golden, even if the centers look slightly underbaked.
Also, pay attention to the temperature of your ingredients. If either the butter or cream cheese is too cold, you won’t achieve that light and airy texture that we’re aiming for. Always allow them to sit out for about an hour before you start mixing.
Lastly, never skip the cooling step! I know it’s hard to resist, but allowing them to cool ensures the cookies set properly and makes for a better overall bite. Trust me; the wait is worth it!
Serving Suggestions
These cookies are incredible on their own but can be even more delightful when served with a cold glass of milk or a warm cup of coffee. I love pairing them with a latte in the morning or as an afternoon pick-me-up—it truly elevates the experience!
If you’re hosting friends or family, consider setting up a mini dessert bar with these cookies alongside some fresh fruit or even small pastries. They look so beautiful on a platter, and the combination of flavors will have everyone raving about your baking skills!
Finally, these cookies are excellent for sharing. Wrap them up in cute packaging or a tin and give them as gifts. I promise they will bring a smile to anyone who receives them, making them perfect for holidays or just because!
Variations & Customizations
You can get creative with these Cinnamon Roll Cheesecake Cookies by adding different types of chocolate. White chocolate chips or even a rich dark chocolate drizzle would taste amazing. The balance of the rich chocolate with the cinnamon and cream cheese provides a fabulous twist!
Another variation is to switch up the flavor profile of the icing. Instead of a simple vanilla icing, consider adding lemon or almond extract for a fresh zing. These flavors can give it a whole new lottery of tastes you won’t want to miss!
For a nutty crunch, fold in some chopped pecans or walnuts into the cookie dough before portioning them out. They add an unexpected texture and delicious flavor that perfectly complements the cinnamon and cheesecake.
How to Store, Freeze & Reheat
You can store your Cinnamon Roll Cheesecake Cookies in an airtight container at room temperature for up to a week—if they last that long! I recommend keeping them on the countertop, away from heat and direct sunlight, to maintain their freshness.
If you want to prepare ahead of time, these cookies freeze beautifully. Just freeze them in a single layer on a baking sheet for a couple of hours, then transfer them to a freezer-safe bag or container. They can be stored this way for up to three months. When you’re ready to enjoy, simply thaw at room temperature or warm them up in the microwave for a few seconds.
To reheat, I find that popping them in the microwave for just 10-15 seconds makes them feel fresh out of the oven. However, if you’re craving that crispy edge, throw them back in the oven for a few minutes at 350°F. Your kitchen will thank you for the lovely aroma that wafts through!
Conclusion
Baking these Cinnamon Roll Cheesecake Cookies has become one of my favorite kitchen activities. The joy of sinking my teeth into their soft, chewy goodness filled with creamy cheesecake and cinnamon swirls makes every moment spent in my kitchen worthwhile. I hope you’ve enjoyed this recipe as much as I do, and I can’t wait to hear how your own batch turns out! Happy baking, friends!