
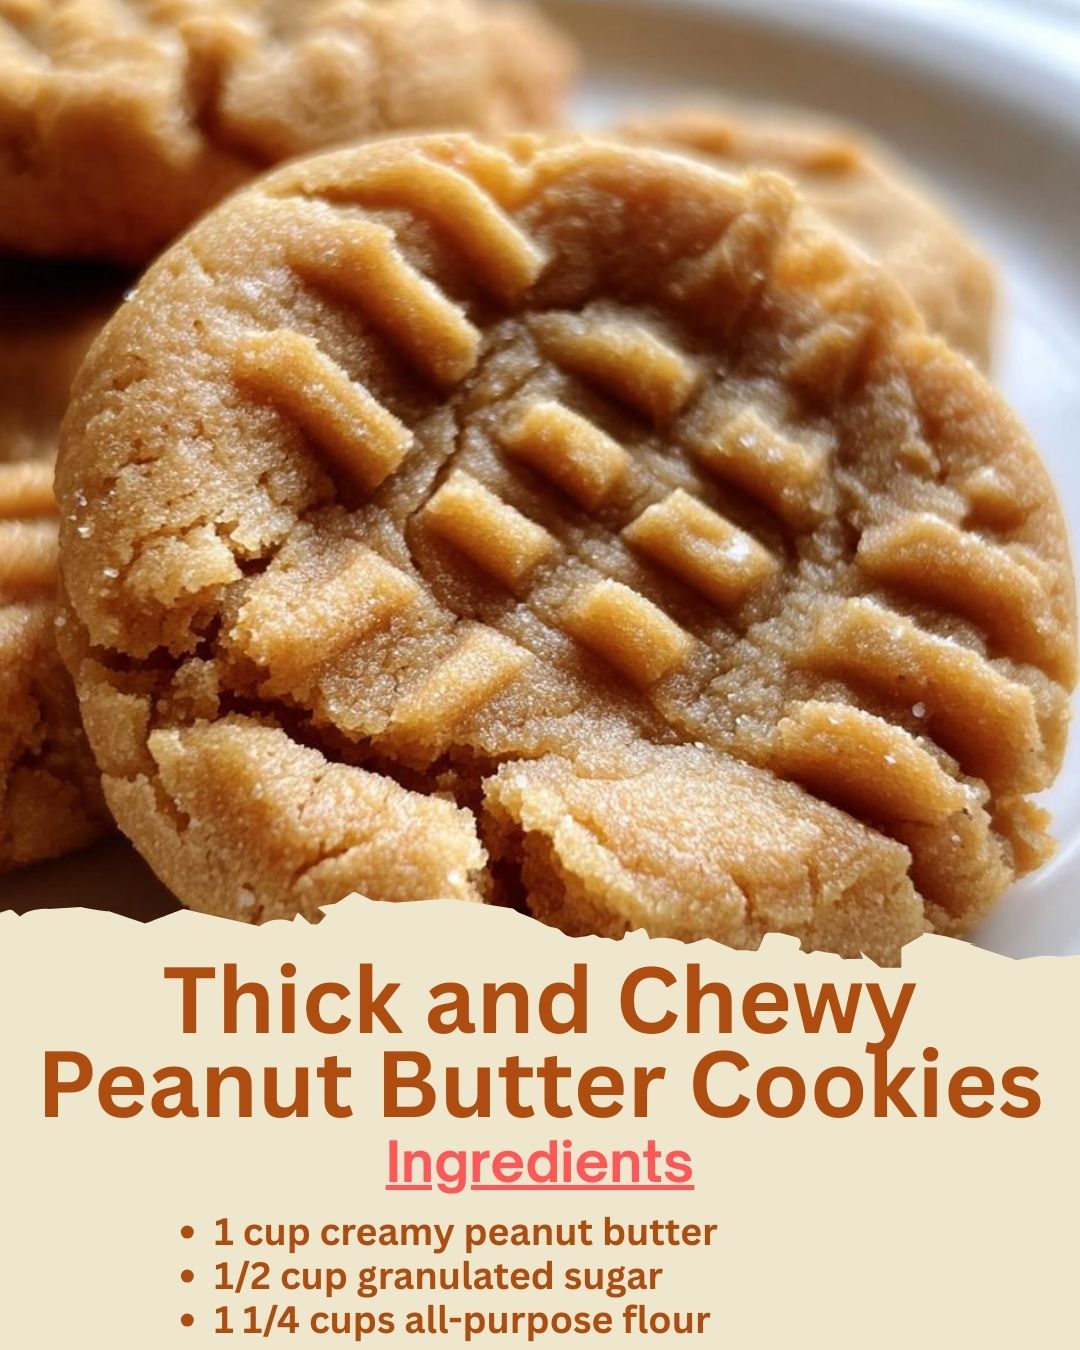
I perfected this recipe after years of searching for the ultimate peanut butter cookie—one that was dense, soft, and chewy, not crumbly or dry. The moment I pulled the first batch from the oven, my kitchen smelled like a roasted peanut dream. These cookies didn’t just flatten; they puffed into thick, golden pillows with those perfect, classic criss-cross fork marks. Letting them cool was agony, but that first warm bite was pure reward: a rich, salty-sweet, melt-in-your-mouth experience with a satisfyingly soft center. They’re everything a peanut butter cookie should be.
Why You’ll Love This Recipe
You are going to fall head over heels for this recipe because it delivers that nostalgic, bakery-style peanut butter cookie with a texture that’s absolutely irresistible. They are incredibly thick and stay wonderfully soft and chewy for days, never turning into dry rocks. The recipe is straightforward, using simple ingredients you likely already have, and the method is forgiving. If you’ve ever been disappointed by thin, brittle peanut butter cookies, this is your answer. It’s the only recipe I use now, and it never fails to impress.
Ingredients
- 1 cup creamy peanut butter (not natural or “stir” style)
- 1/2 cup (1 stick) unsalted butter, softened
- 1/2 cup granulated sugar
- 1/2 cup packed light brown sugar
- 1 large egg plus 1 egg yolk, at room temperature
- 1 1/4 cups all-purpose flour
- 1 teaspoon baking soda
- 1/2 teaspoon salt
- 1 teaspoon pure vanilla extract (See the next page below to continue…)
Equipment Needed
- Stand mixer or handheld electric mixer
- Large and medium mixing bowls
- Whisk
- Rubber spatula
- Baking sheets
- Parchment paper or silicone baking mats
- Fork for criss-cross pattern
- Wire cooling rack
Step-by-Step Instructions
Let’s begin with the most important step: creaming the fats and sugars. In the bowl of my stand mixer, I combine the softened butter, creamy peanut butter, granulated sugar, and brown sugar. I beat them together on medium speed for a full two to three minutes. I’ve learned you cannot rush this. The mixture should become very light, fluffy, and almost look like a creamy peanut butter frosting. This step incorporates air and is the secret to that perfect, tender chew. Once it’s beautifully whipped, I beat in the whole egg, the extra yolk, and the vanilla extract until everything is smooth and emulsified.
While that’s mixing, I whisk together my dry ingredients in a separate bowl. I combine the flour, baking soda, and salt. That extra egg yolk I mentioned is crucial—it adds richness and extra fat, which promotes chewiness without making the cookie cakey. Now, with the mixer on low speed, I gradually add the dry ingredients to the peanut butter mixture. I add the flour in two or three parts, mixing only until the last streak of flour disappears. The moment it’s combined, I stop the mixer. Overmixing is the enemy of a soft cookie!
The dough will be soft and slightly sticky, but it should hold together when pressed. This is where I do something that seems counterintuitive but works perfectly: I chill the dough. I cover the bowl and pop it in the refrigerator for at least 30 minutes. I know, the wait is hard! But I’ve tried baking them immediately, and they spread too much, becoming thinner and crisper. Chilling solidifies the fat, which controls spread and ensures our cookies bake up thick and puffy. Trust me, this step is non-negotiable for the perfect texture. (See the next page below to continue…)
After the chill, I preheat my oven to 350°F and line my baking sheets with parchment paper. I use a medium cookie scoop (about 1.5 tablespoons) to portion the dough, rolling each scoop into a smooth ball. I place them about 2 inches apart on the sheet. Then, using a fork, I press a classic criss-cross pattern into each ball, flattening them just slightly. I dip the fork in a little granulated sugar between presses to prevent sticking. I bake for 10-12 minutes. The key is to pull them out when the edges are just set and lightly golden, but the centers still look puffy and soft. They will finish setting on the hot baking sheet.
Pro Tips for Best Results
My number one tip is about the peanut butter. You must use a commercial, creamy peanut butter like Jif or Skippy. I tested this with natural peanut butter (the kind that separates), and it was a disaster. The oils are different, and the cookies spread uncontrollably and were greasy. The stabilizers in conventional peanut butter are key for the right structure and that classic, creamy peanut flavor. Don’t skip this ingredient advice; it makes a huge difference.
The extra egg yolk is my secret weapon for chew. I tested this with one whole egg, two whole eggs, and the one-egg-plus-one-yolk combination. The yolk version was the clear winner for that dense, rich, melt-in-your-mouth interior. The white adds more structure and can lead to a slightly puffier, cakier texture. For the ultimate fudgy, chewy bite, that extra yolk is absolutely essential. Save the white for a breakfast scramble.
Don’t overbake! These cookies continue to cook on the hot baking sheet after you take them out of the oven. I pull mine when they still look slightly underdone in the very center. They might seem too soft, but as they cool, they set up into the perfect chewy texture. If you wait for them to look fully “done” in the oven, they’ll be overdone and crunchy once cooled. Err on the side of under-baking for the best chew.
Common Mistakes to Avoid
The first mistake I made was not chilling the dough. I was impatient and baked them right away. They spread into thin, flat, crispy disks instead of the thick, chewy puffs I wanted. The chilled dough is what gives you control over the spread. Even 30 minutes makes a dramatic difference. If you’re really in a hurry, you can pop the shaped dough balls on the sheet in the freezer for 15 minutes, but don’t skip this step entirely. (See the next page below to continue…)
Using a different type of peanut butter is the most common pitfall. As I mentioned, natural peanut butter will give you oily, flat cookies. Also, avoid using chunky peanut butter unless you want extra texture (and even then, be prepared for a slightly different spread). The recipe is engineered for the specific consistency of standard creamy peanut butter. Sticking to the script here guarantees perfect results every single time.
Overmixing the flour is a sure way to get tough cookies. Once you add the dry ingredients, mix on low speed and stop the moment you no longer see dry flour. I used to mix for another 30 seconds “just to be sure,” and it developed the gluten, making the cookies more bread-like than tender. A few small streaks are okay; they’ll incorporate when you scoop and roll the dough.
Pressing the cookies too flat with the fork will also affect the texture. You want to press just enough to create the pattern and flatten the ball slightly—maybe to about 1/2 inch thick. If you press them too thin, they’ll bake into crisper, flatter cookies. The goal is to leave them nice and tall so they can puff up in the oven, giving you that desirable thick and chewy center.
Serving Suggestions
I love serving these cookies still slightly warm with an ice-cold glass of milk. It’s the timeless, perfect pairing. For a next-level dessert, I sometimes sandwich a small scoop of vanilla ice cream between two cooled cookies, creating the most incredible peanut butter ice cream sandwich. The chew of the cookie with the cold cream is absolute heaven.
For a fun twist at a party, I’ll set up a “cookie dip” station. I place a stack of cookies next to bowls of chocolate sauce, whipped cream, and even a bowl of extra peanut butter for the true enthusiasts. It’s interactive and lets guests customize their treat. They’re also fantastic crumbled over a bowl of chocolate ice cream.
These cookies are a phenomenal gift. I pack them in a simple cardboard box lined with parchment or a festive tin. They travel well and stay soft. I often include a small note that says “Best enjoyed with a tall glass of milk!” It’s a heartfelt, homemade gift that always brings a smile.
Variations & Customizations
For the chocolate peanut butter lovers, fold in a heaping cup of chocolate chips or chunks after mixing the dough. I prefer semi-sweet or dark chocolate to balance the sweetness. You can also press a few chips onto the tops of the shaped dough balls before baking for a beautiful presentation. It’s a classic combo that’s always a crowd-pleaser.
To make them into “peanut butter blossom” cookies, roll the dough balls in granulated sugar before placing them on the baking sheet. Bake as directed, and immediately after pulling them from the oven, press a chocolate kiss or a chocolate star into the center of each hot cookie. The warmth will slightly melt the chocolate, securing it in place as they cool.
For a salty-sweet kick, use a flaky sea salt like Maldon. After pressing the fork marks, sprinkle each cookie very lightly with a few salt flakes before baking. The contrast with the sweet, rich cookie is incredible. You can also use chunky peanut butter and add 1/2 cup of chopped, salted peanuts to the dough for a double peanut crunch.
How to Store, Freeze & Reheat
To keep them soft and chewy, I store the completely cooled cookies in an airtight container at room temperature. I often add a piece of bread to the container; the cookies will draw moisture from the bread, keeping them soft for days. They stay perfect for up to 5 days this way. Avoid refrigerating them, as it will dry them out.
These cookies freeze beautifully. You can freeze the baked cookies for up to 3 months. Let them cool completely, then pack them in a freezer-safe bag or container. Thaw at room temperature for an hour. Even better, you can freeze the unbaked dough balls. Scoop and shape them, freeze on a tray until solid, then transfer to a bag. Bake from frozen, adding 1-2 minutes to the bake time. This means fresh, warm cookies are always just minutes away.
Reheating is simple. To revive that fresh-from-the-oven warmth and softness, place a cookie on a microwave-safe plate and heat for 5-8 seconds. For a whole batch, warm them on a baking sheet in a 300°F oven for 4-5 minutes. This gently re-warms them without drying them out or overcooking them.
Conclusion
This Thick and Chewy Peanut Butter Cookie recipe is my baking holy grail—a simple, reliable path to cookie perfection. They’ve brought so much joy to my kitchen and to everyone who’s tried them. I hope this recipe becomes your new go-to, filling your home with that incredible peanut butter aroma and delivering pure, chewy satisfaction with every bite. Now, go grab that jar of peanut butter and get ready to bake your new favorite cookie. Happy baking!