
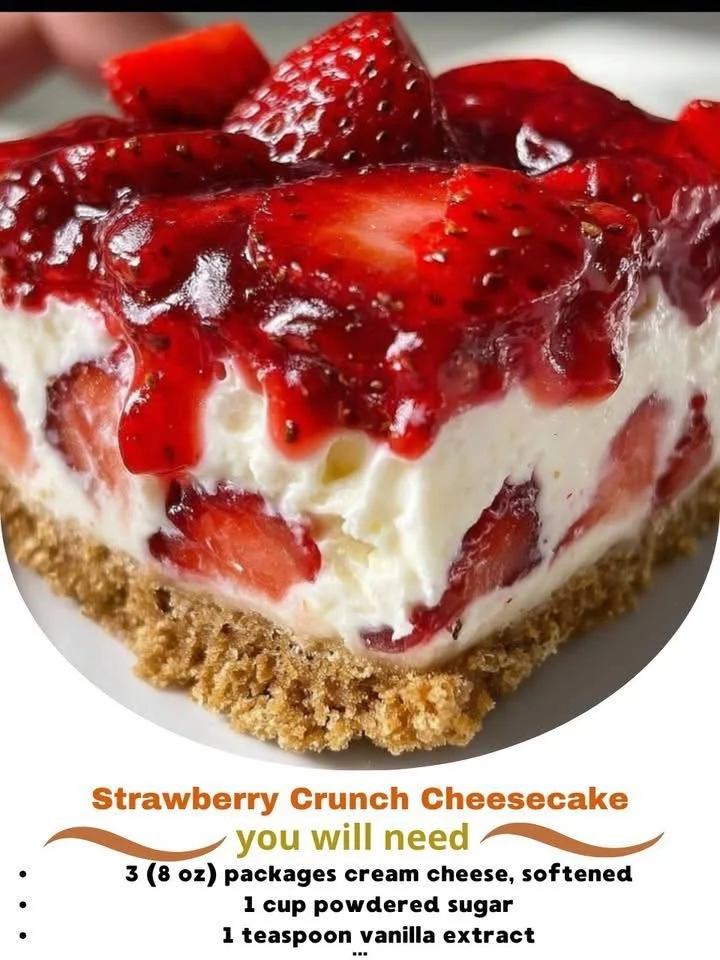
I can’t tell you how many times I’ve walked into my kitchen, craving something sweet, only to find that I’m in the mood for a dessert that feels just a little extra special. That’s when my Strawberry Crunch Cheesecake comes to the rescue! This delightful dessert is the perfect blend of creamy cheesecake, fresh strawberries, and a crunchy topping that reminds me of summer picnics. Let me take you through my journey of creating this heavenly treat!
Why You’ll Love This Recipe
This recipe is not just about the delicious flavors; it’s about the harmony between the creamy, tangy cheesecake and the sweet, fresh strawberries, all nestled on a crunchy base. Plus, it’s visually stunning, making it a perfect centerpiece for any gathering. The combination is so delightful that I find myself sneaking back for seconds (or thirds!). Trust me, once you try this dessert, you’ll want to make it a regular in your dessert rotation. (See the ingredients in the next page below…)
Ingredients
– 1 1/2 cups of graham cracker crumbs
– 1/2 cup of unsalted butter, melted
– 1/3 cup of granulated sugar
– 16 oz cream cheese, softened
– 1 cup of powdered sugar
– 1 teaspoon of vanilla extract
– 1 cup of heavy whipping cream
– 2 cups of fresh strawberries, sliced
– 1 cup of strawberry crunch topping (store-bought or homemade)
Equipment Needed
– 9-inch springform pan
– Mixing bowls
– Electric mixer or whisk
– Spatula
– Measuring cups and spoons
– Food processor (if making homemade strawberry crunch)
Step-by-Step Instructions
To start, I preheat my oven to 350°F (175°C). In a mixing bowl, I combine the graham cracker crumbs, melted butter, and sugar until the mixture resembles wet sand. Then, I press this mixture firmly into the bottom of my springform pan, creating a solid base for my cheesecake. This crust is essential; it adds both flavor and texture! I bake the crust for about 10 minutes, letting it cool slightly as I turn my attention to the creamy filling. (See the next page below to continue steps…)
In another bowl, I use my electric mixer to beat the softened cream cheese until it’s creamy and smooth. Next, I gradually add in the powdered sugar and vanilla extract, blending until everything is well combined. The smell at this point is simply divine! To make it extra fluffy, I whip the heavy cream in a separate bowl until soft peaks form, then gently fold this into the cream cheese mixture. This step is crucial because it adds lightness to the cheesecake.
Once the cheesecake filling is ready, I pour it over the cooled crust, smoothing it out evenly. I like to let the cheesecake settle in the fridge for at least four hours, but overnight is even better if you have the patience! The longer it chills, the firmer and more delicious it becomes. When I finally pull it out, I love to top it with freshly sliced strawberries and a generous sprinkle of strawberry crunch topping before serving.
This presentation always earns me compliments! The vibrant colors and textures make each slice feel special, making it hard to resist going back for just one more bite.
Pro Tips for Best Results
I tested this recipe three ways: using fresh strawberries, frozen strawberries, and even swapping the strawberry crunch with crushed Oreos! Eventually, fresh strawberries won my heart, as they give that burst of summer flavor that makes this cheesecake irresistible.
One thing I learned is never to skip the chilling time; it’s where the cheesecake really sets up and develops its flavor. The texture becomes smooth and creamy, and trust me, you want that melt-in-your-mouth feel!
Finally, as an added tip, if you want a deeper strawberry flavor, consider mixing some strawberry puree into the cream cheese filling. It’s a simple way to enhance the flavor and give your cheesecake an unexpected twist.
Common Mistakes to Avoid
One of the biggest mistakes I’ve made is not letting the cream cheese soften enough. When it’s cold straight from the fridge, it turns into a lumpy mess, and nobody wants that in their cheesecake! Make sure to leave it at room temperature for at least an hour before you start mixing.
Another common pitfall is overmixing the filling. While it might seem like you need to blend it forever for a smooth texture, too much mixing can introduce air bubbles, which can result in cracks after baking. Mix just until combined for a perfectly smooth finish. (See the next page below to continue…)
I’ve also had issues with the crust being too crumbly. Make sure you’re pressing it down firmly enough into the pan so that it holds together when cut. If it falls apart, it can ruin the whole slice, which is heartbreaking. A little extra pressure can make all the difference!
Finally, don’t skimp on the chilling time. I’ve learned the hard way that cutting into a cheesecake too soon leads to a gooey mess. It’s so tempting to dive right in, but waiting makes a world of difference!
Serving Suggestions
When it comes to serving my Strawberry Crunch Cheesecake, I love to present it on a simple, elegant plate that allows the vibrant colors to shine. A nice dollop of whipped cream on the side adds an extra touch of luxury. Sometimes, I even drizzle a bit of strawberry sauce over the top for added flavor and that eye-catching presentation.
Pairing this cheesecake with a cup of coffee or a refreshing glass of iced tea elevates the experience even more. It’s perfect for afternoon gatherings or as a sweet ending to a family dinner. I’ve also found that serving it with a scoop of vanilla ice cream can make it feel like an indulgent treat!
And let’s not forget about the good old-fashioned potluck! This cheesecake is always a crowd-pleaser, and I love hearing everyone rave about how delicious it is after they have a slice.
Variations & Customizations
While I adore the classic Strawberry Crunch Cheesecake, experimenting with different flavors is something I love to do in my kitchen. For a tropical twist, I sometimes replace strawberries with mango or pineapple, or mix them in for a mixed fruit version. Adding a splash of coconut extract in the filling can elevate it to a whole new level!
For those who prefer a chocolatey dessert, swirling in some melted chocolate ganache into the cheesecake filling or using chocolate cookie crumbs for the crust creates a decadent variation that feels like a whole new dessert!
And if you’re looking to make it a little healthier, I’ve tried a version using Greek yogurt instead of cream cheese; it’s lighter but still rich in flavor. The yogurt adds a tangy element that complements the strawberries perfectly.
How to Store, Freeze & Reheat
After making this cheesecake, I usually can’t finish it all in one go, and that’s where storing comes in handy. I wrap it tightly in plastic wrap or cover it with a lid and store it in the refrigerator, where it’ll last about 5 to 7 days.
If I’ve made it ahead to serve at a celebration, I often freeze any leftovers. To do this, I slice the cheesecake and place individual pieces onto a parchment-lined baking sheet to flash freeze. Once frozen, I transfer them into a freezer-safe container or bag. This way, I can pull out a slice whenever I want a quick dessert fix!
When it comes to reheating (if you prefer it a bit softer), I simply let it sit at room temperature for about 10 minutes before serving. This way, it softens just enough, and the flavors really come alive again.
Conclusion
In the end, my Strawberry Crunch Cheesecake has become one of my go-to recipes, and I can’t wait for you to try it. The delicious layers and flavors are sure to impress anyone at your table! I hope this recipe brings as much joy and deliciousness to your home as it has to mine. Happy baking!