
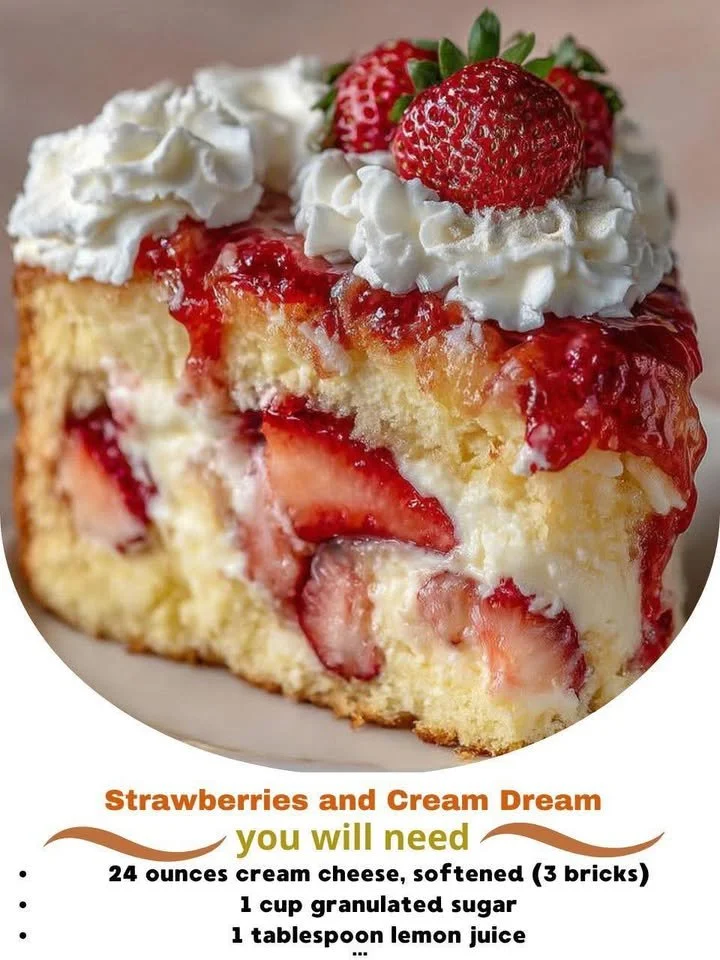
There’s nothing quite like the sweet delight of a strawberries and cream dessert, and when I decided to take that concept a step further, I landed on the Strawberry and Cream Dream Layer Cheesecake Cake. This dessert is a luscious blend of creamy cheesecake, fluffy cake layers, and fresh strawberries. It’s a staple in my kitchen, and I love whipping it up for family gatherings or friendly brunches. Let me take you through the delicious journey of making it!
Why You’ll Love This Recipe
This recipe brings together the best parts of cheesecake and layer cake, resulting in a dreamy dessert that’s sure to impress. The creamy texture contrasts beautifully with the light and fluffy cake layers, while the fresh strawberries add a burst of color and flavor. It’s like a celebration in every bite! Trust me, once you take a slice, you’ll be hooked! (See the ingredients in the next page below…)
Ingredients
– 1 ½ cups graham cracker crumbs
– ½ cup unsalted butter, melted
– 1 cup sugar
– 4 packages (8 oz. each) cream cheese, softened
– 1 tsp vanilla extract
– 4 large eggs
– 1 cup heavy whipping cream
– 2 cups fresh strawberries, sliced
– ½ cup powdered sugar
– Optional: Mint leaves for garnish
Equipment Needed
– 9-inch round cake pans (2)
– Mixing bowls
– Electric mixer or stand mixer
– Rubber spatula
– Measuring cups and spoons
– Cooling rack
– Cake stand or serving platter
Step-by-Step Instructions
First, let’s start with the crust. In my kitchen, I mix the graham cracker crumbs with melted butter and half a cup of sugar until they resemble wet sand. I press this mixture firmly into the bottom of my cake pans and bake them at 350°F for about 10 minutes until they’re golden brown. Let me tell you, the smell wafting through the house is practically irresistible! (See the next page below to continue steps…)
Next, while the crusts are cooling, I turn my attention to the cheesecake layers. In a large mixing bowl, I beat the softened cream cheese with an electric mixer until it’s smooth and creamy. I slowly add the remaining sugar and vanilla, then mix in the eggs one at a time, making sure to scrape down the sides of the bowl to get everything well combined. The texture should be velvety, and I can’t help but sample a bit – it’s so good! Once the mixture is ready, I pour it evenly over the cooled crusts in the pans and bake them for 50-60 minutes. When done, the edges will look set, while the center will maintain a slight jiggle.
After the cheesecake layers cool to room temperature, I whip the heavy cream with powdered sugar until it forms stiff peaks. This step adds a lightness that offsets the dense cheesecake layers beautifully. Once that’s done, I carefully layer everything: first, one cheesecake layer, then a lovely dollop of whipped cream, and a handful of those sweet, fresh strawberries. Follow that with the second cheesecake layer, more whipped cream, and an artistic arrangement of strawberries on top. The colors are absolutely stunning!
Once I’ve assembled everything, I chill the cake in the fridge for a few hours to let the flavors meld together beautifully. I always find it hard to wait, but trust me, it’s worth it!
Pro Tips for Best Results
I tested this cheesecake recipe a few ways before finding the perfect balance. Using room temperature cream cheese is essential; it mixes more easily and results in a smoother texture. I learned this the hard way after ending up with little lumps in my first attempt—definitely not ideal when you want creamy perfection!
Also, I always recommend letting your cheesecake cool slowly. After removing it from the oven, let it rest in the pan for about 30 minutes before transferring it to a cooling rack. This helps prevent cracks from forming on the surface. I’ve noticed that when I skip this step, I often end with cracked cheesecake layers, which definitely isn’t as visually appealing!
Lastly, if you’re someone who loves a little extra flavor, add a splash of lemon juice to the cream cheese mixture. I experimented with this after trying a friend’s version, and it adds such a delightful zing!
Common Mistakes to Avoid
One common mistake I made early on was not properly greasing the cake pans. The last thing you want is for your cheesecake layers to stick to the bottom! I learned this the hard way—one of my layers didn’t come out in one piece, and let’s just say it resulted in an interesting presentation. I now generously grease my pans with butter or cooking spray, and I haven’t had that issue since! (See the next page below to continue…)
Another pitfall is overbaking the cheesecake layers. I recommend setting a timer and checking them regularly; you want a slight jiggle in the middle when you take them out. If they look too set, they will lose that creamy texture we all love.
Also, be cautious with the whipped cream. Overwhipping can turn it into butter, which isn’t what we want for this dessert! I whip it just until I have stiff peaks and that’s perfect. That fluffiness is crucial for that light layer of cream on top of your cake.
Serving Suggestions
When it comes to serving this stunning dessert, I love to garnish it with fresh mint leaves, which not only add a pop of color but also a refreshing flavor. You can also dust a light sprinkle of powdered sugar on top for an extra touch of elegance.
To create an extra-special presentation, I like to serve it on a beautiful cake stand. Placing it in a well-lit area can make all the colors of the strawberries pop, making it even more appealing to my guests.
Don’t forget, this cheesecake pairs wonderfully with a scoop of vanilla ice cream or a drizzle of chocolate sauce for those who enjoy a richer flavor. I often place a scoop next to each slice for that perfect balance of flavors.
Variations & Customizations
If strawberries aren’t your jam, you can easily switch things up! I’ve made this cheesecake with raspberries, blueberries, and even peaches, and they all turned out deliciously. Each fruit brings a unique twist, but my favorites aside from strawberries are definitely the blueberries—talk about a pop of color!
I’ve also tried adding a layer of fruit compote inside the cheesecake. For this, I simply simmer some fruit with sugar until it thickens, cool it, and then spoon it between the layers. It adds an unexpected flavor burst that my family always raves about!
For a different base flavor, consider using chocolate cookie crumbs in place of graham crackers. The chocolate adds an indulgent twist that pairs perfectly with the creaminess of the cheesecake. I did this once for a gathering, and it was a huge hit!
How to Store, Freeze & Reheat
If you find yourself with leftovers (which doesn’t happen too often in my household), this cheesecake can be stored tightly covered in the fridge for up to a week. But I’m sure you’ll have an empty plate long before that!
You can also freeze it if you want to prepare it ahead of time. Just make sure to wrap it well in plastic wrap and then place it in an airtight container. It should last for about two to three months in the freezer. When you’re ready to enjoy, simply remove it from the freezer and let it thaw in the fridge overnight before serving.
As for reheating, this cake is best enjoyed chilled, so I don’t really recommend warming it up. Just let it sit out for a few minutes to get to room temperature before serving, and you’re good to go!
Conclusion
Making the Strawberry and Cream Dream Layer Cheesecake Cake has become a delightful ritual in my kitchen, and I hope it will become one in yours, too! The combination of flavors and textures creates a truly heavenly experience. Don’t be surprised if it becomes a favorite for your family and friends! Enjoy your baking, savor the process, and of course, the delicious result. Happy baking!