
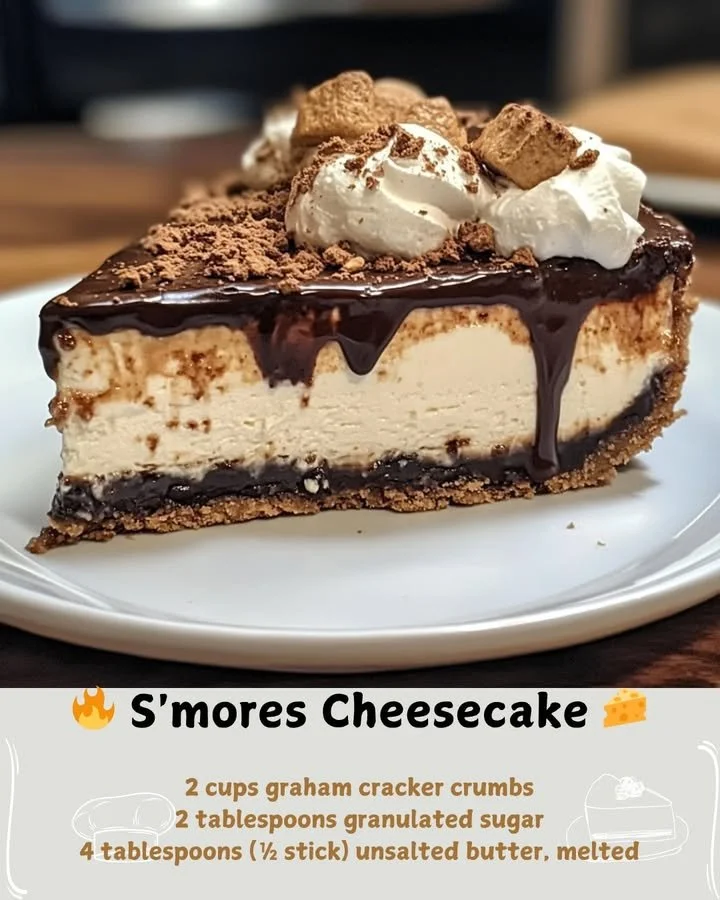
I remember summer nights spent around the fire, roasting marshmallows and constructing the perfect s’more. Now, I can bring that same cozy feeling into my kitchen with a delightful twist: S’mores Cheesecake! It combines all the classic flavors of my favorite campfire treat into a luscious cheesecake that’s sure to impress family and friends alike.
Why You’ll Love This Recipe
This S’mores Cheesecake is not just a dessert; it’s an experience to share with loved ones, brimming with gooey chocolate, creamy cheesecake, and a buttery graham cracker crust. It’s perfect for any occasion and is surprisingly easy to make—trust me, it’ll be a hit whether you’re hosting a gathering or just treating yourself at home. Prepare for compliments galore! And if you’re ready to dig in, I’ve laid out everything you need right here! (See the ingredients in the next page below…)
Ingredients
– 1 ½ cups graham cracker crumbs
– ½ cup unsalted butter, melted
– 2 tablespoons sugar
– 3 (8-ounce) packages cream cheese, softened
– 1 cup sugar
– 3 large eggs
– 1 teaspoon vanilla extract
– 1 cup sour cream
– 1 cup mini marshmallows
– 1 cup chocolate chips
– Additional chocolate and marshmallows for topping
Equipment Needed
– 9-inch springform pan
– Mixing bowls
– Electric mixer
– Rubber spatula
– Measuring cups and spoons
– Baking sheet
– Parchment paper
Step-by-Step Instructions
First, let’s get that crust ready! In my kitchen, I combine the graham cracker crumbs, melted butter, and sugar in a mixing bowl. Once mixed, I press the mixture firmly into the bottom of a greased springform pan. Make sure to pack it down well because a sturdy crust holds everything together beautifully. I bake it at 350°F (175°C) for about 10 minutes until it’s golden. The aroma fills the kitchen, and I can hardly wait to continue! (See the next page below to continue steps…)
Next, while the crust cools, I tackle the cheesecake filling. In another bowl, I beat the softened cream cheese and sugar together until it’s super creamy. Adding the eggs one at a time keeps everything nice and smooth, followed by vanilla extract and sour cream. Once mixed, I fold in the mini marshmallows and chocolate chips gently so they don’t break apart. Pour the filling over the cooled crust and spread it evenly. Now it’s time to bake! I pop it in the oven at the same temperature for about 45-50 minutes, keeping an eye on it until the center is set but slightly jiggly.
After baking, I let my cheesecake cool slowly in the oven with the door cracked open for about an hour. This little trick helps prevent cracks on the surface. Once it’s cool, I chill it in the refrigerator for at least four hours or preferably overnight. The anticipation builds as I patiently wait for this delectable cheesecake to firm up!
Just before serving, I like to top my cheesecake with more mini marshmallows and drizzle melted chocolate on top. If you want to take it a step further, you can use a kitchen torch to toast those marshmallows to a golden perfection. This adds a campfire-like quality that truly elevates the experience!
Pro Tips for Best Results
When making my S’mores Cheesecake, I always use room-temperature ingredients. Last time, I forgot to soften the cream cheese, and it ended up lumpy. Trust me, letting everything warm up on the counter just makes blending easier and the texture creamier!
Another tip I’ve learned over the years is to be cautious with the baking temperature. Ovens can vary a lot, so it’s wise to invest in an oven thermometer! When I adjusted mine, I discovered that my old oven was running hotter than I thought, which made my cheesecakes bake too quickly or crack.
Lastly, I found that letting the cheesecake cool gradually is crucial. I used to rush this part, thinking it would save time, but it often led to cracks. Now, I always cool it down slowly in the oven, and it makes a world of difference!
Common Mistakes to Avoid
One common mistake I’ve made (more than once!) involves over-mixing the cheesecake filling. While I want everything well combined, I’ve learned that overdoing it can introduce extra air, leading to cracks. Mixing just until everything is incorporated ensures a smooth and creamy filling. (See the next page below to continue…)
Another pitfall is forgetting to grease the springform pan. The last time I skipped this step, my cheesecake refused to budge! I had to resort to cutting it while it still clung to the sides. Greasing it generously ensures a smooth release every time.
Also, not letting the cheesecake cool before chilling can lead to a less-than-perfect texture. I remember my eagerness led me to put it straight into the fridge, only to find a gummy topping later on! Patience really is a virtue when making cheesecake—you’ll thank yourself later.
Serving Suggestions
When it comes to serving my S’mores Cheesecake, I love to present it with a drizzle of chocolate sauce and a sprinkling of crushed graham crackers on top. It adds a lovely contrast to the creamy surface and gives that delightful crunch. Sometimes, I even toss a few extra mini marshmallows around the plate for a playful touch!
I’ve also found that serving this cheesecake with fresh berries, like strawberries or raspberries, can elevate the flavor profile. The tartness of the berries cuts through the richness of the cheesecake, creating a delightful balance. It’s a hit with guests who enjoy a bit of contrast in their dessert!
Lastly, if I’m feeling particularly indulgent, I like to serve a scoop of vanilla ice cream alongside the cheesecake. As the ice cream melts slightly against the warm chocolate topping, it’s a heavenly combination.
Variations & Customizations
One of the great things about this S’mores Cheesecake is how versatile it is! If you’re in the mood for something a little different, you can swap out the chocolate chips for a peanut butter variation by adding some creamy peanut butter to the filling. It pairs beautifully with the marshmallows and creates a new favorite in my kitchen!
For an even richer flavor, I’ve experimented with adding a layer of caramel sauce inside the cheesecake or drizzling it on top just before serving. The sweet, buttery taste complements the chocolate magnificently. It’s a little decadent twist that my friends rave about!
If you’re looking for gluten-free options, using gluten-free graham crackers for the crust works wonderfully! I’ve tested this out, and it’s just as delicious as the original.
How to Store, Freeze & Reheat
If, by some miracle, I have leftovers (which is rare!), I make sure to cover the cheesecake tightly with plastic wrap and store it in the refrigerator. It typically lasts about 4-5 days. Just be sure to keep it sealed to prevent it from absorbing any unwanted fridge odors!
For longer storage or if I’m preparing for a special occasion in advance, I freeze individual slices wrapped in plastic wrap and then foil. This way, I can pull out a slice when the craving hits without thawing the entire cheesecake. I’ve found that it maintains its flavor and texture surprisingly well!
When I’m ready to indulge in a frozen slice, I simply transfer it to the fridge to thaw overnight or microwave it for about 30 seconds to get it back to that creamy state. I just make sure to check it so I don’t overdo it. A little warmth brings those flavors right back to life!
Conclusion
Making a S’mores Cheesecake has brought so much joy into my kitchen, and it’s quickly become a beloved recipe in my family. Each bite is like a warm hug, reminding me of those cherished summer nights. I hope you enjoy making this delightful dessert as much as I do! Happy baking!