
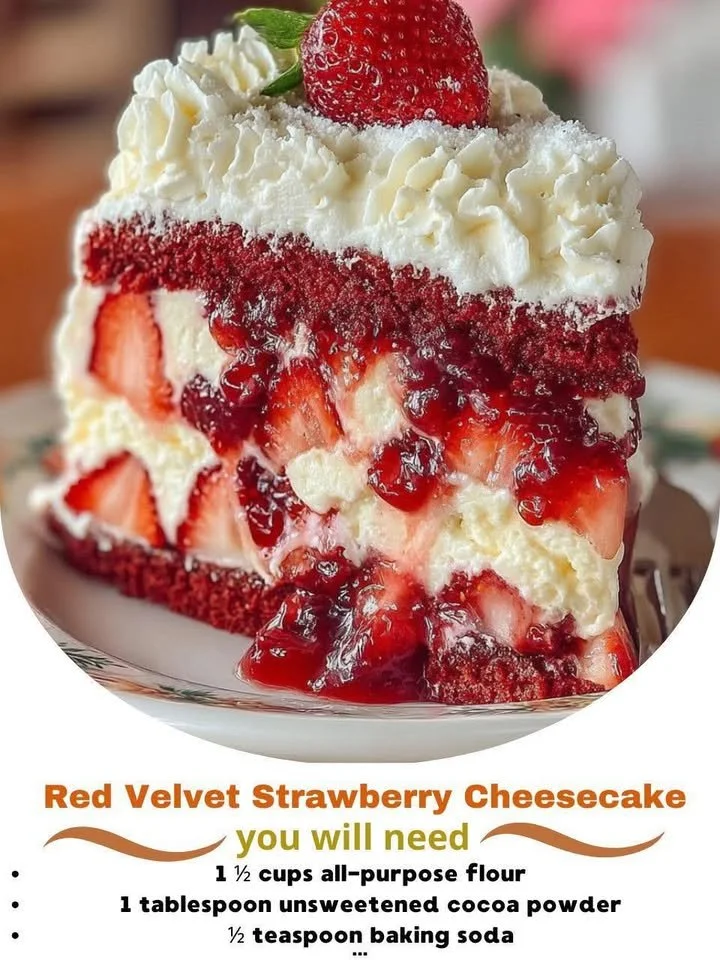
Hi there, fellow baking enthusiasts! Today, I’m thrilled to share one of my all-time favorite recipes that fills my kitchen with the most delightful scents: Red Velvet Strawberry Cheesecake. This dessert has become a signature treat at family gatherings and special occasions. The vibrant red hue paired with the rich creaminess of the cheesecake and the sweet burst of strawberries is just heavenly. Let’s dive into this deliciousness!
Why You’ll Love This Recipe
There’s something truly magical about combining classic flavors in a new way. This Red Velvet Strawberry Cheesecake brings together the rich, velvety taste of red velvet cake, the creamy texture of cheesecake, and the fresh sweetness of strawberries. Each bite is a perfect balance of flavors and textures that will leave everyone asking for seconds! I can already smell the warmth in the air as I make this treat, and I can’t wait for you to experience it too! (See the ingredients in the next page below…)
Ingredients
– 1 ½ cups all-purpose flour
– 1 cup granulated sugar
– 1 teaspoon baking soda
– 1 teaspoon salt
– 1 tablespoon unsweetened cocoa powder
– 1 cup vegetable oil
– 1 cup buttermilk
– 2 large eggs
– 2 tablespoons red food coloring
– 1 teaspoon vanilla extract
- 16 oz cream cheese, softened
- 1 cup powdered sugar
- 1 cup heavy cream
- 1 teaspoon vanilla extract (for the cheesecake)
- 1 cup fresh strawberries, sliced
Equipment Needed
– 9-inch springform pan
– Mixing bowls
– Electric mixer or whisk
– Rubber spatula
– Measuring cups and spoons
– Oven
– Refrigerator
Step-by-Step Instructions
First things first, preheat your oven to 350°F (175°C). In a large mixing bowl, I combine the dry ingredients: flour, sugar, baking soda, salt, and cocoa powder. The smell is already delightful! Then, in another bowl, I mix the wet ingredients: vegetable oil, buttermilk, eggs, red food coloring, and vanilla extract. When I whisk them together, the color is so vibrant it feels like magic! I then fold the wet ingredients into the dry until everything is just combined. Remember, I don’t want to overmix! (See the next page below to continue steps…)
Next, I pour the batter into my prepared springform pan and pop it in the oven for about 25-30 minutes. While that’s baking, I like to prepare the cheesecake layer. In a separate bowl, I beat the softened cream cheese and powdered sugar until it’s smooth and creamy. Then I whip the heavy cream with a splash of vanilla extract until stiff peaks form. Gently folding the whipped cream into the cream cheese mixture is one of my favorite parts; the texture becomes so fluffy and light! Once the red velvet cake is cooled, I spread the cheesecake mixture evenly over the top.
Now comes the fun part: fresh strawberries! I place the sliced strawberries on top of the cheesecake layer, arranging them beautifully to create a stunning presentation. It always makes me smile to see the colors all coming together. After that, I wrap the pan in plastic wrap and let it chill in the fridge for at least 4 hours, or overnight if I’m willing to wait. This chilling time lets the flavors meld, making each slice taste divine!
Pro Tips for Best Results
I tested this recipe three ways, and one of the best tips I can give you is to make sure your cream cheese is truly softened. If it’s too cold, it can create lumps in your cheesecake mixture, which is a texture nightmare. I let mine sit out at room temperature for at least an hour before I start mixing.
Another little secret I discovered is to use fresh strawberries instead of pre-packaged ones. I tried one batch with frozen strawberries, and while it was okay, nothing compares to the fresh ones shining on top! They add that vibrant burst of color and flavor.
Lastly, don’t rush the chilling process. Trust me, I’ve been tempted to dive in early, but flavors really develop when it chills for a longer period. The wait is absolutely worth it, and you’ll be rewarded with a creamy cheesecake that melts in your mouth!
Common Mistakes to Avoid
One of the biggest mistakes I made when I first started baking cheesecakes was not properly preparing the springform pan. I’ve experienced a few pan leaks, making a mess in my oven. Always make sure to grease your pan well and consider placing it on a baking sheet to catch any drips, just in case!
Another thing to look out for is overbaking the red velvet layer. I once left it in a couple of minutes too long, and it dried out. Just check around the 25-minute mark—your skewer should come out with a few moist crumbs but not wet batter.
Also, avoid slicing into your cheesecake too soon. I know how tempting it can be to show off that beautiful dessert, but patience is key. Allowing it to chill for a complete few hours ensures clean cuts and a beautiful presentation every time. (See the next page below to continue…)
Serving Suggestions
When it’s time to serve, I love to garnish each slice with a bit of whipped cream and an extra strawberry or two. It elevates the presentation, making it look fancy without much effort! You can even dust it with some cocoa powder or powdered sugar for that little extra touch.
Pairing it with a scoop of vanilla ice cream is another one of my go-to moves. The creamy ice cream complements the cheesecake beautifully, creating a delightful contrast of temperatures.
If you’re hosting a gathering, consider serving it alongside a selection of coffee or hot chocolate. The richness of this cheesecake pairs so well with a warm drink, making it a cozy treat for any occasion!
Variations & Customizations
If you’re in the mood for a twist on classic flavors, why not try incorporating white chocolate chips into the cheesecake batter? I experimented with this once, and it added a lovely sweetness that paired nicely with the strawberries.
For those who may not be fans of strawberries, you can swap them out for raspberries or blueberries. Both of these berries work beautifully in terms of flavor and visual appeal, giving you the freedom to customize based on your preferences.
Another fun idea I love to play with is adding a layer of chocolate ganache on top of the cheesecake before adding the fresh fruit. It just takes the dessert to another level of indulgence, and who doesn’t love a little chocolate?
How to Store, Freeze & Reheat
I’ll sometimes keep leftovers (if there are any!) in the fridge, covered with plastic wrap or in an airtight container. It’s good for about three to four days, but trust me, it never lasts that long in my kitchen!
If you want to freeze it, I recommend slicing it first. That way, you can easily pull out individual slices to enjoy whenever you want! Just wrap each piece tightly in plastic wrap and then foil, and it should last for about a month in the freezer. When you’re ready to eat, just let it thaw in the fridge overnight.
Reheating isn’t usually necessary—I enjoy it cold, but if you crave a warm piece, just take a slice and pop it in the microwave for about 10-15 seconds to take the chill off. But be cautious; you don’t want to overdo it!
Conclusion
I hope you’re as excited as I am to try out this Red Velvet Strawberry Cheesecake! With its stunning presentation and irresistible flavors, it’s the perfect treat for any occasion (or just a cozy night in). As you bake, remember that it’s about enjoying the process, the sweet smells wafting through your kitchen, and the smiles you create with each slice. Happy baking!