
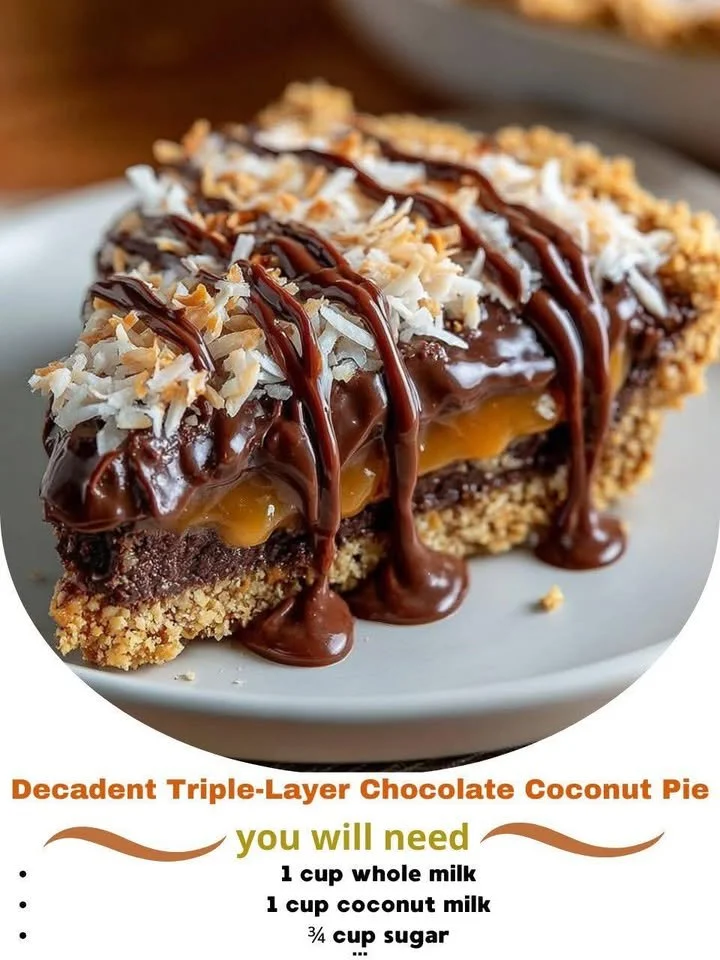
There’s something about the combination of chocolate and coconut that just melts my heart. It evokes memories of tropical escapes and indulgent desserts that brighten up any day. Today, I’m excited to share my recipe for Decadent Triple-Layer Chocolate Coconut Pie. This pie is not just a feast for the eyes; it’s a delightful treat that strikes the perfect balance between rich chocolate and creamy coconut. Get ready to impress your family and friends with a dessert that’s as delicious as it is stunning!
Why You’ll Love This Recipe
This pie has three glorious layers of chocolate and coconut bliss that will make you swoon with every bite. The velvety chocolate layer is complemented perfectly by the luscious coconut cream layer, and let’s not forget the delightful whipped topping that ties it all together! It’s not just a pie; it’s an experience. I promise you’ll find yourself dreaming about it long after it’s gone. I can already hear the oohs and aahs at your next gathering! (See the ingredients in the next page below…)
Ingredients
– 1 pre-made chocolate graham cracker crust
– 1 cup semi-sweet chocolate chips
– 1 cup coconut milk
– 1/2 cup powdered sugar
– 1 tablespoon cornstarch
– 1 teaspoon vanilla extract
– 1 cup unsweetened shredded coconut
– 1 cup heavy whipping cream
– 1 tablespoon cocoa powder
– Flaked coconut for topping
Equipment Needed
– 9-inch pie dish
– Mixing bowls
– Saucepan
– Whisk
– Electric mixer
– Spatula
Step-by-Step Instructions
To start, I first melted the semi-sweet chocolate chips in a saucepan over low heat, stirring constantly until they are smooth and glossy. In another bowl, I combined the coconut milk, powdered sugar, cornstarch, and vanilla extract, whisking until well blended. Once the chocolate’s melted, I poured this mixture into the saucepan, continuing to stir until it thickened—about 2-3 minutes. The smell of melting chocolate wafting through my kitchen was just heavenly, making me anticipate the first slice already! (See the next page below to continue steps…)
Next, I poured the chocolate mixture into the graham cracker crust, spreading it evenly. Afterward, I let it cool to room temperature before placing it in the refrigerator for about an hour to set nicely. Meanwhile, I whipped the heavy cream in a mixing bowl until soft peaks formed. Gradually, I added the cocoa powder and continued whipping until it was thick and creamy. In a separate small bowl, I mixed the shredded coconut with a bit of powdered sugar as a backdrop for the next layer.
After the chocolate layer had set beautifully, it was time to add the coconut cream layer. I gently spread the whipped cream over the chocolate layer, followed by the sweetened shredded coconut on top, creating a nice contrast in textures. The pie was looking gorgeous, even before I added the whipped topping! I placed it back in the fridge to chill for another hour, allowing all those fabulous flavors to meld together beautifully.
When I was finally ready to serve this beauty, I took it out of the fridge and topped it off with a sprinkle of flaked coconut for that finishing touch. Each layer was distinct yet harmonious, and the taste? Oh, it was absolutely divine! I couldn’t wait to dig in.
Pro Tips for Best Results
For the best results, I recommend using high-quality chocolate chips. I tested three different brands, and the taste difference was astonishing! The richer the chocolate, the more decadent your pie will taste. Also, make sure to use full-fat coconut milk for that creamy texture; low-fat coconut milk just won’t cut it in this recipe.
Whipping the heavy cream takes a bit of patience. I found that using a chilled bowl and beaters makes a significant difference in achieving those perfect peaks. And if you’re like me and love a touch of coconut flavor, add a little coconut extract to the whipped cream; it enhances the overall taste beautifully!
Lastly, let your pie chill in the fridge for at least two hours before serving. This gives the layers a chance to settle and enhances the flavor overall. Trust me; patience is a virtue when it comes to this delicious pie!
Common Mistakes to Avoid
One common mistake I made the first time I attempted this pie was not letting the chocolate layer set long enough. It resulted in a gooey mess when I added the coconut layer. This time, I was sure to be patient, allowing ample time for each layer to cool and set perfectly. The taste was worth the wait!
Another pitfall is using unsweetened shredded coconut when you’re aiming for a dessert. I’ve been there! It’s important to use sweetened shredded coconut for that luscious flavor, as it adds to the overall sweetness of the pie.
Don’t forget to watch the consistency of the chocolate mixture as you heat it. If it gets too hot, it may seize up, resulting in a grainy texture. Slow and steady wins the race! The melting process should be gentle and controlled.
Finally, when you’re ready to whip the cream, don’t rush it. If you over-whip it, you’ll end up with butter instead of the light, airy texture you want. I often remind myself to stop when I see soft peaks forming—it’s the sweet spot for pie perfection! (See the next page below to continue…)
Serving Suggestions
When it comes to serving this pie, I love to pair it with fresh berries! Strawberries or raspberries create a beautiful color contrast and offer a delightful tartness that balances the rich pie perfectly. You could even serve it with a drizzle of chocolate sauce for that extra touch of indulgence.
Another idea is to sprinkle some extra coconut flakes on top right before serving. It adds a nice texture and a little flair, making it even more irresistible. If you want to get creative, consider serving it with a scoop of vanilla or coconut ice cream on the side. Truly a match made in dessert heaven!
Lastly, don’t underestimate the power of presentation! I often serve my slices on colorful plates with a decorative mint leaf on the side to make it pop. It feels special and always garners compliments from my guests!
Variations & Customizations
If you want to mix things up, consider adding a hint of coffee. A tablespoon of instant coffee powder mixed with the chocolate layer can create a mocha flavor that takes this pie to a new level. It’s subtle but adds a beautiful depth that chocolate lovers will appreciate.
For a fruity twist, why not incorporate a layer of fresh fruit? I suggest mango or pineapple, which would add a tropical vibe and contrast wonderfully with the chocolate and coconut layers. Just make sure to cut the fruit into small pieces to fit well within the pie!
And if you’re feeling adventurous, why not try different crusts? While I absolutely adore the chocolate graham cracker crust, a classic buttery shortbread or a coconut macaroon crust can create delightful variations that still hold true to the chocolate-coconut theme.
How to Store, Freeze & Reheat
Storing this pie is easy! I always cover it tightly with plastic wrap or a pie cover to keep it fresh in the fridge for up to 4-5 days. Each slice remains just as delicious as the day it was made, ensuring you can enjoy this mouthwatering dessert for days!
If you want to prepare it ahead of time, I recommend assembling the pie entirely and then freezing it before adding the whipped topping. This way, you can just add the topping when you’re ready to serve! Wrapped well, the pie can last in the freezer for up to 3 months. Just let it thaw in the fridge overnight before getting it ready for guests.
Reheating isn’t necessary as this pie is best served cold. However, if you want that fresh-out-of-the-kitchen taste, you can slightly warm the chocolate layer in the microwave before serving. Just be cautious not to overheat it; I recommend 10-15 seconds at a time!
Conclusion
I hope you give this Decadent Triple-Layer Chocolate Coconut Pie a try! It’s not just a dessert; it’s a sweet escape filled with layers of love and flavor. Whether you’re celebrating a special occasion or just treating yourself, this pie is bound to become a favorite in your home. Enjoy the baking, and more importantly, enjoy every scrumptious bite!