
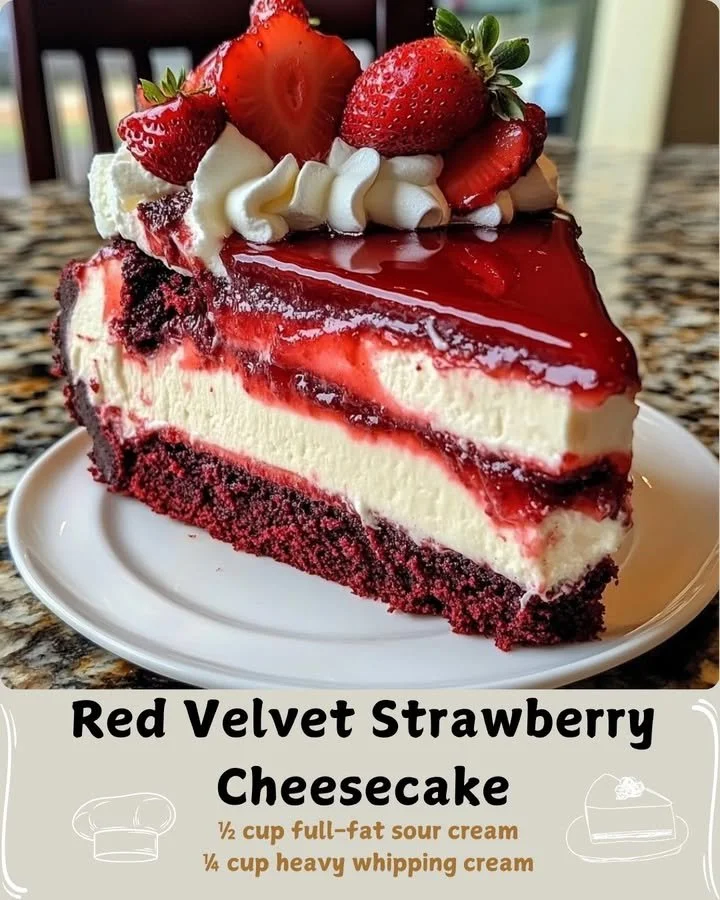
Welcome to my cozy kitchen! Today, I’m thrilled to share one of my absolute favorite desserts: Red Velvet Strawberry Cheesecake. This delightful combination of rich, velvety cake and creamy cheesecake, complemented by fresh strawberries, creates a treat that is both gorgeous and mouthwatering. Whether I’m celebrating a special occasion or just looking to indulge, this cheesecake never fails to impress my friends and family. So, put on your apron, and let’s get baking!
Why You’ll Love This Recipe
This recipe brings together the best of both worlds: the nostalgic taste of red velvet cake and the smoothness of cheesecake, all adorned with vibrant strawberries. Each bite is an explosion of flavor and texture, which always leaves me craving more. Plus, it’s a showstopper! I love how its beautiful red color and fresh topping make it a perfect centerpiece for any gathering. Trust me, once you try this creation, you’ll want to add it to your regular baking rotation. (See the ingredients in the next page below…)
Ingredients
- 1 ½ cups all-purpose flour
- 1 cup granulated sugar
- 1 teaspoon baking soda
- 1 teaspoon cocoa powder
- ½ teaspoon salt
- 1 cup vegetable oil
- 1 cup buttermilk, room temperature
- 2 large eggs
- 2 tablespoons red food coloring
- 1 teaspoon vanilla extract
- 1 teaspoon white vinegar
- 16 oz cream cheese, softened
- 1 cup powdered sugar
- 1 teaspoon vanilla extract
- 1 cup heavy whipping cream
- 1 pint fresh strawberries, sliced
Equipment Needed
- 9-inch round springform pan
- Mixing bowls
- Electric mixer or whisk
- Rubber spatula
- Measuring cups and spoons
- Offset spatula
- Parchment paper
- Cooling rack
Step-by-Step Instructions
Let’s get started on this delightful cheesecake! First, I preheat my oven to 350°F (175°C) and grease my springform pan. I then sift together the flour, sugar, baking soda, cocoa powder, and salt in a mixing bowl. The dry ingredients smell heavenly, and the cocoa gives a hint of richness. In a separate bowl, I combine the vegetable oil, buttermilk, eggs, red food coloring, vanilla extract, and vinegar. The bright red mixture is always such a fun sight! Next, I slowly add the wet ingredients to the dry ones, mixing until just combined. The batter will be beautifully velvety and so inviting! (See the next page below to continue steps…)
Next, I pour the batter into the prepared pan and smooth the top with a spatula. Baking time is usually about 25-30 minutes, and during that time, my kitchen fills with the most delightful aroma! Once the cake is done, I let it cool in the pan for about 10 minutes before transferring it to a wire rack to cool completely. While the cake cools, I prepare the cheesecake layer. I beat the softened cream cheese with powdered sugar and vanilla until it’s super creamy. The sweetness combined with the tanginess of the cream cheese is just divine!
After the cake has cooled completely, I slice it horizontally to create two layers. I apply a layer of cheesecake filling on the top of the first layer, followed by fresh strawberry slices. I like to arrange the strawberries in a lovely pattern; it just feels more special! Then, I place the second layer of cake on top and spread more cheesecake filling over the top. To finish it off, I dollop whipped cream to give it a beautiful, fluffy finish. I can’t resist adding a few more strawberries on top because they look so gorgeous against the red velvet!
To serve, I carefully run a knife around the edges of the springform pan and release the sides. I love hearing the satisfying pop as it comes free! The cheesecake is now ready to slice, and I’m always in awe of how beautifully it layers. The contrast of colors, combined with the luscious filling and rich cake, makes it irresistible.
Pro Tips for Best Results
I tested this recipe three ways to ensure I get the best red velvet flavor. If you’re aiming for a more intense taste, opt for a higher quality cocoa powder – trust me, the taste difference is worth it! I also recommend using room temperature ingredients; it helps everything blend together better for a smoother batter and cheesecake layer.
Additionally, when I prepare the strawberries, I wash and slice them just before serving to prevent them from getting too mushy. The freshness is key in this recipe! I’ve made the mistake of prepping them too early before, and they ended up being too watery, which wasn’t ideal.
Lastly, believe me when I say to let your cheesecake chill for at least 4 hours, or overnight if you can manage it. The flavors meld beautifully, and the texture firms up just right! I’ve tried indulging right away, and while it’s still tasty, the experience is much better after it has chilled properly.
Common Mistakes to Avoid
One mistake I made was measuring my flour incorrectly. Too much flour can lead to a dry cake, which is the last thing you want for a rich dessert like this. I always use the scoop and level method, so my measurements are precise. It’s a simple tweak, but it makes all the difference!
Another common pitfall is not allowing the cream cheese to soften adequately. If you try to mix it while it’s still too cold, you’ll end up with lumps in your filling. I’ve learned to plan ahead and set it out on the counter about an hour before I start mixing.
Also, don’t skip the vinegar in the cake batter! The acidity helps activate the baking soda and gives the cake that perfect tender texture. I’ve made versions without it before, and while they were still tasty, they just didn’t have that same softness.
Lastly, be careful not to overbake the red velvet layer. It should be just set in the center; if you overdo it, you’ll lose that moist, fudgy quality that makes it so desirable! The cake is perfect as soon as a toothpick inserted in the center comes out with just a few moist crumbs attached. (See the next page below to continue…)
Serving Suggestions
When it comes time to serve my Red Velvet Strawberry Cheesecake, I always like to pair it with a scoop of vanilla ice cream. The creaminess of the ice cream complements the cheesecake perfectly. A drizzle of chocolate sauce wouldn’t hurt either, adding an extra touch of decadence!
Presentation is key! I often serve it on a beautiful platter and add a garnish of fresh mint leaves around the edge for some color. Before serving, I like to dust a little powdered sugar on top to enhance the visual appeal – it truly elevates the dessert.
If I’m feeling adventurous, I’ll whip up a berry sauce or compote to drizzle over the slices. I’ve made this with mixed berries simmered down with a little sugar, and it contrasts beautifully with the rich red velvet and creamy filling. It adds a fresh tartness that balances all the sweetness.
Variations & Customizations
One variation I love is incorporating a chocolate ganache topping instead of whipped cream. I’ll melt some chocolate with heavy cream and pour it over the cheesecake layer for a rich, indulgent treat. The chocolate pairs beautifully with the red velvet flavor, creating a decadent twist!
Another fun option is to add crushed cookies to the cheesecake layer. I’ve experimented with Oreos and graham crackers, which give a lovely crunch and enhance the overall experience. The contrasting textures make it even more delightful!
If you want a healthier twist, you can swap out the cream cheese for Greek yogurt. It still has that creamy texture, and you get a nice protein boost as an added bonus. Although it might slightly change the taste, you’ll still end up with a delicious dessert!
How to Store, Freeze & Reheat
To store your Red Velvet Strawberry Cheesecake, I recommend keeping it covered in the fridge. It should stay fresh for about 4-5 days, although it never lasts that long in my house! Just slice the pieces as you go, and they’re ready for indulgence anytime.
If you want to freeze it, simply wrap individual slices in plastic wrap and then place them in an airtight container. I’ve done this many times and found that it can last up to 3 months in the freezer! Just let it thaw in the fridge overnight when you’re ready to enjoy a piece.
Reheating isn’t necessary for this cheesecake, as I prefer it chilled. However, if you really want warmth, popping it in the microwave for about 10-15 seconds can bring back some of that softness without compromising too much on taste!
Conclusion
I truly hope you give this Red Velvet Strawberry Cheesecake a try! Creating it in my kitchen is always a joyful experience, and I can’t wait for you to share in the delight when you take that first bite. The combination of flavors and textures makes it an unforgettable dessert that everyone will love. Happy baking, and enjoy every delicious piece!