
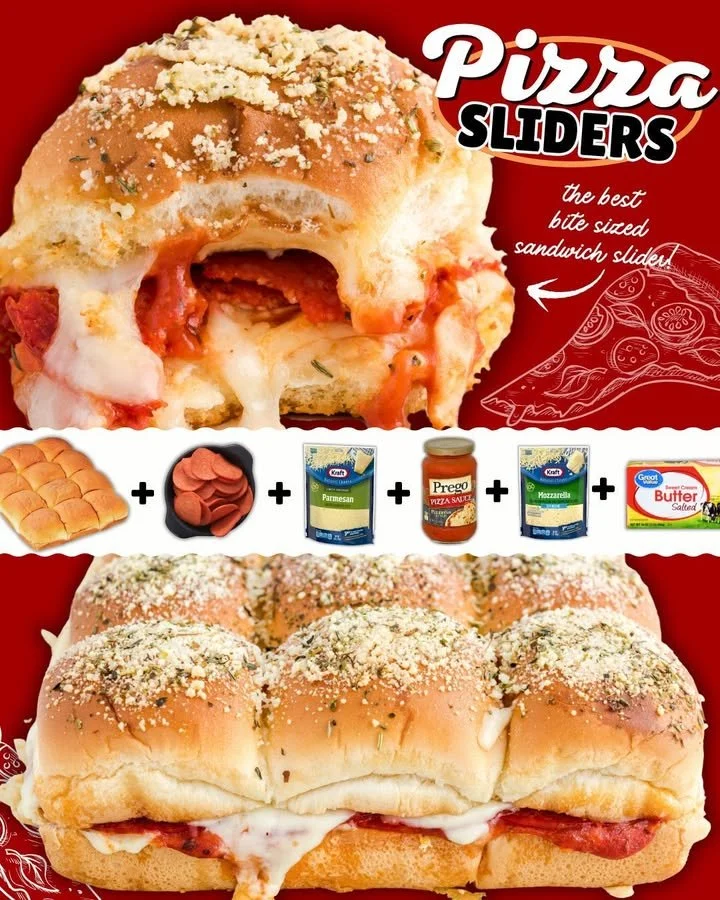
Hey there! If you’re looking for a fun and easy way to get your pizza fix, let me introduce you to one of my favorite recipes: Pizza Sliders! These mini sandwiches are packed with all the delicious flavors of pizza, making them perfect for game nights, parties, or even just a cozy movie marathon at home. They are not only a hit with my family but also incredibly simple to whip up, which is a major win in my kitchen.
Why You’ll Love This Recipe
There’s just something magical about sliders—they’re bite-sized, customizable, and always satisfying. These Pizza Sliders take that magic to another level by putting all your favorite pizza toppings between soft, gooey layers of fluffy bread. You can make them for a crowd or have some leftovers (if there are any!). The best part? You get the deliciousness of pizza in a fun, portable form that everyone can enjoy. Trust me; you’ll have a hard time stopping at just one slider. (See the ingredients in the next page below…)
Ingredients
– 12 slider rolls (Hawaiian rolls work perfectly)
– 1 cup marinara sauce
– 1 ½ cups shredded mozzarella cheese
– ½ cup sliced pepperoni
– ¼ cup grated Parmesan cheese
– 2 tablespoons melted butter
– 1 teaspoon garlic powder
– 1 teaspoon Italian seasoning
– Optional: sliced bell peppers, mushrooms, or olives
Equipment Needed
– Baking dish (9×13 inch works great)
– Mixing bowl
– Pastry brush
– Sharp knife or pizza cutter
– Aluminum foil
Step-by-Step Instructions
First things first, preheat your oven to 350°F (175°C). I love the smell of the oven warming up while I prepare the sliders. Next, in a mixing bowl, get your slider rolls ready. Carefully slice the entire pack of rolls in half, keeping them connected. Place the bottom half into your baking dish. Spread a good layer of marinara sauce on those rolls—don’t be shy; we want all that flavor! (See the next page below to continue steps…)
Now, sprinkle half of your mozzarella cheese over the marinara. This cheesy layer is key for that gooey texture we all love. Then, layer on the pepperoni or any of your chosen toppings. Remember, this is a customizable recipe, so get creative! Finally, top it all off with the remaining mozzarella cheese and cap it with the top half of the rolls. We’re nearly there!
In a small bowl, mix the melted butter, garlic powder, and Italian seasoning until well combined. Brush this luscious mixture generously over the top of the rolls. It’ll add that golden, crispy finish that you can’t resist! Cover the baking dish with aluminum foil and pop it in the preheated oven for 15 minutes.
After 15 minutes, remove the foil, sprinkle the grated Parmesan cheese on top, and bake uncovered for an additional 10-15 minutes until the cheese is bubbly and the rolls are golden brown. Your kitchen will start smelling like a pizzeria, and trust me, you won’t be able to wait too long before diving in!
Pro Tips for Best Results
I tested this recipe three ways—using different types of bread, adjusting cooking times, and trying various toppings. The Hawaiian rolls absolutely take the prize for their sweetness, which balances perfectly with the savory toppings. If you want the rolls extra crisp, you can raise the heat to 400°F for the last few minutes.
Another tip I love is to keep a close watch during the final baking process. I once got distracted, and my sliders ended up a little too crispy—delicious but not as soft as I like! A quick peek at the oven will save your sliders from becoming overly crunchy.
Lastly, don’t skip on the seasoning in the melted butter! It really elevates the flavor of the sliders, making each bite irresistibly tasty. Trust me; your taste buds will thank you for it!
Common Mistakes to Avoid
One of the most common mistakes I see is using too much sauce. While I love a saucy pizza, soggy sliders are less appealing. I recommend spreading a thin layer of marinara to start with and adding more only if needed. A little goes a long way! (See the next page below to continue…)
Another misstep is not keeping an eye on the baking time. Every oven is different, so using a timer is essential, as is checking the sliders a few minutes before the timer goes off. You want that beautiful golden color on top—trust me, you’ll want to catch them just before they get too brown!
Also, be gentle when slicing the sliders. I once went too fast and ended up with toppings spilling everywhere! A sharp knife or pizza cutter ensures clean cuts for beautiful, perfectly layered sliders.
Finally, don’t forget that these sliders can be made in advance. Many people overlook that and end up making a mess of their last-minute plans. Prep them ahead of time, cover well, and refrigerate to simplify things for any gathering!
Serving Suggestions
These Pizza Sliders are perfect for serving alongside a fresh green salad or some crispy veggies. The contrast of textures makes for a satisfying meal. You could even prepare a simple dipping sauce—like a tangy ranch or herbed olive oil—to elevate your serving game!
If you’re putting together a snack table, I recommend pairing the sliders with other finger foods like sliders, wings, or a cheese platter for a fun spread that everyone can enjoy. It creates an inviting atmosphere and encourages guests to mingle.
For those cozy nights in, serve them with a side of homemade fries or sweet potato wedges. Trust me, the combination is nothing short of heavenly, and it’ll turn your dinner into a delicious feast!
Variations & Customizations
One of the best parts about Pizza Sliders is how versatile they are! If pepperoni isn’t your jam, you can easily swap it out for cooked sausage, grilled chicken, or even veggies like roasted bell peppers, onions, or mushrooms. Experimenting with different toppings keeps the sliders fresh and exciting.
You can also step outside the classic pizza flavor and try some international twists. How about a BBQ chicken slider with BBQ sauce, mozzarella, and chicken? Or a vegetarian version with pesto, mozzarella, and sun-dried tomatoes for a Mediterranean flair? The options are endless!
And let’s not forget about the cheese! While mozzarella is a must for the classic taste, mixing in some cheddar, provolone, or even a bit of feta can give your sliders an exciting boost in flavor. I love trying out new combinations to see what family and friends enjoy the most!
How to Store, Freeze & Reheat
If you happen to have leftovers (which I doubt after seeing how delicious these are!), storing the sliders is super easy. Just place them in an airtight container and they’ll keep in the refrigerator for about 3-4 days. Reheating in the oven for a few minutes will help retain that gooey cheese texture.
If you want to make the sliders in advance, they freeze beautifully! Just prepare them as you would and wrap them tightly in plastic wrap before placing them in a freezer-safe bag. When you’re ready to enjoy, thaw them overnight in the fridge before baking. It’s a game changer for busy weeknights!
Reheating frozen sliders can be done in the oven or microwave, but I recommend using an oven to get that lovely crisp finish back. Heat at 350°F for about 15 minutes, and you’ll have warm, cheesy sliders that feel freshly made!
Conclusion
There you have it! Perfectly cheesy, warm, and scrumptious Pizza Sliders that are a guaranteed hit in my home. Whether you’re feeding a crowd or treating yourself to a hearty snack, these sliders will always deliver on flavor and comfort. So, roll up your sleeves and give this recipe a try. I can’t wait for you to enjoy them just as much as I do! Happy cooking!