
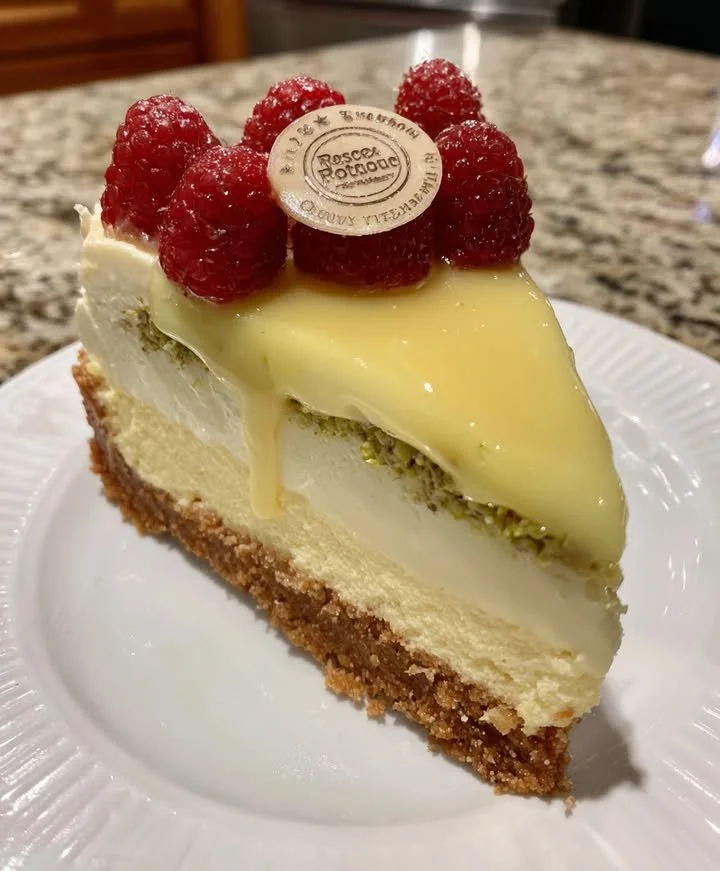
There’s something about a decadent dessert that just warms the heart, don’t you think? Recently, I found myself in my kitchen craving something a bit different, a sweet treat that could impress at my next gathering without demanding hours of my time. That’s when I decided to whip up a Pistachio Raspberry Cheesecake Mousse Cake! This delightful concoction is layers of rich, creamy goodness mingling with the bright zing of raspberries and the subtle crunch of pistachios. Trust me; it’s a show-stopper that’s surprisingly easy to make.
Why You’ll Love This Recipe
You’ll love this recipe for its perfect blend of flavors and textures. The creamy cheesecake mousse is light and airy, while the nutty pistachios add a satisfying crunch, and the fresh raspberries provide a burst of tartness that perfectly balances everything. Plus, it looks stunning when served, and its taste? Absolutely divine. It’s a dessert that’s bound to leave a lasting impression on your friends and family. (See the ingredients in the next page below…)
Ingredients
– 1 cup pistachios, shelled and chopped
– 1/2 cup butter, melted
– 1/2 cup granulated sugar
– 8 oz cream cheese, softened
– 1 cup heavy cream
– 1 tsp vanilla extract
– 1 cup raspberry puree
– 1/4 cup powdered sugar
– 1/2 tsp lemon juice
– Fresh raspberries and additional crushed pistachios for garnish
Equipment Needed
– Mixing bowls
– Electric mixer
– 9-inch springform pan
– Rubber spatula
– Measuring cups and spoons
– Food processor (for the raspberry puree)
Step-by-Step Instructions
To start, I preheat my oven to 350°F (175°C). I take a mixing bowl and combine the chopped pistachios, melted butter, and granulated sugar, creating a crumbly mix. This mix goes into the bottom of my springform pan, and I press it down with the back of a measuring cup to ensure a solid crust. It bakes for about 10 minutes until it turns golden. The smell of toasting nuts wafts through my kitchen, and I can’t help but feel excited! (See the next page below to continue steps…)
Then, I let the crust cool while I whip up the creamy filling. In a separate bowl, I beat together the softened cream cheese with the heavy cream and vanilla extract until it’s smooth and luscious. I always keep an eye out for lumps, as they can ruin that smooth texture we’re after. I gently fold in half of the raspberry puree, creating a beautiful swirl that makes my heart flutter.
Next, I pour the mousse onto the cooled pistachio crust. The contrast of the green crust against the pink filling is just heavenly! I rap my pan gently on the counter to settle it, ensuring there are no air bubbles. I let it chill in the fridge for at least two hours. The anticipation builds as I watch the mousse slowly set, firming up into a creamy dreaminess.
Finally, before serving, I whip up some heavy cream with the powdered sugar and lemon juice until soft peaks form. This fluffy cloud of cream, when dolloped on top of the mousse, is the perfect finishing touch. I drizzle the remaining raspberry puree over the top and sprinkle extra pistachios and fresh raspberries to make it pop. My mouth waters; it looks almost too pretty to eat!
Pro Tips for Best Results
I’ve tested this recipe a few ways, and one significant takeaway is to use softened cream cheese at room temperature. Cold cream cheese can lead to a lumpy filling, and nobody wants that in their dessert, right? Trust me; letting it sit out for about 30 minutes makes all the difference.
Another pro tip is to make your raspberry puree ahead of time. I like to prepare it the day before and store it in the fridge. That way, it’s nice and chilled when it’s time to mix it into the mousse, enhancing that refreshing taste. Plus, it saves you a bit of time on the day you’re assembling everything.
Lastly, if you want to impress your guests, consider adding a layer of whole raspberries between the mousse and the crust. It not only adds to the flavor contrast but also provides that extra ‘wow’ factor when you cut into the cake. Everyone loves a surprise!
Common Mistakes to Avoid
One of the common mistakes people make is not allowing the crust to cool properly before adding the mousse. I once rushed this step, and my filling started to melt slightly, which affected the final texture. Patience is key here; trust me, it’s worth the wait! (See the next page below to continue…)
Another misstep can happen during the mixing process. If you beat the cream too aggressively, you risk overwhipping it, resulting in a grainy texture instead of that velvety smoothness we crave. I learned this the hard way, so take it easy when mixing your ingredients.
Often, folks forget to taste as they go along. This recipe offers layers of flavors that can evolve as you add your elements. A dash more sugar or a squeeze more lemon juice can elevate your mousse dramatically. Don’t be afraid to adjust based on your palate!
Serving Suggestions
When it comes to serving, I love plating my Pistachio Raspberry Cheesecake Mousse Cake with a simple garnish of mint leaves, which adds a refreshing visual pop. It brightens up the dessert incredibly and offers a hint of freshness. You can also serve it with a side of extra raspberry puree for those who love a little extra zing.
I enjoy personalizing each slice by adding different toppings depending on my guests’ preferences. Some adore a drizzle of chocolate, and I can’t blame them; the combination of chocolate with the tart raspberry is heavenly!
Finally, I often pair this sweet delight with a cup of freshly brewed coffee or a light herbal tea for a balanced dessert experience. It’s fascinating to see how the flavors dance together and create such a satisfying conclusion to a meal.
Variations & Customizations
This recipe offers a world of possibilities when it comes to customization! For instance, if you’re not a fan of raspberries, try swapping them out for strawberries, blueberries, or even mango puree for a tropical twist. Each fruit will bring its unique flavor and character, keeping this dessert fresh and exciting every time.
If you want to make it a bit richer, consider adding a layer of chocolate ganache atop the mousse before adding the whipped cream. This little addition transforms the cake into a chocolate-lover’s dream without overwhelming the delicate flavors of the mousse.
For a more nutty flavor, I’ve experimented with almond or walnut crumbs instead of pistachios in the crust. Each nut offers a different taste profile and often pairs well with the raspberry. Just remember to adjust the sweetness a bit to match the nutty flavor you choose!
How to Store, Freeze & Reheat
Storing your Pistachio Raspberry Cheesecake Mousse Cake is a breeze. I simply cover the leftover slices with plastic wrap or store them in an airtight container in the fridge. It stays fresh for about 3 to 4 days, but I guarantee it won’t last that long in my house!
If you want to make this dessert in advance for a special occasion, you can prepare and freeze the mousse part. Just assemble as directed and let it freeze solid. When you’re ready to serve, transfer it to the fridge the day before so it can gradually thaw. Just keep in mind that it’s best consumed within a week.
Reheating isn’t necessary for this dessert, but if you find it’s gotten a bit too soft, a touch of time in the refrigerator can bring it back to its proper consistency. Tasting it chilled is honestly where the flavors shine!
Conclusion
I hope you find joy in making this Pistachio Raspberry Cheesecake Mousse Cake as much as I do! It’s a wonderful recipe that’s not only pleasing to the eyes but also to the palate. Whatever the occasion, celebrating with this vibrant, creamy treat makes everything feel special. So, gather your ingredients and get ready for a delightful bake—it’ll surely become a favorite in your kitchen!