
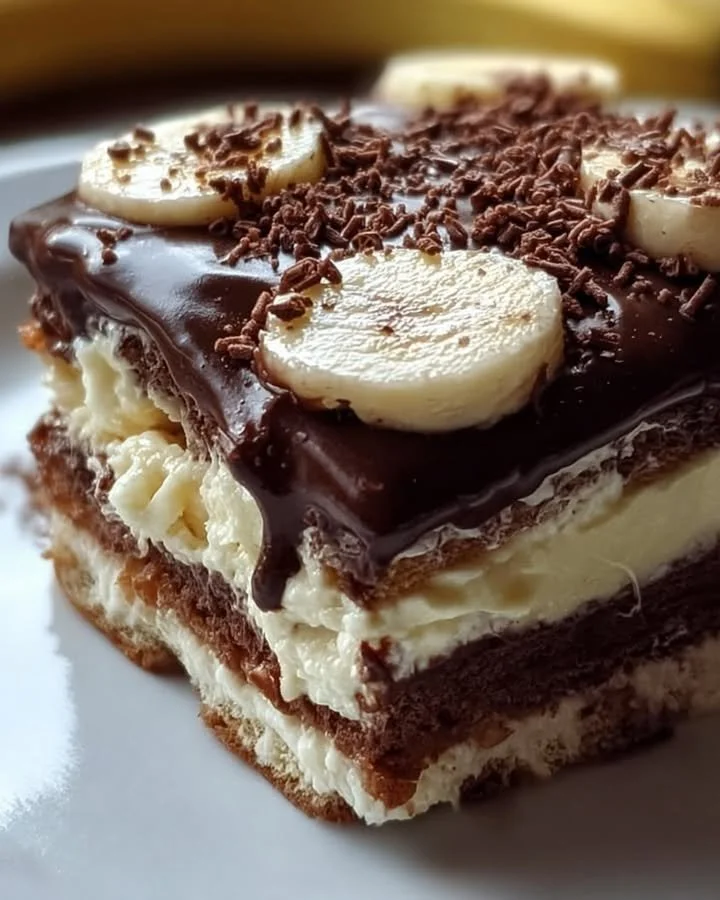
I’m excited to share a delightful recipe that brings together two of the most beloved flavors: chocolate and banana. It’s a dessert that’s not only visually stunning but also incredibly delicious. I remember the first time I made Choco-Banana Dream Layers; it transformed an ordinary day into something extraordinary. Trust me, once you try this recipe, you’ll be dreaming about it!
Why You’ll Love This Recipe
This recipe is perfect for any occasion, whether it’s a cozy family dinner or a festive gathering with friends. The combination of rich chocolate and sweet, creamy banana creates a heavenly experience for your taste buds. Plus, the layered presentation makes it look as wonderful as it tastes! It is a treat that’s sure to impress, and you can feel good about serving it. Your family and friends will keep coming back for more! (See the ingredients in the next page below…)
Ingredients
- 2 ripe bananas
- 1 cup heavy cream
- 1/2 cup powdered sugar
- 1 cup chocolate pudding (store-bought or homemade)
- 1 teaspoon vanilla extract
- 1/4 cup crushed graham crackers
- Chocolate shavings or cocoa powder for garnish
Equipment Needed
- Mixing bowls
- Electric mixer
- 9×9-inch baking dish or individual serving glasses
- Spatula
- Knife and cutting board
Step-by-Step Instructions
To start, I always recommend gathering all my ingredients and equipment before diving in. First, slice the bananas into thin rounds and set them aside. Then, in a medium bowl, whip the heavy cream until it starts to thicken. Gradually add the powdered sugar and vanilla extract and continue to whip until stiff peaks form. This whipped cream is the dreamy topping that elevates the dessert! (See the next page below to continue steps…)
Next, it’s time to layer everything beautifully. In a glass or dish, start by spreading a layer of chocolate pudding at the bottom. This is followed by a layer of banana slices, which adds a fresh and fruity flavor. Then, layer on some of that luscious whipped cream, creating a light and fluffy texture. Repeat the layers, ending with a generous dollop of whipped cream on top. Finally, sprinkle the crushed graham crackers for a delightful crunch and garnish with chocolate shavings or cocoa powder.
After you’ve assembled the layers, cover your dish with plastic wrap and let it chill in the refrigerator for at least 4 hours (or overnight, if you can wait!). This resting time helps all the flavors meld together and makes it even more delightful when served. Trust me, the anticipation will be worth it!
Pro Tips for Best Results
I tested this three ways to find the best method for whipping cream. The ideal way is to use chilled equipment—make sure your bowl and beaters are cold for maximum volume. Another tip is to slice your bananas just before assembly. This prevents them from browning and keeps the layers looking fresh. Finally, don’t skip the chilling time! Allowing the dessert to rest makes a world of difference by enhancing the flavors and textures.
Additionally, I recommend using ripe bananas for this recipe. They’re sweeter and have a more pronounced flavor that complements the chocolate beautifully. I found that if they are too firm, the banana taste doesn’t shine as brightly. Last but not least, feel free to experiment with the type of chocolate pudding. Dark chocolate pudding gives an indulgent twist that I absolutely love!
Common Mistakes to Avoid
One common mistake I made initially was not chilling the whipped cream enough before folding it into the pudding. The dessert ended up having a runny consistency that was far from dreamy. Always ensure that your cream is whipped to stiff peaks before mixing. It makes all the difference for that light, airy texture.
Another pitfall is overmixing the whipped cream with the pudding. I almost ruined my beautiful layers one time by being too eager! Gently fold the two together to keep the whipped cream fluffy. You want to maintain that lightness throughout the dessert for the best mouthfeel.
Also, it’s essential to use a good quality chocolate pudding. Skimping here can lead to a less rich flavor, which can impact the overall dessert. I learned this the hard way after trying a lower-quality brand. Finally, don’t forget to cover your dessert while it chills! It can absorb odd smells from your fridge, leaving it less than tempting.
(See the next page below to continue…)
Serving Suggestions
When it comes time to serve, I love garnishing with additional banana slices and a sprinkle of crushed graham crackers—this adds a lovely contrast in texture. Serving this in individual glasses can make it even more special and personal; it feels like you’re treating each guest to a mini celebration.
I also suggest pairing Choco-Banana Dream Layers with a scoop of vanilla ice cream. The creaminess and coolness of the ice cream complements the rich layers perfectly and adds another dimension to the dessert. It’s a dreamy combination that feels like summer on a plate!
Lastly, consider serving this dessert at your next gathering or potluck. It can easily be doubled for more servings, and it’s a dessert that will bring smiles all around. Trust me; it will become a star attraction on your table.
Variations & Customizations
If you’re feeling adventurous, you can swap out the bananas for other fruits like strawberries or raspberries. They offer a delicious tartness that contrasts beautifully with the chocolate. Just be sure to adjust the layering technique to suit softer fruits, which may require a gentler hand.
I’ve also experimented by adding a layer of peanut butter between the pudding and bananas. If you’re a peanut butter fan like me, you’ll love how the nutty flavor enhances the combo. Just be sure to thin the peanut butter slightly to make it spreadable!
For a vegan alternative, you could use non-dairy whipped cream and a plant-based pudding option. The beauty of this recipe lies in its flexibility!
How to Store, Freeze & Reheat
Choco-Banana Dream Layers can be kept in the refrigerator for up to three days, but it’s best to consume it within 24 hours for the freshest taste. The layers can start to separate a bit the longer it sits, but it still holds up wonderfully.
If you want to freeze it, I recommend doing so before the assembly. You can freeze the individual components separately—like the whipped cream and pudding—and then layer them fresh when you’re ready to enjoy. Just be aware that bananas don’t freeze well after they’ve been sliced, so it’s best to add them fresh right before serving.
Reheating isn’t necessary for this dessert, but if you want to serve it warm, consider creating a warm chocolate sauce to drizzle over the top! It adds an entirely new and indulgent experience that’s just heavenly.
Conclusion
I hope you enjoy making Choco-Banana Dream Layers as much as I do! It’s a surprisingly easy dessert that rewards you with delightful flavors and texture. Whether for a special occasion or just to satisfy that sweet craving, you can’t go wrong with this recipe. Happy cooking, and may your kitchen be filled with joy and delicious aromas!