
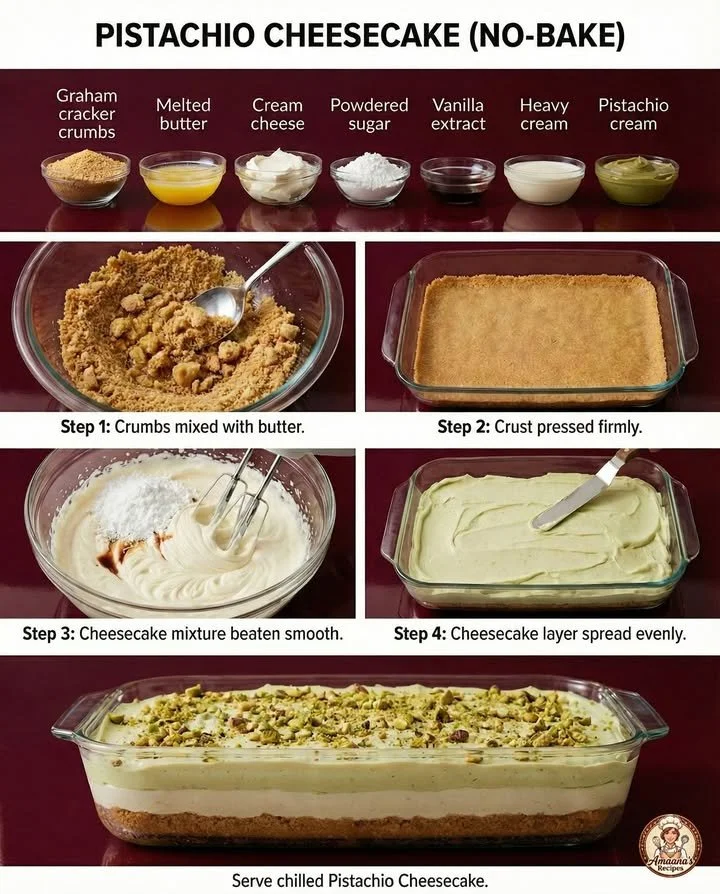
I absolutely adore desserts, and when it comes to cheesecake, it’s a true love affair! That’s why I’ve been so excited to share my go-to no-bake pistachio cheesecake recipe. It’s creamy, delightful, and has that charming nutty flavor that only pistachios can provide. Best of all? You don’t even have to turn on the oven! This cake has become my secret weapon for impressing friends at gatherings or indulging myself on quiet afternoons. Let’s dive in!
Why You’ll Love This Recipe
This pistachio cheesecake recipe brings together the rich, creamy texture of classic cheesecake with the unique, slightly earthy taste of pistachios. Each bite is a little piece of heaven, and the best part is the no-bake aspect, which makes it incredibly easy and stress-free to whip up. You can prepare it ahead of time, leaving your kitchen cool and your day free for more fun activities! What’s not to love? I promise you’ll want to keep this recipe in your arsenal! (See the ingredients in the next page below…)
Ingredients
– 1 ½ cups crushed graham crackers
– ½ cup unsalted butter, melted
– 1 cup shelled pistachios, finely ground
– 1 tablespoon sugar
– 2 cups cream cheese, softened
– 1 cup powdered sugar
– 1 teaspoon vanilla extract
– 1 cup heavy whipping cream
– ¼ cup chopped pistachios, for garnish
Equipment Needed
– 9-inch springform pan
– Mixing bowls
– Electric mixer or whisk
– Rubber spatula
– Food processor (for grinding pistachios)
Step-by-Step Instructions
First things first, let’s get that crust ready. In a mixing bowl, I combine the crushed graham crackers with the melted butter and sugar. I like to mix until it all comes together and resembles wet sand. Then, I press this mixture firmly into the bottom of my springform pan. Once I have a nice, even layer, I pop it in the refrigerator to chill while I prepare the filling. This step is crucial for achieving that crunchy foundation! (See the next page below to continue steps…)
Next, it’s time for the real star of the show: the cheesecake filling! In a separate bowl, I beat together the softened cream cheese and powdered sugar until it’s smooth and creamy. The sweet aroma of the cream cheese fills my kitchen, and I just know this cheesecake is going to be a hit. After that, I mix in the vanilla extract and finely ground pistachios, which serves to elevate the flavor even more. The color starts to turn a lovely soft green, signaling that this cheesecake will not only taste delicious but look stunning as well!
Now comes the fun part! In another bowl, I whip the heavy cream until it forms stiff peaks. Folding this fluffy magic gently into the cream cheese mixture is something I really cherish, as it brings in that airy lightness and balance to the cheesecake. Once it’s all combined, I pour this gorgeous filling on top of the chilled crust. I smooth out the top, knowing that this will be a highlight for whoever takes a slice!
Finally, I cover the cheesecake with plastic wrap and let it chill in the fridge for at least four hours, but overnight is even better. The anticipation is almost too much, but believe me—once it’s set, it’s worth the wait!
Pro Tips for Best Results
One thing I learned after testing this recipe several ways is that using room-temperature cream cheese makes a world of difference. I tried it once with cold cream cheese, and it just didn’t blend as smoothly. The texture is everything when it comes to cheesecake, so be sure to plan ahead!
Another tip is to use fresh and high-quality pistachios. I’ve tried this recipe with store-bought pistachio flour, but nothing compares to the flavor and texture of freshly ground nuts. I simply pop them into my food processor until they are finely ground, and the scent that wafts up is heavenly!
Lastly, I cannot stress enough the importance of chilling the cheesecake well. I’ve made the mistake of trying to rush the chilling time and was met with a less-than-ideal consistency. Trust me when I say, patience is a virtue when it comes to this decadent dessert!
Common Mistakes to Avoid
One of the biggest mistakes I’ve made with cheesecakes in the past is not pressing the crust firmly enough. The crust should be sturdy to support the filling. If it isn’t pressed down tightly, you’ll end up with a crumbly mess when you cut into the cheesecake. Make sure to use the bottom of a measuring cup or something flat to really pack it down! (See the next page below to continue…)
Another pitfall is overbeating the filling. I learned this the hard way when I ended up with a cheesecake that had a strange texture. Overmixing can introduce too much air into the filling, causing it to crack. Just mix until everything is combined and smooth, and you’ll be in the clear!
I’ve also found that garnishing too soon can be a big mistake. If you add the chopped pistachios before the cheesecake has set, they can sink into the filling. I like to wait until just before serving to sprinkle them on top for that beautiful, finished look.
Serving Suggestions
When it comes to serving, I like to keep it simple. A slice of this pistachio cheesecake deserves a moment in the spotlight! I usually serve it chilled, alongside a dollop of whipped cream or a scoop of vanilla ice cream for extra indulgence. The contrast of the cool, creamy cheesecake with the nutty, crunchy crust is just divine!
For a touch of elegance, I’ll often add a drizzle of honey or a sprinkle of finely chopped chocolate over the top right before serving. It adds a lovely charm and fragrance that’s just irresistible! Plus, it pairs beautifully with a cup of coffee or tea.
If I’m feeling a bit adventurous, I sometimes serve this cheesecake with a side of fresh berries. The tartness of the berries complements the sweetness of the cheesecake wonderfully, creating a beautiful and fresh dessert experience.
Variations & Customizations
I love how versatile this no-bake cheesecake recipe is. One of my favorite variations is adding a layer of strawberry or raspberry compote on top before serving. The sweet-tart flavors really elevate the pistachio and give it a beautiful pop of color! Making a compote is simple—just cook down berries with a bit of sugar until syrupy and then let it cool.
Another fun option is to swap the pistachios for another nut or even a flavored cookie crumb crust. I’ve experimented with almond and macadamia nuts, both of which give a slightly different yet delicious twist on the flavor profile.
And if you’re looking for a chocolatey kick, why not mix in some cocoa powder or melted chocolate into the cheesecake filling? It results in a decadent chocolate-pistachio cheesecake that’s simply irresistible!
How to Store, Freeze & Reheat
Storing the cheesecake is a breeze! Just keep it covered in the refrigerator, and it should last about 5-7 days. I always slice it after it has set and then cover it with plastic wrap to keep it fresh.
If you want to enjoy it later, you can freeze it too. Just make sure to wrap it in plastic wrap, then a layer of aluminum foil to protect it from freezer burn. It can last up to a month in the freezer. When you’re ready to enjoy it, just thaw it in the refrigerator overnight!
Now, reheating isn’t necessary for this no-bake cheesecake, but if you prefer it at room temperature, simply take it out of the fridge about 30 minutes before serving. This allows it to soften slightly, enhancing that creamy texture we all love.
Conclusion
I hope you’re as excited to make this no-bake pistachio cheesecake as I am every time I pull out the ingredients. It’s a delightful dessert that never fails to impress and brings joy to anyone who takes a bite. Don’t hesitate to get creative with it and make it your own! Happy baking (or no-baking, in this case)! Enjoy!