
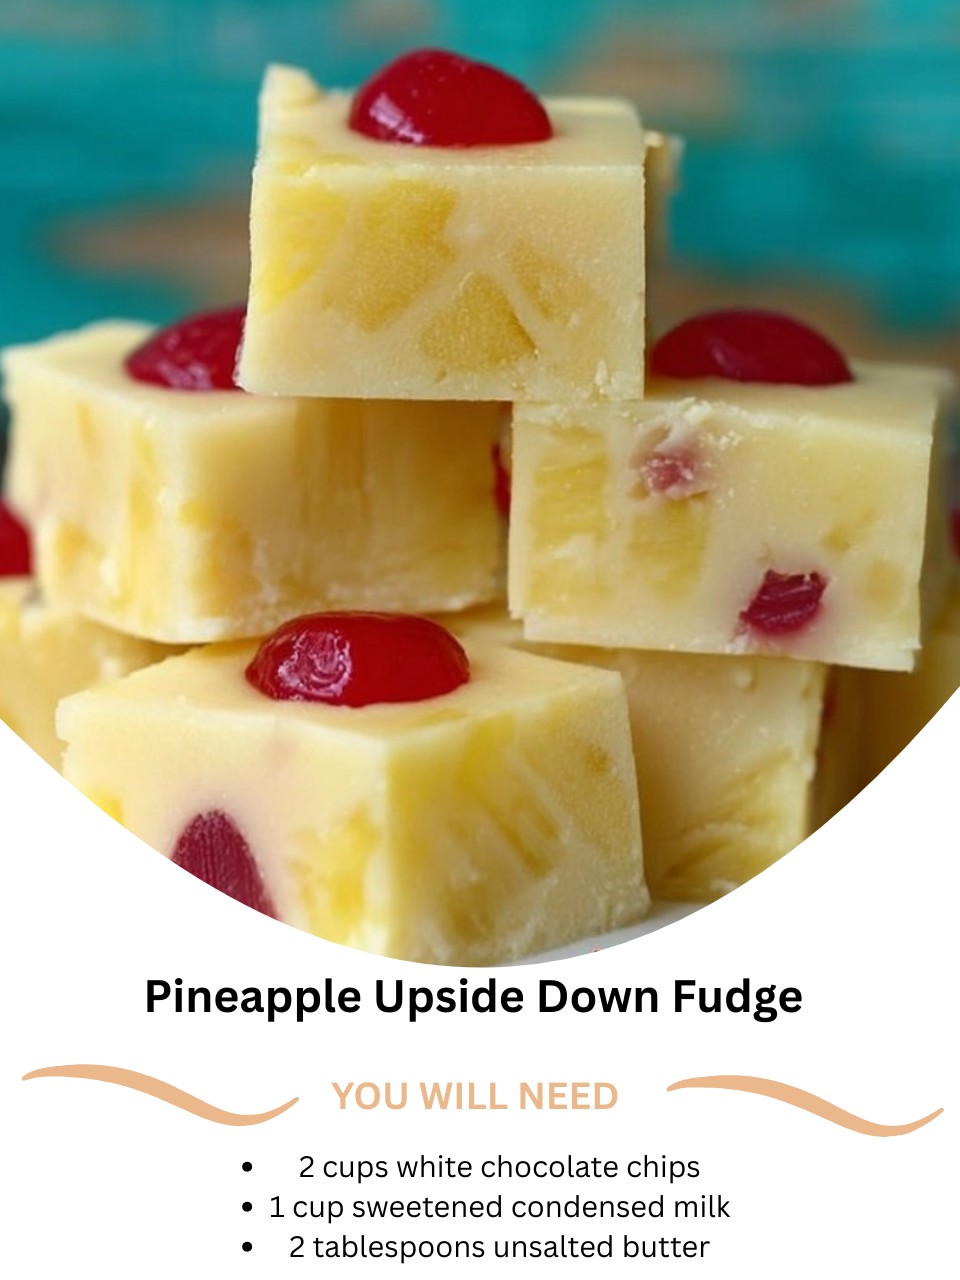
The moment I dreamed up this Pineapple Upside Down Fudge, I was trying to capture the magic of my grandmother’s famous cake in a single, bite-sized piece of candy. As the white chocolate and sweetened condensed milk melted together on my stovetop, my kitchen filled with a sweet, buttery, and tropical scent that was pure nostalgia. When I finally inverted the pan and saw that golden, caramelized layer of pineapple and cherries on top, I let out a genuine squeal of delight. It was stunning, and the first taste—creamy, tangy, and rich—transported me right back to her Sunday dinner table. This fudge isn’t just a treat; it’s a story in every square.
Why You’ll Love This Recipe
You are going to be head-over-heels for this recipe because it takes all the beloved flavors of a classic pineapple upside-down cake—the caramelized fruit, the buttery brown sugar, the moist vanilla crumb—and transforms them into an unbelievably creamy, no-bake fudge. It’s surprisingly simple to make, looks absolutely spectacular when you turn it out, and delivers that perfect sweet-and-tangy balance in every single bite. It’s the ultimate showstopper for a potluck or holiday tray, guaranteed to have everyone asking, “How did you make this?!”
Ingredients
- 2 cups high-quality white chocolate chips
- 1 cup sweetened condensed milk (from a 14 oz can—you’ll use about 2/3 of it)
- 2 tablespoons unsalted butter, divided
- 1/4 cup packed light brown sugar
- 1 can (8 oz / 225 g) pineapple slices in juice, well-drained
- 6-8 maraschino cherries
- 1/2 teaspoon pure vanilla extract
- Pinch of salt
(See the next page below to continue…)
Equipment Needed
- Medium, heavy-bottomed saucepan
- 8×8 inch metal baking pan (do not use glass)
- Small skillet
- Wooden spoon or silicone spatula
- Parchment paper
- Sharp knife for slicing pineapple
Step-by-Step Instructions
This recipe starts at the end, which is the fun part. Before I even think about the fudge base, I prepare the iconic pineapple topping. I take my 8×8 inch metal pan and line it neatly with parchment paper, ensuring there’s overhang on all sides—this is my lifeline for the big flip later. In a small skillet, I melt one tablespoon of the butter over medium heat and stir in the brown sugar. I cook it, stirring constantly, for just 2-3 minutes until it’s bubbling and smells like caramel. I immediately pour this into my parchment-lined pan and carefully spread it into a thin, even layer with the back of a spoon. Now for the artistry: I pat my drained pineapple slices very dry with paper towels (crucial!), cut them into small chunks, and arrange them in the pan along with the whole cherries. I gently press them into the warm caramel layer. This creates the beautiful “top” that will eventually become the bottom.
With my masterpiece base ready, I turn to the fudge itself. In my medium saucepan, I combine the white chocolate chips, the remaining tablespoon of butter, and the one cup of sweetened condensed milk. I turn the heat to the absolute lowest setting. Patience is my mantra here. I stir slowly and constantly with my wooden spoon, watching the chips slowly surrender into a smooth, glossy, ivory-colored pool. I learned the hard way that rushing this with higher heat will cause the delicate white chocolate to scorch or seize into a grainy mess. This gentle melt takes about 5-7 minutes, and the moment it’s perfectly smooth, I remove it from the heat.
Off the heat, I stir in the vanilla extract and a tiny pinch of salt. That pinch of salt isn’t for taste so much as for chemistry—it helps stabilize the mixture and heightens all the other flavors. Now, I carefully pour this luscious white fudge base over my arranged pineapple and cherry layer in the pan. I use my spatula to gently spread it into an even layer, being careful not to disturb the fruit pattern underneath. The warm fudge will slightly melt the caramel below, which is exactly what we want—it all marries together as it chills.(See the next page below to continue…)
Now comes the hardest part: the wait. I let the pan cool on the counter for about 30 minutes before transferring it, uncovered, to the refrigerator. It needs to chill for a solid 4 hours, or better yet, overnight. This allows it to set completely firm. The first time I made this, I tried to invert it after only 2 hours, and it was a sloppy, heartbreaking mess. Trust the full chill! When it’s time, I run a knife around the very edge, grab the parchment overhang, and confidently lift the entire block out onto a cutting board. The big reveal—flipping it over so the gorgeous caramelized fruit is on top—is a moment of pure kitchen triumph.
Pro Tips for Best Results
First, drain and dry your pineapple like your fudge depends on it—because it does. Canned pineapple holds a lot of juice, and extra moisture is the enemy of a smooth, firm fudge texture. After draining in a sieve, I spread the pineapple chunks on a triple layer of paper towels and pat them firmly until the towels come away almost dry. This simple step prevents a weepy, soggy bottom layer and ensures clean slices.
My second tip is about the caramel layer. Don’t walk away from the brown sugar and butter! It goes from perfect to burnt in seconds. I keep the heat at a steady medium and stir nonstop for just 2-3 minutes until it’s fully dissolved and bubbly. Pouring it into the pan immediately stops the cooking. Also, using a metal pan is key here. I tried a glass dish once, and the caramel didn’t set as firmly, making the final flip much trickier.
Finally, use the best white chocolate you can. I’ve tested this with generic chips and high-quality baking bars, and the difference in flavor and smoothness is night and day. A good white chocolate has a creamy vanilla flavor, while cheaper ones can taste waxy and overly sweet. Since the fudge base is primarily white chocolate, this ingredient makes the single biggest difference in the final taste. Trust me, do not skimp here.
Common Mistakes to Avoid
The most common mistake is using fresh or frozen pineapple. I tried using fresh pineapple for a “healthier” version, and the enzymes (bromelain) prevented the fudge from setting properly, and it released far too much water. Canned pineapple in juice is pasteurized, which deactivates those enzymes, and its consistent sweetness and texture are perfect for this recipe. It’s a non-negotiable swap for guaranteed success.(See the next page below to continue…)
Don’t try to speed up the melting process for the fudge base. White chocolate is incredibly delicate. If you turn the heat up past low, you risk scorching the bottom or causing the fats to separate, leaving you with an oily, grainy mixture. I made this mistake the first time, and I had to start over with new ingredients. Low and slow is the only way to achieve that velvety-smooth base.
Avoid using a glass baking dish if you can. Glass is a poor conductor of heat, so the caramel layer takes much longer to cool and set, which can throw off your timing and make the final product harder to release cleanly. A metal pan allows for quicker, more even cooling and setting of both the caramel and the fudge, giving you that perfect, clean flip.
Finally, don’t skip the parchment paper lining. Greasing the pan is not enough. The caramel layer is sticky, and the fudge is rich. Parchment paper with ample overhang is your insurance policy for a flawless, stress-free release. Trying to pry out the first beautiful square without it will likely end in it breaking or the fruit layer sticking to the pan. It’s a one-minute step that saves so much frustration.
Serving Suggestions
I love serving this fudge at a summer barbecue or potluck, displayed on a simple white platter. The golden pineapple and red cherries look like edible sunshine and always become the centerpiece of the dessert table. For a fun twist, I sometimes use a small cookie cutter to cut the fudge into shapes after the big flip, creating individual “mini cakes” that are adorable for a party.
This is also a fantastic giftable treat. Once sliced, I package a few squares in a clear cellophane bag tied with a green ribbon—it instantly evokes a tropical feel. It’s such a unique alternative to cookies or brownies, and because it’s so rich, a little goes a long way, making one batch perfect for several thoughtful gifts for neighbors, teachers, or friends.
For a truly decadent dessert experience, I’ll serve a square slightly chilled alongside a scoop of vanilla bean ice cream or a dollop of freshly whipped cream. The cold, creamy fudge with the cool ice cream is heavenly, and it turns a simple weeknight dessert into something that feels special and celebratory.
Variations & Customizations
For a “Tropical Upside Down” version, I’ve added 1/3 cup of toasted coconut flakes to the fudge base along with the vanilla. After arranging the pineapple, I’ll also sprinkle a thin layer of coconut over the caramel before pouring in the fudge. The toasted coconut flavor adds a wonderful depth and texture that pairs perfectly with the pineapple.
You can play with the fruit! While pineapple and cherry are classic, I’ve had great success using mandarin orange segments (well-drained and patted dry) instead of pineapple for a different citrus twist. I’ve also tried a version with peach slices and a dash of cinnamon in the caramel layer for a fall-inspired “Peach Cobbler Fudge.” The basic method is wonderfully adaptable.
If you want to enhance the cake flavor, add 1/4 teaspoon of butter extract or a tablespoon of dry yellow cake mix (yes, really!) to the melting fudge base. I tested this once on a whim, and it gave the fudge an incredible, authentic “cake batter” flavor that made the whole experience even more magical. Just be sure to stir it in completely so there are no dry pockets.
How to Store, Freeze & Reheat
This fudge stores beautifully in the refrigerator. I keep it in an airtight container, with layers separated by parchment paper, for up to one week. The cool temperature helps maintain its perfect, firm-yet-creamy texture. You can let it sit out for an hour or two before serving to slightly soften, but I don’t recommend leaving it at room temperature for an entire day, as the fruit layer can become sticky.
Yes, you can freeze it for longer storage. I wrap the whole block or individual squares tightly in plastic wrap, then place them in a heavy-duty freezer bag. It will keep for 2-3 months. To thaw, I transfer it to the refrigerator overnight. Thawing at room temperature can cause condensation on the beautiful fruit topping, making it wet.
There is no need to reheat this fudge. It is meant to be enjoyed cool. If it is too firm straight from the fridge, a 10-15 minute rest on the counter is all it needs. The goal is to preserve that stunning glossy fruit topping and the smooth, sliceable texture of the fudge beneath, which is best achieved served chilled.
Conclusion
This Pineapple Upside Down Fudge is more than just a recipe to me; it’s a little slice of edible joy and nostalgia that never fails to impress. It has become my secret weapon for celebrations and my favorite way to bring a taste of the tropics to any table. I hope it brings as much happiness to your kitchen as it has to mine, creating sweet memories with every delicious, gorgeous square. Now, go grab that can of pineapple—it’s time to create some magic.