Method: Build, Fill, and Cook the Perfect Waffle
Step 1: Step 1: Place the 4.2 oz of flour into a medium mixing bowl. The bowl should be wide enough to let you whisk without splashing.
Step 2: Step 2: Add the 5 fl oz of whole milk to the flour. Pour slowly while stirring to avoid lumps.
Step 3: Step 3: Stir in the 0.7 fl oz maple syrup, then whisk the mixture until the batter is smooth and glossy, about 30 seconds. The batter should be pourable but not runny.
Step 4: Step 4: Preheat a standard waffle maker on medium heat for 2 minutes. Lightly brush the lower grid with a touch of oil or non‑stick spray.
Step 5: Step 5: Pour roughly half of the batter onto the lower grid, spreading it just enough to cover the surface without spilling over the edges.
Step 6: Step 6: Drop the 2.1 oz of smooth peanut butter onto the center of the batter. Use a spoon to spread it just a little; you want a concentrated core.
Step 7: Step 7: Quickly pour the remaining batter over the peanut butter, sealing the filling inside. The top layer should completely cover the peanut butter so it doesn’t ooze out.
Step 8: Step 8: Close the waffle maker lid and cook for 4–5 minutes, or until the waffle turns golden brown and the edges are crisp. Listen for a faint sizzle; that signals the batter is setting.
Step 9: Step 9: Open the waffle maker. The waffle should release easily and look uniformly golden. If it sticks, a quick spray before the next batch helps.
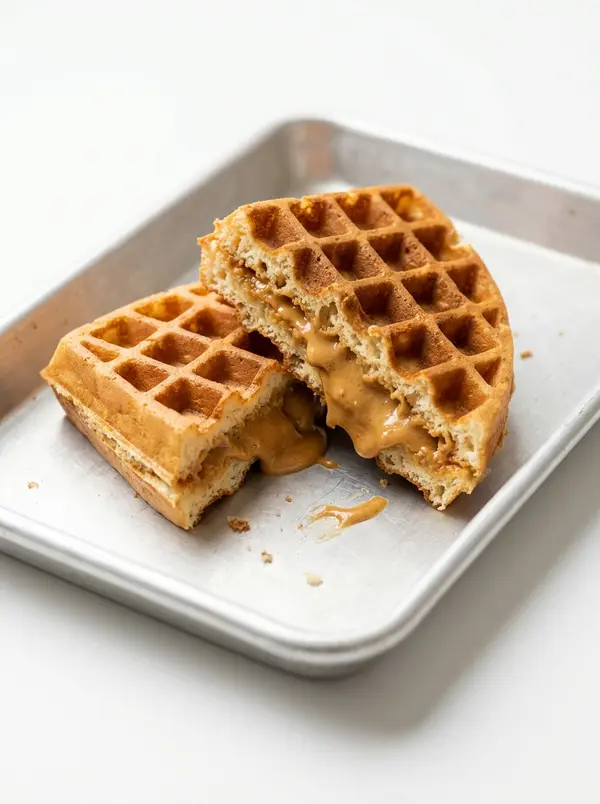
Step 10: Step 10: Slice the waffle in half with a sharp knife to reveal the warm, creamy peanut butter center. Serve immediately for the best texture.
What Makes This Dish Work
The two‑layer batter creates a sealed pocket that keeps the peanut butter from leaking.
Whole milk adds enough fat to produce a tender crumb while still allowing a crisp exterior.
Only five ingredients keep prep time under fifteen minutes, perfect for busy mornings.
The waffle iron’s heat distributes evenly, giving a uniform golden color without burning.
Maple syrup adds a subtle sweetness that balances the rich peanut butter without overwhelming it.
Avoiding Leaky Waffles and Fixing Runny Centers
Batter too thick: Add a splash of milk, one tablespoon at a time, until it flows easily.
Peanut butter leaks out: Ensure the top layer completely covers the filling before closing the lid.
Waffle sticks to the iron: Lightly oil both grids before each pour, and wait for the iron to be fully preheated.
Undercooked center: Extend cooking by 30 seconds; the waffle should spring back when pressed.
Overly soggy texture: Reduce the maple syrup or omit it if you prefer less moisture.
Uneven browning: Rotate the waffle iron halfway through cooking if your model has hot spots.
Swaps and Add‑Ons That Still Shine
Nut‑free version: Replace smooth peanut butter with almond or cashew butter; keep the same amount.
Chocolate twist: Drizzle 0.5 fl oz melted dark chocolate over the finished waffle for a quick ganache.
Spice boost: Stir a pinch of cinnamon into the batter for warm flavor notes.
Extra crunch: Sprinkle chopped toasted peanuts on top before serving for added texture.
Extending Freshness of Peanut Butter Waffles
Store any leftover waffles in an airtight container in the refrigerator for up to three days. Reheat in a toaster or a hot skillet for two minutes per side to restore crispness. For longer storage, wrap each waffle tightly in plastic wrap and freeze; they’ll keep for two months. Reheat frozen waffles in a toaster or bake at 350°F (175°C) for eight minutes.
Toppings and Pairings for Peanut Butter Stuffed Waffles
Serve the waffles topped with a drizzle of maple syrup and a dusting of powdered sugar for a classic breakfast. Pair with fresh berries for acidity, or add a dollop of Greek yogurt for extra creaminess. They also make a satisfying snack when sliced and eaten cold.
Peanut Butter Stuffed Waffles Questions
How do I prevent the peanut butter from spilling out while cooking?
Make sure the second pour of batter fully covers the peanut butter and seals the edges. A thick enough top layer creates a barrier that holds the filling in as the waffle cooks.
Can I use a non‑stick waffle maker instead of a regular one?
Yes, a non‑stick model works well and often requires less oil. Just preheat it as usual and follow the same pouring technique; the batter will release easily.
What if I don’t have maple syrup on hand?
Swap the maple syrup for an equal amount of honey, agave nectar, or even a light corn syrup. The sweetness level stays similar, and the texture of the batter remains unchanged.
Is it possible to make these waffles gluten‑free?
Replace the all‑purpose flour with a 1‑to‑1 gluten‑free flour blend. Ensure the blend contains xanthan gum for structure; the cooking time and technique stay the same.
How many waffles can I make in one batch?
Most standard waffle irons produce one large waffle per cycle. If you have a larger iron with multiple grids, you can double the batter and fill each compartment, but keep the cooking time consistent for each waffle.
Related Recipes You Might Enjoy
If you love the peanut butter flavor, try the Peanut Butter Banana Pancakes for a fruity twist, or the rich Peanut Butter Brownies for an indulgent dessert.