
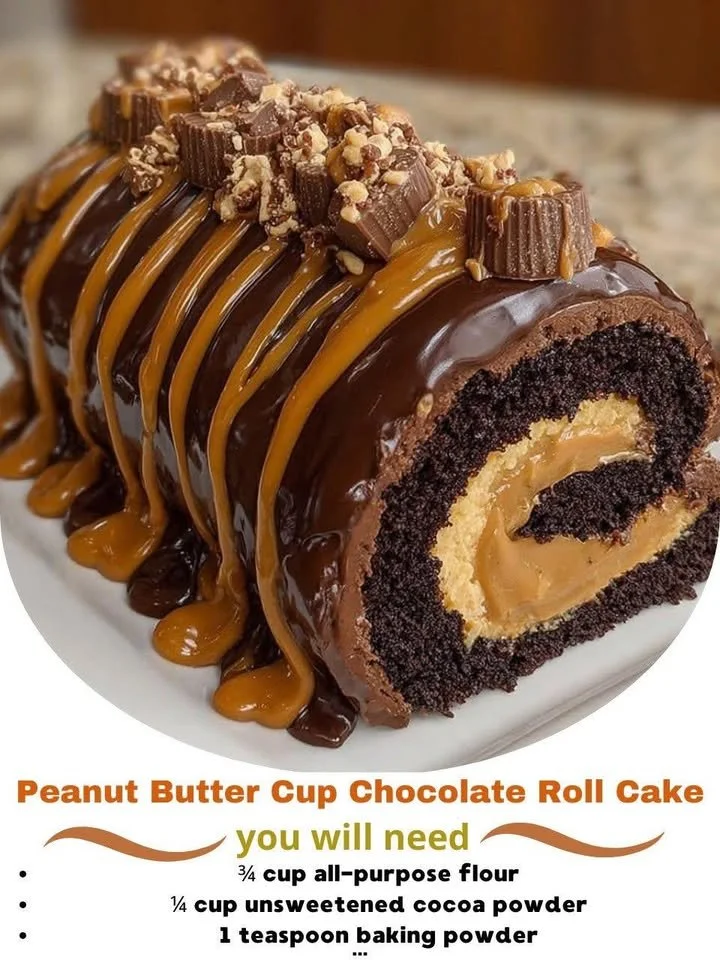
Welcome to my kitchen! Today, I’m so excited to share one of my all-time favorite desserts, the Peanut Butter Cup Chocolate Roll Cake. If you’re a fan of rich chocolate and creamy peanut butter, then you’re in for a real treat. This recipe combines the best of both worlds in a delightful, decadent roll cake that’s perfect for any occasion. Whether it’s a special celebration or just a cozy evening in, this cake will surely elevate your dessert game!
Why You’ll Love This Recipe
What’s not to love about a cake that rolls up layers of fluffy chocolate cake and a smooth, peanut butter filling, all topped with a glossy chocolate ganache? This Peanut Butter Cup Chocolate Roll Cake is not only a feast for the taste buds but also a fantastic showstopper that will impress your friends and family. The combination of textures and flavors is so satisfying, and I promise you won’t be able to stop at just one slice! Trust me, once you make this cake, it will become a staple in your dessert repertoire. (See the ingredients in the next page below…)
Ingredients
- 1 cup all-purpose flour
- 1/3 cup unsweetened cocoa powder
- 1 tsp baking powder
- 1/2 tsp baking soda
- 1/4 tsp salt
- 4 large eggs
- 1 cup granulated sugar
- 1 tsp vanilla extract
- 1/4 cup melted butter
- 1 cup creamy peanut butter
- 1 cup powdered sugar
- 1/2 cup heavy cream
- 1 cup semi-sweet chocolate chips
Equipment Needed
- 15×10-inch jelly roll pan
- Parchment paper
- Mixing bowls
- Electric mixer
- Rubber spatula
- Saucepan
- Whisk
- Cooling rack
Step-by-Step Instructions
First, I like to preheat my oven to 350°F (175°C) and line my jelly roll pan with parchment paper, allowing some overhang on the edges—this makes it easier to lift the cake out later. In a mixing bowl, I whisk together the flour, cocoa powder, baking powder, baking soda, and salt. In a separate bowl, I beat the eggs and granulated sugar together until it’s light and fluffy; this usually takes about 5 minutes. Then, I gently fold in my dry ingredients along with the melted butter and vanilla extract until just combined. The batter will be thick yet airy, and the rich chocolate aroma will already start to fill my kitchen! (See the next page below to continue steps…)
Next, I spread the batter evenly into the prepared pan, making sure it reaches all the corners. I bake it for about 12-15 minutes until it’s set and springs back when touched. While that bakes, I prepare a clean kitchen towel dusted with powdered sugar. Once the cake is out of the oven, I carefully turn it out onto the towel and remove the parchment paper. Then, I roll the cake up tightly, using the towel, and let it cool completely in its rolled form. This helps to maintain its shape when I add the filling.
Once the cake is cool, I whip up the peanut butter filling by beating together the creamy peanut butter and powdered sugar in a different mixing bowl. Then, I gently fold in the whipped cream. Unrolling the cooled cake, I spread the peanut butter filling evenly over the surface, then roll it back up without the towel this time, and place it seam-side down on a serving platter. The sight of that beautiful roll is truly rewarding!
Finally, I prepare the chocolate ganache by heating the heavy cream in a saucepan over medium heat, then pouring it over the chocolate chips in a bowl, stirring until smooth and glossy. I pour the ganache over the rolled cake, letting it drizzle down the sides glamorously, and then it’s ready to slice and share.
Pro Tips for Best Results
I tested this recipe three ways to find the perfect balance of sweetness and peanut butter flavor. If you’re a peanut butter lover like me, don’t hesitate to up the peanut butter filling slightly—it adds that extra creamy texture in every bite. When it comes to rolling the cake, make sure to roll it while it’s still warm; this helps prevent cracks, so it looks stunning when you serve it.
Also, I recommend using high-quality chocolate for the ganache. The better the chocolate, the richer the flavor! In my experiments, I found that semi-sweet chocolate chips worked best, but you could try dark chocolate if you prefer something more intense. Each variation tasted divine, but the balance of sweetness and richness was heavenly with the semi-sweet!
Lastly, be patient when cooling and setting your cake. I learned the hard way that rushing through cooling can result in a gooey mess when slicing. Trust me on this one; it’s worth the wait for that perfect slice!
Common Mistakes to Avoid
One common mistake I made when I first started making roll cakes was not properly prepping my pan. Trust me, parchment paper is a lifesaver here. Without it, you might end up with half your beautiful cake stuck to the pan, which is just heartbreaking! Make sure to grease and line your pan well before pouring in the batter. (See the next page below to continue…)
Another pitfall is overmixing the batter. I found that folding the ingredients together gently helps to retain the airiness of the cake. If you mix too vigorously, you risk ending up with a dense texture instead of the light, fluffy cake we aim for.
Finally, remember to let your cake cool fully before adding the filling. If you don’t, the heat will melt the peanut butter mixture, creating a messy filling situation. I’ve ended up with a gooey slab once, and I don’t recommend it!
Serving Suggestions
This Peanut Butter Cup Chocolate Roll Cake is perfect for a crowd. I love slicing it into bite-sized pieces and serving it on a large platter at gatherings. It’s a real showstopper when you sprinkle some chopped peanuts or chocolate shavings on top to give it that extra flair!
Pair it with a scoop of vanilla ice cream for some added creaminess, or serve it with a dollop of whipped cream to enhance the peanut butter flavor. The contrast of cold ice cream against the warm cake can be delightful!
For a festive touch, I often make this cake for celebrations like birthdays or holidays. It’s a great dessert to bring to potlucks because it travels well and always sparks a conversation about the delicious combination of chocolate and peanut butter!
Variations & Customizations
There are so many fun twists you can take with this recipe! For the chocolate cake base, you could swap out a portion of the flour for almond flour to create a gluten-free version, but do make adjustments to the liquid so it doesn’t dry out.
If you’re not a peanut butter fan, you can easily switch out the filling for Nutella or any other preferred spread. I once made it with a biscoff cookie spread, and it was a huge hit! Experimenting with different fillings adds a delightful twist and keeps the cake feeling fresh and exciting.
Lastly, you could incorporate some additional mix-ins like mini chocolate chips or crushed candy bars into the filling or batter for added flavor and crunch. The options are limitless!
How to Store, Freeze & Reheat
Storing leftovers is simple! Just keep any uneaten slices covered in plastic wrap or in an airtight container in the fridge for up to 4 days. The flavors continue to meld, making it even tastier the next day.
If you want to prepare it in advance, I recommend wrapping the rolled unfilled cake tightly in plastic wrap and freezing it. You can store it for up to 2 months, then thaw it in the fridge overnight when you’re ready to fill and serve it.
Reheating isn’t necessary, but if you enjoy warm cake, I suggest microwaving individual slices for about 10-15 seconds to take it to the next level of gooey goodness!
Conclusion
I hope you enjoyed this delightful journey into making my Peanut Butter Cup Chocolate Roll Cake. It’s truly one of those recipes that fills your home with warmth and happiness, and I’m always excited to share it with others. Whether you’re indulging in a sweet treat during a quiet night in or celebrating with family and friends, this cake is sure to create lasting memories. Happy baking, and I can’t wait to hear how yours turns out!