
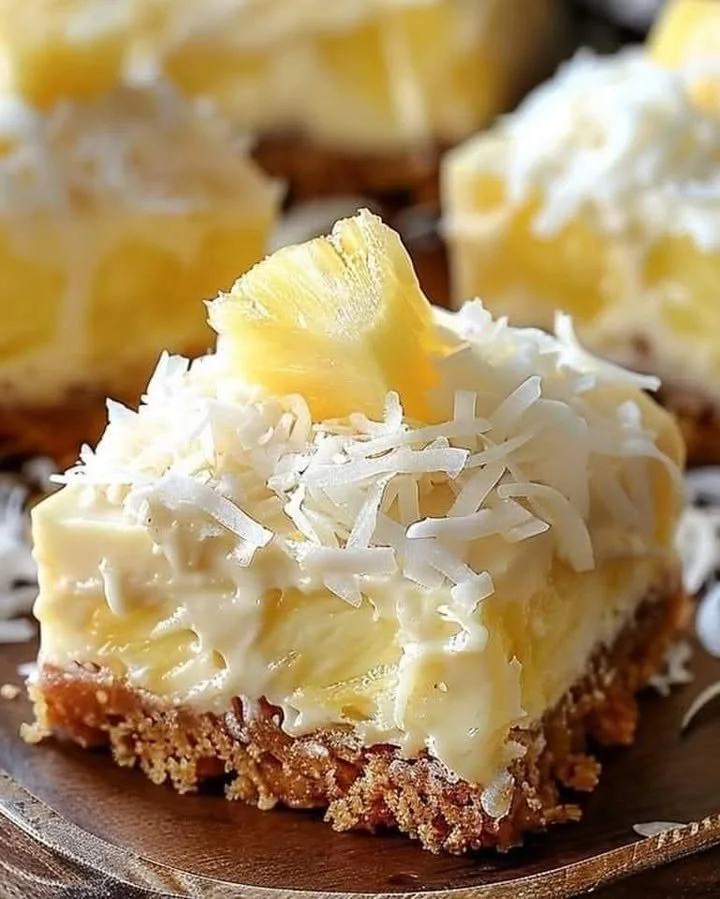
I absolutely adore whipping up treats in my kitchen, especially when they are easy, refreshing, and require no baking. One of my go-to recipes for a warm day is my Refreshing No-Bake Pineapple Coconut Bars. They’re a delightful blend of tropical flavors that can instantly transport me to a sun-soaked beach, even if I’m just sitting at home. With their creamy, luscious texture and a hint of sweetness, these bars are perfect for sharing with family and friends or simply indulging in on a lazy afternoon.
Why You’ll Love This Recipe
This recipe captures the essence of summer in every bite, combining the sweet tanginess of pineapple with the creamy richness of coconut. It’s incredibly easy to make, and you don’t even have to turn on your oven! Plus, each bite is satisfying without being too heavy, making these bars the perfect snack or dessert for any occasion. I can promise you’ll be going back for seconds! (See the ingredients in the next page below…)
Ingredients
– 1 cup of crushed graham crackers
– ½ cup unsweetened shredded coconut
– ⅓ cup granulated sugar
– ½ cup unsalted butter, melted
– 1 can (20 oz) crushed pineapple, drained
– 1 cup cream cheese, softened
– 1 cup whipped topping
– 1 teaspoon vanilla extract
Equipment Needed
– Mixing bowls
– Measuring cups and spoons
– A spatula
– An 8×8 inch baking pan
– Parchment paper (optional for easy removal)
– Refrigerator
Step-by-Step Instructions
To start off, I gather all my ingredients and line an 8×8 inch baking pan with parchment paper for easy removal later on. In a large mixing bowl, I first combine the crushed graham crackers, shredded coconut, and sugar. Once those are mixed, I stir in the melted butter until the mixture resembles wet sand. I press this crust mixture firmly into the bottom of the baking pan to create a nice base for the bars. After that, I let it set in the fridge for about 10 minutes to firm up. (See the next page below to continue steps…)
Next, I prepare the filling. In a separate bowl, I beat the softened cream cheese until it’s nice and smooth. I then fold in the drained crushed pineapple, whipped topping, and vanilla extract, mixing everything until it’s evenly blended and fluffy. The combination of cream cheese and pineapple smells heavenly, reminding me of tropical vacations! I spread this delicious filling on top of the crust. Once everything is layered nicely, I smooth the top with a spatula and cover it with plastic wrap, allowing it to chill in the refrigerator for at least 2-3 hours (or overnight if I’m feeling patient!).
When it’s finally chilled and set, I remove the bars from the pan using the parchment paper, and cut them into squares. The moment I slice through, I can see the gorgeous layers and slightly toasted coconut flecks peeping through. A sprinkle of extra shredded coconut on top makes them look extra pretty, perfect for popping into my mouth!
Pro Tips for Best Results
One thing I learned is to ensure that the pineapple is adequately drained—if it has excess liquid, the bars may become soggy. I usually let it sit in a strainer for a bit while I prepare everything else. Also, using full-fat cream cheese gives these bars a richer texture and a creamier taste, which I find really elevates the flavor.
I also like to chill the bars overnight if I can. This extra time helps all the flavors meld together beautifully, and it makes them easier to slice! Lastly, be sure to use the sweetened shredded coconut; it provides that extra touch of sweetness that pairs perfectly with the pineapple.
As for the crust, I love to play around with the graham crackers. Sometimes, I’ll use flavored ones like cinnamon graham or even add some nuts for a bit of crunch! It’s all about personalizing it to my taste.
Common Mistakes to Avoid
One mistake I often see (and made myself a couple of times) is not pressing the crust down hard enough. It needs to hold its shape, especially when slicing. If it’s too loose, the filling will make it crumble. So, I always give it a good press with the bottom of a measuring cup or my hands to ensure it’s tightly packed. (See the next page below to continue…)
Another pitfall is skimping on the chilling time. Rushing this step can lead to messy squares that don’t hold their shape. While it might be tempting to take a slice out early, trust me, waiting pays off!
Lastly, don’t underestimate the power of tasting as you go! Sometimes, I add a little more sugar or coconut based on what I’m feeling that day. Don’t hesitate to adjust the sweetness or flavors to suit your palate.
Serving Suggestions
When it comes to serving these fruity bars, I absolutely love presenting them on a colorful platter garnished with fresh mint leaves. It makes for a delightful and fresh look! Pairing them with a scoop of vanilla ice cream creates an indulgent dessert experience that I can’t resist.
For a brunch idea, I like to cut them into small squares and include them on a dessert table alongside fresh fruit and whipped cream. They are a crowd-pleaser, and I guarantee you’ll be hearing compliments left and right!
If I’m feeling a bit festive, sometimes I drizzle some melted chocolate on top before serving for an added touch of decadence. Just a little drizzle takes them up a notch and makes them unforgettable.
Variations & Customizations
I love experimenting with this recipe! Sometimes, I swap out the crushed pineapple for crushed mango or strawberries for a fun twist. Each fruit integrates beautifully, bringing its unique flavor, and it’s a great way to mix things up if I’m looking for a change.
Another idea I recently tried was incorporating a bit of whipped cream into the filling for a lighter, fluffier texture. It was a hit, and I can see how this could be a delightful way to customize the bars based on my audience. Adding lemon or lime zest can also bring a bright, zesty note that complements the tropical flavors wonderfully.
For a grown-up twist, I’ve even added a splash of coconut rum to the filling! It adds a bit of warmth and depth that really enhances the overall tropical vibe, perfect for summer gatherings.
How to Store, Freeze & Reheat
These Pineapple Coconut Bars are incredibly easy to store. I simply keep any leftovers in an airtight container in the refrigerator, where they’ll stay fresh for up to a week—if they last that long! The flavors seem to get even better as they sit.
If I want to make a batch ahead of time, I often double the recipe and freeze half. Just wrap them tightly in plastic wrap and place them in a freezer-safe container. When I’m ready to enjoy them, I thaw them in the fridge overnight, and they taste as fresh as the day I made them.
Reheating isn’t necessary for these bars, as they are best served chilled. However, if I ever find myself wanting to warm them up a little, I suggest placing a slice in the microwave for just a few seconds to take the chill off—just be careful not to melt them!
Conclusion
In conclusion, my Refreshing No-Bake Pineapple Coconut Bars have become a staple in my kitchen, especially during the warmer months. They’re fun to make and delightful to eat, and I hope you enjoy them just as much as I do! Whether you’re hosting a summer gathering or just want a sweet treat for yourself, these bars are sure to be a hit. Happy cooking!