
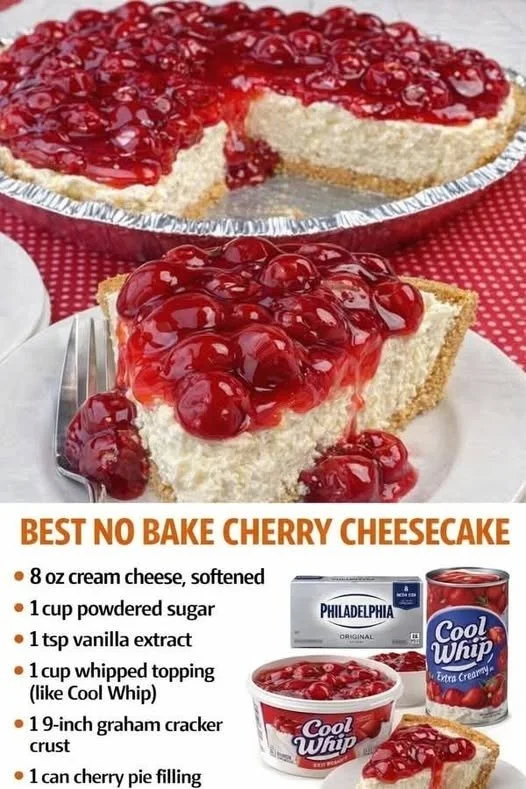
I absolutely love desserts that are quick, easy, and utterly delightful, which is why my No-Bake Cherry Cheesecake Dessert has become a staple in my kitchen. Perfect for warm weather when you don’t want to heat up your oven, this delicious treat combines a creamy cheesecake filling with a sweet cherry topping. It’s the kind of dessert that brings everyone together, whether it’s a family gathering or a simple weekend treat to enjoy with a cup of coffee.
Why You’ll Love This Recipe
This No-Bake Cherry Cheesecake Dessert is not only incredibly simple to whip up, but it also delivers on flavor with every luscious bite. The creamy filling melts in your mouth while the tart cherries add just the right amount of zing. Plus, it’s visually stunning—there’s nothing like a gorgeous dessert to impress your guests! So grab your ingredients and let’s get started! (See the ingredients in the next page below…)
Ingredients
– 1 cup graham cracker crumbs
– 1/4 cup unsalted butter, melted
– 2 cups cream cheese, softened
– 1 cup powdered sugar
– 1 teaspoon vanilla extract
– 1 cup heavy whipping cream
– 1 can cherry pie filling (or fresh cherries, if you prefer)
Equipment Needed
– Mixing bowls
– Electric mixer or whisk
– 9-inch pie dish or springform pan
– Spatula
– Measuring cups and spoons
Step-by-Step Instructions
To start, I combine the graham cracker crumbs and melted butter in a mixing bowl to create a lovely crust. Once it’s well mixed, I press it evenly into the bottom of my pie dish, making sure to pack it down firmly. It’s satisfying to see the crust taking shape! Let that rest in the fridge while I prepare the filling. (See the next page below to continue steps…)
Next, in another large mixing bowl, I beat together the softened cream cheese and powdered sugar until it’s smooth and creamy. The mixture looks so rich and inviting! I can’t help but sneak a little taste—yum! I then add in the vanilla extract and mix it in well, giving it that added layer of flavor. In a separate bowl, I whip up the heavy whipping cream until stiff peaks form and then gently fold it into the cream cheese mixture. This step is essential because it makes the filling light and airy, elevating the overall texture of the dessert.
Once my filling is ready, I pour it over the chilled crust, smoothing it out with my spatula to make an even layer. It’s starting to look like a real cheesecake! I then cover it with plastic wrap and pop it back in the fridge, allowing it to set for at least four hours, but overnight is even better if you can wait. This is a great time for me to clean up the kitchen and savor the delightful anticipation of what’s to come.
When I’m ready to serve, I take it out of the fridge and generously spoon the cherry pie filling over the top. The bright red cherries look so enticing against the creamy cheesecake, and the sweet aroma wafts through my kitchen, making my mouth water! Now it’s time to slice it up and enjoy this beautiful no-bake dessert.
Pro Tips for Best Results
First and foremost, I highly recommend using full-fat cream cheese for the best flavor and creaminess in your cheesecake filling. I tested this recipe with low-fat cream cheese, and while it’s still good, it doesn’t have that luxurious mouthfeel that makes this dessert truly special. Trust me, the extra richness is worth it.
Another tip I’ve learned from my own trials is to always whisk the heavy cream until it reaches stiff peaks. This is crucial for achieving that light, airy texture in the filling. If you over-whisk, you might accidentally turn it into butter, which isn’t what we want for our cheesecake, so watch that mixer carefully!
Lastly, if you plan to make this dessert ahead of time, I suggest preparing the crust and filling the day before. It gives the cheesecake extra time to set up nicely, and when your guests arrive, all you have to do is add the cherry topping and slice it up—super easy!
Common Mistakes to Avoid
One common mistake people make is not allowing the cream cheese to soften before mixing. If you try to blend cold cream cheese, you’ll end up with lumps in your filling. I made that mistake once, and let me tell you, the texture was far from smooth! Make sure to take it out of the fridge well in advance to warm up.
Another thing to watch out for is the crust. If you don’t pack the graham cracker crust tightly enough, it might fall apart when you slice into the cheesecake. On my first attempt, I learned the hard way that a little pressure goes a long way in ensuring a sturdy base for this dessert.
Also, be cautious with the cherry topping. If you pour it on while the cheesecake is still too warm, it can seep into the filling. I suggest waiting until the cheesecake has fully set in the fridge before adding your cherries for that perfect presentation. (See the next page below to continue…)
Serving Suggestions
This No-Bake Cherry Cheesecake Dessert is perfect for any occasion, but I love serving it at family gatherings and summer barbecues. The refreshing cherries make it an ideal choice for warm weather, and I often find myself making two to ensure there are enough slices for everyone!
If I’m feeling a bit fancy, I’ll drizzle some chocolate sauce over the top or garnish the slices with whipped cream for that extra touch. It’s a wonderful way to elevate an already delightful dessert, and my guests are always impressed when I go the extra mile.
Finally, I love serving this cheesecake with a side of ice cream—a scoop of vanilla perched alongside just amplifies the whole experience! It’s a simple yet satisfying way to finish off a meal and leave everyone with smiles on their faces.
Variations & Customizations
While I adore the classic cherry topping, I’ve experimented with a few variations that I think you’ll love too! One of my favorites is replacing the cherry filling with fresh blueberries or strawberries. You can even mix and match seasonal fruits to create a beautiful, colorful dessert throughout the year.
Another variation I’ve enjoyed is adding a touch of lemon zest to the filling. It adds a lovely citrus note that brightens up the cheesecake and pairs beautifully with many fruit toppings. Sometimes, I’ll even mix in some crushed cookies or nuts into the crust for an added crunch.
If you’re feeling adventurous, how about a chocolate cheesecake? Simply swap out some of the cream cheese for cocoa powder and adjust the sweetness a bit. You can’t go wrong with chocolate, and this twist has been a total hit whenever I’ve served it!
How to Store, Freeze & Reheat
If there are any leftovers (which doesn’t happen often in my house!), this cheesecake can be stored in the fridge for up to five days. I recommend covering it with plastic wrap to keep it fresh and prevent it from absorbing any odors from the fridge.
For longer storage, this cheesecake can be frozen for up to three months. Just be sure to wrap it well in plastic wrap and then place it in an airtight container. When you’re ready to indulge again, simply transfer it to the fridge to thaw overnight.
I don’t recommend reheating it, as this dessert is best served chilled and fresh. Just take it out of the fridge, let it sit for a bit to soften slightly, and dive in!
Conclusion
I hope you enjoy making and indulging in this No-Bake Cherry Cheesecake Dessert as much as I do. It’s such a delightful treat that’s always a crowd-pleaser. Remember, it’s all about the little moments—making memories in the kitchen and sharing them with loved ones. Happy baking, or should I say, “mixing”? Enjoy every delicious bite!