
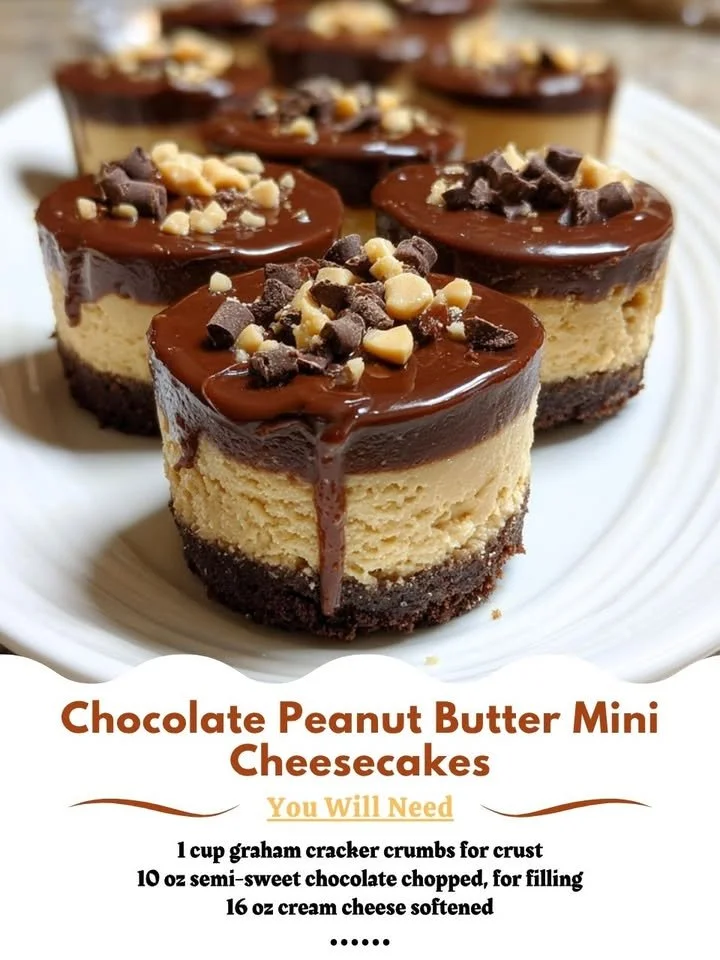
Chocolate Peanut Butter Mini Cheesecakes! These little gems are the perfect bite-sized delights, ideal for a sweet snack or a decadent dessert at your next gathering. The combination of rich chocolate and creamy peanut butter will leave you wanting more, and trust me, it’s a crowd-pleaser every time I make them!
Why You’ll Love This Recipe
You will absolutely adore this recipe because it brings together two of the most beloved flavors—chocolate and peanut butter—in a delightful mini cheesecake form. They are easy to prepare, and the individual portions make them perfect for sharing (or not!). Plus, with a smooth and creamy filling atop a crunchy graham cracker crust, each bite is a heavenly experience. Whether you’re a seasoned baker or a novice in the kitchen, these cheesecakes will make you feel like a pro! (See the ingredients in the next page below…)
Ingredients
– 1½ cups graham cracker crumbs
– ⅓ cup sugar
– ½ cup unsalted butter, melted
– 16 oz cream cheese, softened
– 1 cup powdered sugar
– ½ cup creamy peanut butter
– 1 teaspoon vanilla extract
– 2 large eggs
– 1 cup chocolate chips
– ½ cup heavy cream
Equipment Needed
– Muffin tin
– Mini cupcake liners
– Mixing bowls
– Electric mixer
– Double boiler or microwave-safe bowl
– Whisk
– Rubber spatula
– Measuring cups and spoons
Step-by-Step Instructions
Let’s get started on these delightful mini cheesecakes! First, preheat your oven to 325°F (163°C). In a mixing bowl, combine the graham cracker crumbs, sugar, and melted butter until the mixture resembles wet sand. Press this mixture into the bottom of the mini cupcake liners in the muffin tin, making sure it’s compact. Bake for about 5 minutes, then take them out of the oven and let them cool while you make the filling. (See the next page below to continue steps…)
Next, in a separate large bowl, beat the softened cream cheese until it’s creamy and smooth. Gradually add the powdered sugar, creamy peanut butter, and vanilla extract, mixing until well combined. Then, add the eggs one at a time, beating until just incorporated; we want to avoid overmixing. Once your filling is ready, spoon it generously into the cooled crusts, filling each liner almost to the top.
Now, for the chocolate topping! In a double boiler (or the microwave), melt the chocolate chips and heavy cream together, stirring until smooth. Once combined, drizzle this luscious chocolate sauce on top of each cheesecake. It’s okay if it drips a little—more chocolate is always better! Bake the mini cheesecakes for 15-18 minutes, or until the edges are set but the center still has a slight jiggle. Let them cool at room temperature before refrigerating for at least two hours.
Once they’re chilled, it’s time to enjoy! You can serve them as is, or feel free to add whipped cream on top for an extra touch of sweetness.
Pro Tips for Best Results
During my experimentation, I found that letting the cream cheese soften at room temperature before mixing really makes a difference in achieving that creamy texture. No one likes lumps in their cheesecake! I also recommend chilling them overnight if you can; the flavors meld beautifully this way, and the texture becomes super smooth and lovely.
Another tip is to use high-quality chocolate for the topping. The rich chocolate really shines through, and it pairs beautifully with the peanut butter. I’ve made these with both dark and milk chocolate, and both work wonderfully, so it really depends on your sweet tooth! Lastly, if you’re feeling adventurous, try adding a sprinkle of sea salt on top of the chocolate for a salted chocolate-peanut butter version—it’s divine!
Common Mistakes to Avoid
One common mistake I made on my first try was overmixing the filling. It might be tempting to keep mixing until everything is perfectly smooth, but overmixing can lead to a dense and heavy texture. I learned that just mixing until the ingredients are combined works best for that light and airy cheesecakes. (See the next page below to continue…)
Another pitfall is not allowing enough time for the cheesecakes to cool before refrigerating. If they’re still warm when you put them in the fridge, the condensation can lead to a watery topping. Trust me, letting them cool completely is key for that gorgeous presentation when you serve them!
Also, be sure to check your oven’s temperature with an oven thermometer, as the temperature can vary. This can make a big difference in how your cheesecakes bake. And finally, don’t skip the chilling step! They truly need that time to firm up properly, so patience is a must here!
Serving Suggestions
When it comes to serving these mini cheesecakes, I love to present them on a beautiful platter, garnished with fresh raspberries or strawberries. Not only do they add a pop of color, but the tartness of the berries balances out the richness of the cheesecakes perfectly.
For special occasions, I sometimes drizzle additional melted chocolate artfully on the platter and sprinkle crushed nuts around. It looks stunning, and guests are always impressed by the presentation! You can also serve these with a scoop of vanilla ice cream for an extra sweet treat.
Another idea I love is to host a mini cheesecake bar where everyone can customize their toppings! Some wonderful choices can be crushed cookies, caramel sauce, or even a dollop of flavored whipped cream. This way, each bite can be a new flavor experience!
Variations & Customizations
If you’re looking to switch things up, there are plenty of variations you can try. For a fruity twist, consider adding a layer of fresh fruit puree on top instead of chocolate. Strawberry or raspberry puree adds a refreshing zing that complements the richness beautifully. If you’re a cookie dough lover, you could fold in some edible cookie dough pieces into the peanut butter filling for added texture and flavor!
You can also experiment with different types of nut butter! Almond butter or cashew butter could be great substitutes if you’re looking for a change. Each will impart its own unique flavor to the cheesecake. For a gluten-free version, simply use gluten-free graham crackers for the crust—no one will even notice the difference!
Finally, consider adding some spices to the cream cheese mixture for an extra kick. A pinch of cinnamon or a hint of espresso powder can elevate the flavor profile in a delightful way.
How to Store, Freeze & Reheat
Storing these mini cheesecakes is a breeze. Just keep them in an airtight container in the fridge, and they’ll last for about a week—if they last that long! I usually find myself sneaking one (or two!) out every day after they’re made.
If you’d like, you can also freeze them for up to three months. Just be sure to wrap each cheesecake individually in plastic wrap and then place them in a freezer-safe container. When you’re ready to enjoy them again, let them thaw in the fridge overnight for the best texture.
As for reheating? These cheesecakes are best enjoyed cold! If you saved any without the chocolate topping, you could gently warm them in the microwave for a few seconds, but otherwise, I recommend savoring them straight from the fridge for that cool, creamy experience.
Conclusion
I hope you find joy in making these Chocolate Peanut Butter Mini Cheesecakes as much as I do! They’re fun to prepare, delightful to eat, and sure to bring smiles to anyone who tries them. Whether it’s a family gathering or a cozy night in, these treats are always a hit. Happy baking, and may your kitchen be filled with sweet, delicious aromas!