
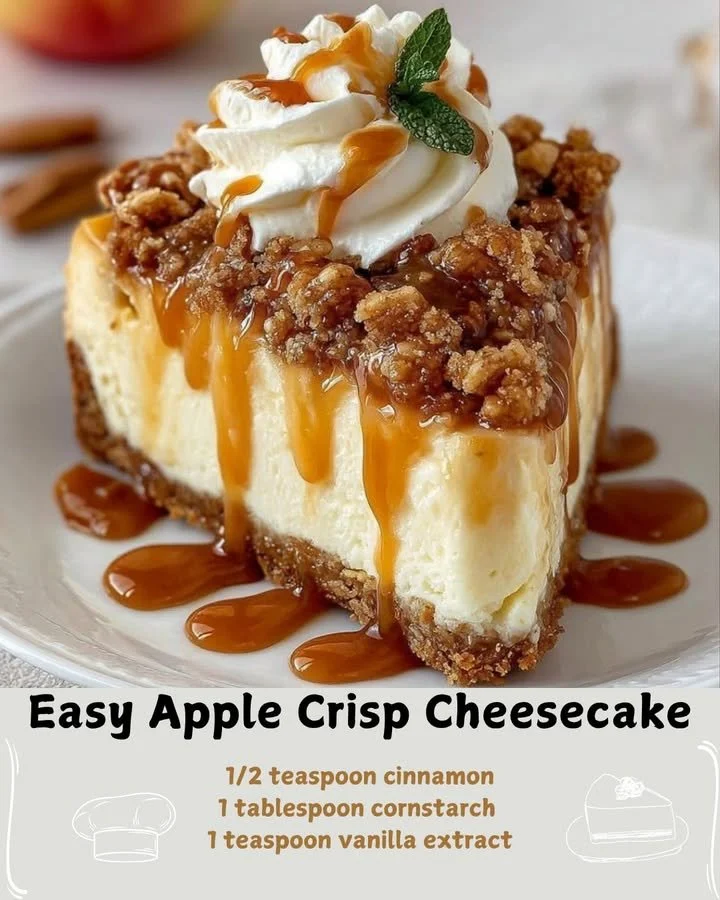
As the leaves begin to change colors and the air turns crisp, all I can think about is cozying up with a slice of something sweet. That’s when my Easy Apple Crisp Cheesecake comes into play. It’s the perfect dish to combine the rich, creamy texture of cheesecake with the warm, spiced flavors of apple crisp. No matter the occasion, this dessert will fill your home with mouthwatering aromas and create lasting memories around the table.
Why You’ll Love This Recipe
This Easy Apple Crisp Cheesecake is not just a dessert; it’s an experience that captures the essence of fall. The combination of luscious cheesecake, spiced apple filling, and a crunchy topping results in an irresistible treat that will have your family and friends begging for seconds. It’s surprisingly easy to whip up, making it a great choice for both novice and seasoned bakers alike. Trust me, once you try it, you’ll understand why I keep coming back to this recipe! (See the ingredients in the next page below…)
Ingredients
– For the cheesecake filling:
– 16 oz cream cheese, softened
– 1 cup granulated sugar
– 3 large eggs
– 1 teaspoon vanilla extract
– 1 teaspoon cinnamon
– For the apple layer:
– 3 cups peeled and sliced apples (I like to mix tart and sweet varieties)
– 1/4 cup brown sugar
– 1 teaspoon lemon juice
– 1 teaspoon cinnamon
– 1 tablespoon cornstarch
– For the crisp topping:
– 1 cup oats
– 1/2 cup all-purpose flour
– 1/2 cup brown sugar
– 1/2 teaspoon cinnamon
– 1/4 cup butter, melted
Equipment Needed
– 9-inch springform pan
– Mixing bowls
– Hand mixer or stand mixer
– Rubber spatula
– Measuring cups and spoons
– Peeler and knife for apples
Step-by-Step Instructions
To begin, I preheat my oven to 325°F (160°C). While it’s heating up, I prepare my springform pan by greasing it lightly with butter. In a large mixing bowl, I combine the softened cream cheese and sugar using my hand mixer until it’s creamy and smooth. Then I add the eggs, one at a time, mixing well after each addition, followed by the vanilla and cinnamon. This mixture is the heart of my cheesecake! (See the next page below to continue steps…)
Next, for the apple layer, I toss the sliced apples in a separate bowl with brown sugar, lemon juice, cinnamon, and cornstarch until they are well coated. This is where the magic really begins; the sweet and tangy aromas fill the kitchen! I spread the apple mixture evenly over the bottom of the greased springform pan. Then I pour the cheesecake filling over the apple layer, smoothing it out gently with my spatula to ensure an even spread.
Now, for the topping: in another bowl, I mix the oats, flour, brown sugar, and cinnamon before adding the melted butter. I stir until the mixture becomes crumbly and delicious. Then, I sprinkle the crisp topping over the cheesecake layer generously. This crunchy contrast brings an incredible texture to the final dish! Once it’s all assembled, I pop it into the preheated oven and bake for about 60 minutes, or until the edges are set and the center still has a slight jiggle.
After baking, I let it cool in the pan for about an hour, then I carefully remove the sides of the springform pan. The beautiful layers are on full display; the golden brown topping is absolutely irresistible! I let the cheesecake chill in the refrigerator for at least four hours before slicing; this step is crucial for the flavors to meld beautifully.
Pro Tips for Best Results
I tested this recipe three different ways until I found the perfect balance of flavors. One tip I’d share is to use a blend of apples. I love combining Granny Smith for their tartness with Honeycrisp for sweetness. This combo adds complexity to the taste!
Another thing I learned is that chilling the cheesecake overnight not only improves the flavors but also enhances the texture. It makes each slice you cut just that much cleaner and prettier, perfect for presentation!
Lastly, I recommend covering the cheesecake with plastic wrap after it cools, but without letting it touch the topping. This keeps it fresh without messing up that lovely crisp layer.
Common Mistakes to Avoid
One common mistake I made when I first tried this recipe was not letting the cream cheese soften enough. If you try to mix it when it’s still cold, your cheesecake will end up lumpy instead of silky smooth. Always ensure your cream cheese is at room temperature! (See the next page below to continue…)
Another pitfall is not allowing the cheesecake to cool properly before removing it from the springform pan. This can lead to cracks or even pieces sticking to the edges. I learned to be patient here; a little time is worth it for a beautiful slice.
Using too many apples can also throw off the balance. I once loaded up on apples, thinking more is better, but it turned the cheesecake too soggy. Stick to the recommended amount for a perfect topping-to-filling ratio!
Serving Suggestions
When it comes to serving my Easy Apple Crisp Cheesecake, I like to keep it simple and elegant. A dollop of fresh whipped cream on top is always a hit, and it adds a lovely texture. Sometimes, I’ll even add a sprinkle of cinnamon for an extra touch!
For those who really want to take it to the next level, a warm caramel drizzle over each slice complements the flavors perfectly. The contrast of the warm caramel with the chilled cheesecake is simply divine and feels like an indulgent treat.
If I’m serving this at a gathering, I like to include a side of vanilla ice cream. Watching it melt slightly over the warm crisp topping is a sight to behold and makes for a comforting dessert experience for everyone.
Variations & Customizations
One of the things I adore about this recipe is its versatility. For a twist, you could swap the apples for pears or even a combo of both! Pears provide a lovely softness that pairs beautifully with the cheesecake.
If you’re a fan of nuts, adding chopped pecans or walnuts into the topping can give it an extra crunch. Just be sure to toast them lightly beforehand to really bring out their flavor.
For a touch of decadence, consider adding a layer of chocolate ganache between the cheesecake and apple layers. The rich chocolate with the apple’s sweet-tart flavor creates a symphony in your mouth!
How to Store, Freeze & Reheat
To store my Easy Apple Crisp Cheesecake, I usually cover it tightly with plastic wrap or transfer it to an airtight container. It keeps well in the refrigerator for up to a week, although it rarely lasts that long in my house!
If you’d like to freeze it, I recommend slicing it first for easy thawing. Wrap each slice tightly in plastic wrap and then place them in a freezer-safe bag. It will last in the freezer for up to three months. Just remember to let it sit in the fridge overnight to thaw before enjoying it.
Reheating isn’t usually necessary, as I prefer it chilled, but if you enjoy warm cheesecake, you can pop a slice in the microwave for about 15-20 seconds. Just keep an eye on it so it doesn’t get too warm, losing that lovely creamy texture!
Conclusion
I hope you’re as excited to try my Easy Apple Crisp Cheesecake as I was when I first baked it! The combination of flavors and textures creates a comforting dessert that will bring joy to any gathering. The warmth of the apples, the creaminess of the cheesecake, and the crunch of the topping truly make this treat a must-have. Happy baking!