
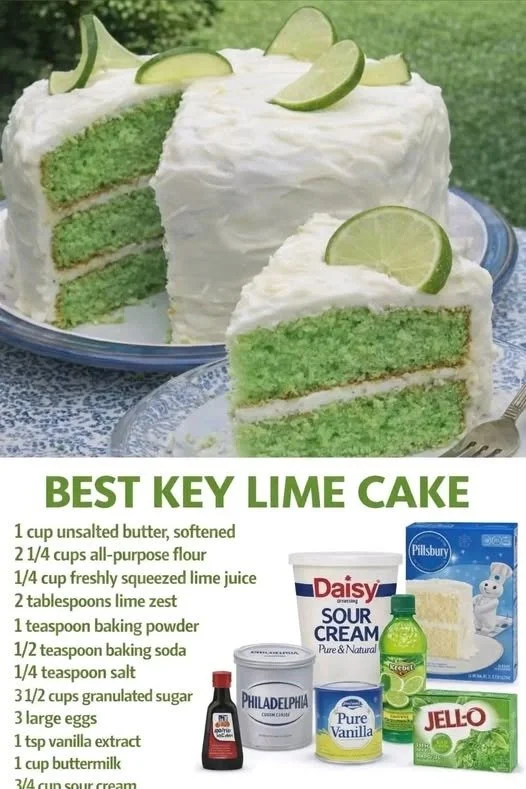
The first time I made a true key lime cake, it felt like I had bottled up a perfect, sun-drenched Florida afternoon. The sharp, floral scent of fresh lime zest filled my kitchen, cutting through the sweet, buttery aroma of the cake baking. That first bite was a revelation: impossibly moist, tangy, sweet, and creamy all at once. It was so much more than a dessert; it was an experience. Now, every time I make it, that bright, cheerful flavor transports me, and I love sharing that little vacation in a slice with everyone I know.
Why You’ll Love This Recipe
You are going to fall head-over-heels for this cake because it strikes the absolute perfect balance. It’s not cloyingly sweet—it has that bright, tangy punch that makes your taste buds sing. The texture is unbelievably tender and moist, and the creamy frosting is like a cloud of lime-flavored happiness. It’s a showstopper that’s surprisingly straightforward to make, guaranteed to make you feel like a baking rockstar.(See the ingredients in the next page below…)
Ingredients
For the Cake:
- 1 cup (2 sticks / 226g) unsalted butter, softened to room temperature
- 2 cups (400g) granulated sugar
- 3 large eggs, at room temperature
- 3 cups (360g) all-purpose flour, sifted
- ½ teaspoon baking soda
- ½ teaspoon baking powder
- ½ teaspoon fine sea salt
- 1 cup (240ml) buttermilk, at room temperature
- ¼ cup (60ml) fresh key lime juice (about 10-15 key limes, or see note)
- Zest of 4-5 key limes (about 2 tablespoons packed)
- 1 teaspoon pure vanilla extract
For the Key Lime Cream Cheese Frosting:
- 1 (8-ounce / 226g) package full-fat cream cheese, softened
- ½ cup (1 stick / 113g) unsalted butter, softened
- 4 cups (480g) powdered sugar, sifted
- 2 tablespoons fresh key lime juice
- Zest of 1-2 key limes for garnish
Note: If you cannot find fresh key limes, you may use regular Persian lime juice and zest. The flavor will be slightly different but still delicious. Do not use bottled key lime juice for the cake batter—it lacks the fresh, vibrant flavor. Save it for a last-resort pinch in the frosting only.
Equipment Needed
- 9×13 inch baking pan or two 9-inch round cake pans
- Stand mixer or hand mixer
- Medium and large mixing bowls
- Zester and citrus juicer
- Whisk and rubber spatula
- Sifter or fine-mesh sieve
- Parchment paper
- Cooling rack
Step-by-Step Instructions
Let’s start with the most important prep work: the limes. I zest all of my limes first, using a fine microplane, being careful not to get the bitter white pith. That bright green zest is pure flavor gold. Then, I roll each lime firmly on the counter under my palm to burst the juice vesicles inside before cutting and juicing them. I measure out the juice I need for both the cake and frosting. Remember, room temperature ingredients are non-negotiable here. Cold butter, eggs, or buttermilk will make your batter curdle and result in a dense cake. I learned this the hard way with a sad, sunken first attempt.(See the next page below to continue steps…)
Now, for the cake itself. I preheat my oven to 350°F (175°C) and generously grease and flour my 9×13 pan, or I line my round pans with parchment paper circles for easy release. In my stand mixer, I cream the softened butter and sugar together on medium-high speed for a full 3-5 minutes. It should become very light, fluffy, and almost white. This step aerates the batter, which is key for a tender crumb. I then add the eggs one at a time, letting each fully incorporate before adding the next. I scrape down the bowl often—don’t let any hidden pockets of butter lurk at the bottom.
In a separate bowl, I whisk together my sifted flour, baking soda, baking powder, and salt. In a large measuring cup, I combine the room-temperature buttermilk, fresh lime juice, lime zest, and vanilla. It will look a little curdled and wild, and that’s perfectly fine. With the mixer on low, I add the dry ingredients and the wet ingredients to the butter mixture alternately, starting and ending with the dry ingredients. I usually do three additions of dry and two of wet. I mix only until the last streak of flour disappears. The batter will be thick, creamy, and speckled with beautiful green zest.
I pour the batter into my prepared pan, smoothing the top with a spatula. I give it a gentle tap on the counter to settle any air bubbles. Into the preheated oven it goes, right on the middle rack. For a 9×13 pan, this usually takes 35-40 minutes for me. For round layers, start checking at 25 minutes. The trick is to not overbake. The cake is done when a toothpick inserted into the center comes out with a few moist crumbs clinging to it, not completely clean. Overbaking is the enemy of moisture. I let it cool completely in the pan on a rack before even thinking about frosting.
Pro Tips for Best Results
The single most important tip I can give you is to use fresh lime juice and zest. I tested this three different ways: with all fresh juice, with a mix, and with all bottled juice. The bottled juice cake was flat, one-dimensional, and vaguely metallic. The fresh juice cake was vibrant and complex. Don’t skip this ingredient; it makes a huge difference. If you can’t find key limes, regular Persian limes work beautifully—just know the flavor profile is a bit different.
Room temperature ingredients are not a suggestion; they are the law for this cake. Here’s what I learned the hard way: adding cold buttermilk to creamed butter can cause the emulsion to break, making your batter look grainy and separated. This can lead to a dense, greasy texture. To quickly bring eggs to room temp, I place them in a bowl of warm (not hot) water for 10 minutes. For buttermilk, I microwave it in 10-second bursts until it’s no longer cold.
For the frosting, ensure your cream cheese and butter are truly softened. If they’re too cold, you’ll have lumps. If they’re too warm, your frosting will be soupy. The perfect consistency is spreadable but still holds a peak. I always sift my powdered sugar to avoid any lumps, and I add the lime juice last, a tablespoon at a time, to control the consistency. A slightly tangy, not-too-sweet frosting is the perfect complement to the cake.(See the next page below to continue…)
Common Mistakes to Avoid
My first-time mistake was a classic: I overmixed the batter. After adding the dry ingredients, I kept the mixer running, wanting it “perfectly smooth.” What I got was a tough, rubbery cake because I overdeveloped the gluten in the flour. Now, I mix on the lowest speed and stop the very second I no longer see dry flour. A few tiny streaks are fine—they’ll incorporate as you pour the batter into the pan.
Do not substitute the buttermilk. I once tried using regular milk with a splash of vinegar as a hack, and another time I used plain yogurt thinned with milk. Neither gave me the same tender, fine crumb and subtle tang as true, cultured buttermilk. The acidity in buttermilk reacts with the baking soda, giving you a better rise and a more delicate texture. It’s worth the trip to the store.
Overbaking is the quickest way to turn this moist masterpiece into a dry desert. The cake continues to cook from residual heat as it cools. If you wait for a toothpick to come out completely clean in the oven, it will be overdone by the time it’s cool. Pull it when there are a few moist crumbs attached. The edges should be just pulling away from the pan, and the top will spring back lightly when touched.
Finally, do not frost a warm cake. I was once so excited to dig in that I slathered my cream cheese frosting onto a slightly warm cake layer. It was a meltdown—literally. The frosting slid right off, pooling at the base in a sad, soupy mess. You must let the cake cool completely to room temperature, and I even prefer to chill my layers in the fridge for 30 minutes before frosting. It makes the process so much cleaner and easier.
Serving Suggestions
I adore serving this cake simply, right from the pan, cut into generous squares. It’s sublime with a cup of strong, black coffee in the afternoon. The bright flavor is so satisfying all on its own, and it makes for a fantastic, easy-to-transport potluck or picnic dessert. Sometimes, I’ll just sprinkle a little extra lime zest on top for a fresh pop of color and flavor.
For a more elegant presentation, especially if I’ve made round layers, I like to serve thin slices on individual plates with a few artistic accompaniments. A small dollop of lightly sweetened whipped cream and a few fresh raspberries or a mint leaf make it look like it came from a fancy bakery. The tart berries complement the lime flavor wonderfully.
In the summer, I take it up a notch by serving it with a side of slowly melting vanilla bean ice cream or a pile of toasted coconut flakes. The creamy, cold ice cream with the tangy, cool cake is a match made in heaven. For a truly tropical twist, a quick mango or pineapple compote spooned over the top is absolutely incredible.
Variations & Customizations
If you love coconut as much as I do, a Key Lime Coconut Cake is a dream. I fold 1 cup of sweetened shredded coconut into the batter (toasted first for deeper flavor) and another cup into the frosting. I sometimes even brush the baked cake layers with a little coconut milk before frosting. It’s like a tropical vacation on a plate.
For a fun, layered dessert, I’ve turned this into a Key Lime Cake Trifle. I bake the cake in a sheet pan, then cube it once cool. In a large glass bowl, I layer the cake cubes with homemade lime curd and whipped cream or vanilla pudding. It’s a stunning, no-fuss dessert for a crowd that highlights all the wonderful flavors.
You can also play with the pan shape. This batter bakes beautifully in a Bundt pan for a dramatic presentation. Just be sure to grease and flour the pan meticulously. I’ve also made it as cupcakes—the bake time reduces to about 18-22 minutes. Top each cupcake with a swirl of the cream cheese frosting and a tiny slice of lime for a perfect portable treat.
How to Store, Freeze & Reheat
Because of the cream cheese frosting, this cake must be stored in the refrigerator. I cover it tightly with plastic wrap or store it in a cake carrier. It will keep beautifully for up to 4 days. The cool, moist environment of the fridge actually helps the flavors meld and the texture stay supremely moist. Let slices sit at room temperature for 20-30 minutes before serving to take the chill off and let the flavors shine.
You can freeze this cake successfully. For a whole cake or layers, I freeze them unfrosted. I wrap the completely cooled cake tightly in a layer of plastic wrap, then a layer of heavy-duty aluminum foil. It can be frozen for up to 3 months. Thaw overnight in the refrigerator, then bring to room temperature before frosting. You can also freeze individual frosted slices on a parchment-lined baking sheet until solid, then transfer them to a freezer bag.
I do not recommend freezing the fully frosted, assembled cake, as the frosting can become slightly grainy upon thawing. For reheating, you generally don’t need to. However, if you want to enjoy a single slice as if it were fresh, you can microwave it for a mere 8-10 seconds. Any longer and the frosting will melt. The best way is to let it come to room temperature naturally.
Conclusion
This key lime cake is more than just a dessert; it’s a burst of sunshine, a testament to how simple, fresh ingredients can create something truly magical. It has brought smiles to so many of my gatherings and comfort to my quietest days. I hope this recipe finds its way into your kitchen, becoming a cherished, bright spot for you and the people you love. Now, go zest those limes—your new favorite cake is waiting.