
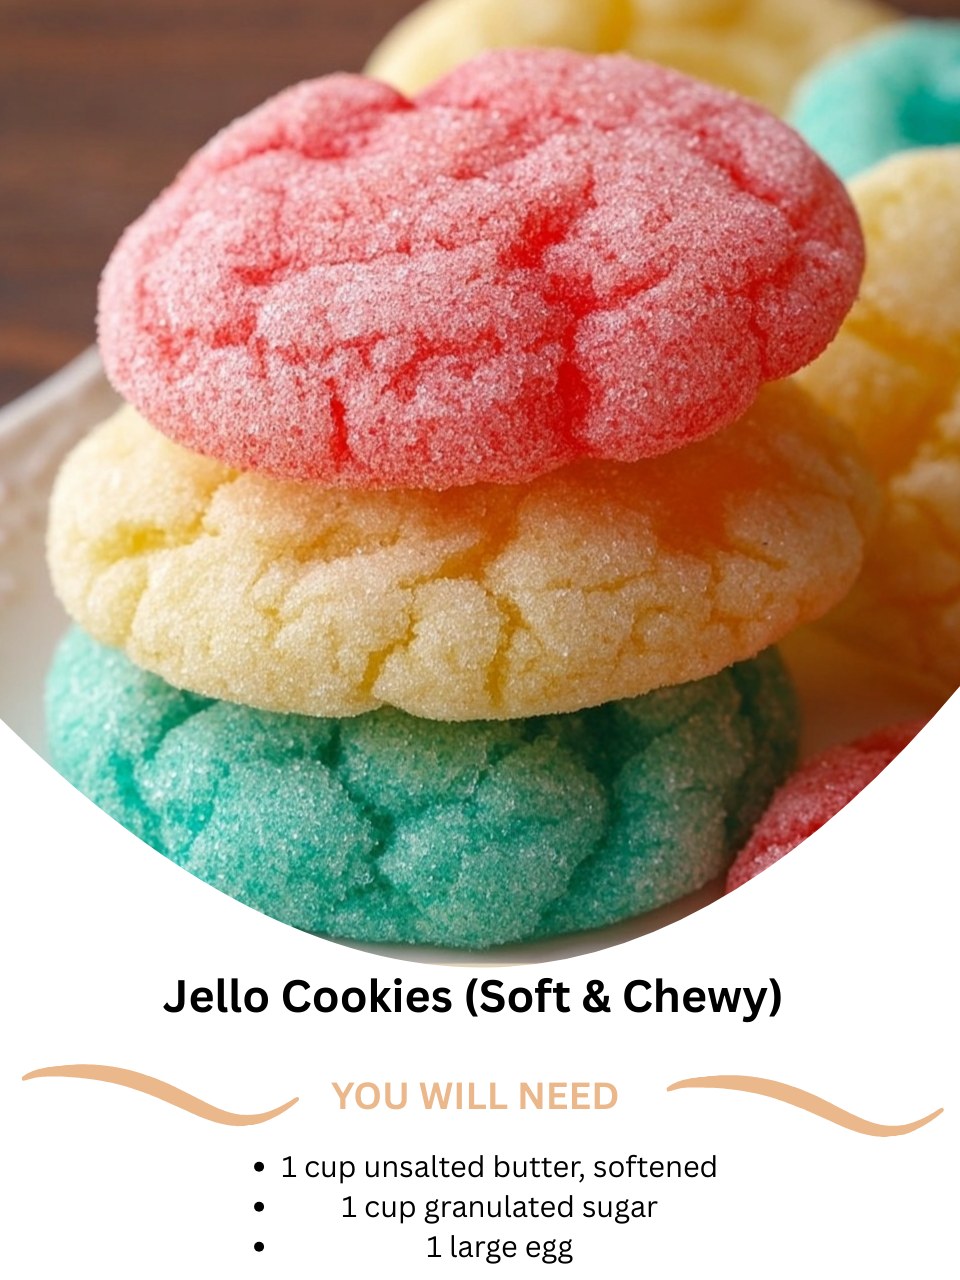
I first baked these Jello Cookies on a rainy Sunday with my niece, looking for a project that was as fun to make as it was to eat. As we creamed the bright pink strawberry powder into the butter and sugar, the kitchen filled with a sweet, fruity, almost candy-like aroma that made us both giggle. Watching those vibrant dough balls bake into soft, puffy, and impossibly chewy cookies was pure magic. That first warm bite, with its intense berry flavor and a texture that was somehow both cakey and delightfully chewy, was an instant victory. They were nostalgia and joy, baked into a single, colorful treat.
Why You’ll Love This Recipe
You are going to absolutely adore this recipe because it creates the most uniquely soft, tender, and chewy cookie you’ve ever had, with a powerful burst of fruity flavor in every bite. It’s incredibly simple—no chilling the dough, no fancy techniques—and the Jell-O powder does all the heavy lifting for both vivid color and intense taste. These cookies are a huge hit with kids, a dazzling addition to any holiday or party platter, and a fantastic way to use up those boxes of gelatin in the back of your pantry. They’re fun, foolproof, and deliver a seriously satisfying cookie experience.
Ingredients
- 1 cup (2 sticks) unsalted butter, softened to room temperature
- 1 cup granulated sugar
- 1 large egg, room temperature
- 1 teaspoon pure vanilla extract
- 2 ¼ cups all-purpose flour, spooned and leveled
- 1 teaspoon baking powder
- ¼ teaspoon salt
- 1 (3 oz) box Jell-O gelatin powder, any flavor (like strawberry, cherry, lime, or orange)
- Optional: ½ cup additional granulated sugar or sanding sugar for rolling (See the next page below to continue…)
Equipment Needed
- Stand mixer or hand mixer
- Large and medium mixing bowls
- Whisk and rubber spatula
- Baking sheets
- Parchment paper or silicone baking mats
- Cookie scoop (about 1.5 tablespoon size)
- Measuring cups and spoons
Step-by-Step Instructions
My process always starts with the most important step: getting my butter and egg to true room temperature. I take them out of the fridge at least an hour before I start. This isn’t a suggestion—it’s a rule. Room-temperature ingredients cream together into a light, fluffy base that gives the cookies their signature soft, cake-like texture. I learned this the hard way when I used cold butter and ended up with dense, greasy pucks instead of cloud-like cookies. While they come to temperature, I line my baking sheets with parchment paper and whisk together the flour, baking powder, and salt in a medium bowl.
Now, for the fun part. In the bowl of my stand mixer, I beat the softened butter and granulated sugar together on medium-high speed for a full 3-4 minutes. I don’t skimp on this time. I watch it transform from gritty yellow to a pale, fluffy, almost white mixture. This step incorporates air, which is key for a tender crumb. Then, I beat in the egg and vanilla extract until just combined. Now, I add the entire 3-ounce box of Jell-O powder. The moment the colorful powder hits the bowl, the kitchen smells like a candy shop. I beat it on medium until the mixture is uniformly pink (or whatever color you choose) and smooth.
With the mixer on low, I gradually add the flour mixture in two or three additions, mixing just until the dry ingredients disappear and a soft, very colorful dough forms. The dough will be slightly sticky and incredibly fragrant. I scrape down the sides of the bowl with my spatula to ensure everything is incorporated, but I’m careful not to over-mix. Over-mixing develops gluten and leads to tough cookies. If I’m using the extra sugar for rolling, I pour it into a shallow bowl now.(See the next page below to continue…)
Using my cookie scoop, I portion out dough balls. If I want a pretty, sparkly finish, I roll each ball in the extra granulated or sanding sugar, coating it completely. This gives the baked cookies a slight crunch and a gorgeous, sparkling crust. I place the dough balls about 2 inches apart on the prepared baking sheets—they will spread and puff up. I bake them one sheet at a time in the center of a preheated 350°F (175°C) oven for 9-11 minutes. The cookies are done when the edges are set and the centers look soft and puffy, but not wet.
Pro Tips for Best Results
My number one tip is to use room-temperature ingredients, especially the butter and egg. This is the single biggest factor in achieving the perfect soft, chewy texture. Cold butter won’t cream properly with the sugar, and a cold egg can cause the fluffy butter mixture to seize up. I leave mine on the counter for a solid hour before I start. Trust me, it makes all the difference.
Second, don’t over-bake. These cookies continue to set on the hot baking sheet after you pull them from the oven. They are done when the edges are just firm and the centers look soft, matte, and slightly underdone. If you wait for them to turn golden brown or look fully set, they’ll be over-baked and lose that legendary chewiness. I set a timer for 9 minutes and check from there.
Finally, experiment with Jell-O flavors. While strawberry and cherry are classics for their vibrant colors, don’t sleep on lime (perfect for St. Patrick’s Day), orange (like a dreamsicle), or even berry blue. Each flavor bakes up with its own distinct, nostalgic taste. I like to make a rainbow batch for parties using small portions of different colors.
Common Mistakes to Avoid
The most common mistake is not measuring the flour correctly. Scooping the flour directly from the bag with the measuring cup packs it down, leading to an extra ¼ cup or more of flour. This makes the dough dry and the cookies cakey and crumbly instead of soft and chewy. I always spoon the flour lightly into the measuring cup and level it off with a knife. This “spoon and level” method guarantees the right texture.(See the next page below to continue…)
Don’t use melted butter. This recipe relies on creaming solid, softened butter with sugar to create air pockets. Melted butter will make the cookies spread thin and become greasy and crisp, losing the soft, puffy texture we’re after. I made this error once, thinking it would be faster, and ended up with colorful, flat lace cookies—tasty, but not the intended result.
Avoid over-mixing the dough once the flour is added. Mix just until you no longer see dry streaks. Over-mixing develops the gluten in the flour, which leads to tough, dense cookies. The dough should be soft and slightly sticky, not elastic. I use my spatula for the final mix by hand to ensure I don’t go too far.
Finally, don’t skip the parchment paper. These cookies are soft and tender, and they can stick to an ungreased or greased baking sheet, tearing when you try to remove them. Parchment paper or a silicone mat guarantees a perfect, easy release every time and promotes even browning.
Serving Suggestions
I love serving these cookies on a bright, colorful platter that matches their vibe. They’re perfect for kids’ birthday parties, baby showers, or holiday gatherings where you want a pop of color. For a fun twist, I’ll match the cookie flavor to the occasion—green lime for St. Patrick’s Day, red cherry for Valentine’s, or a mix for Easter.
These cookies are a fantastic homemade gift, especially for families with children. I stack them in a clear cellophane bag tied with a matching ribbon, or pack them in a cheerful tin. They’re a wonderful alternative to the usual chocolate chip and always bring a smile.
For a nostalgic dessert, I’ll sandwich two cookies together with a scoop of vanilla ice cream that matches the flavor—strawberry cookies with vanilla or strawberry ice cream is a dream. They also make a sweet, fun lunchbox treat or after-school snack with a glass of cold milk.
Variations & Customizations
For a confetti cookie effect, fold in ½ cup of rainbow sprinkles along with the flour. The sprinkles bake into the soft dough, creating a funfetti-like cookie that’s even more festive. You can also roll the dough balls in colored sanding sugar that matches or contrasts with the Jell-O color.
To make them extra decadent, after the cookies have cooled, drizzle them with a simple glaze made from powdered sugar and a little milk or a matching flavored extract. Or, dip half of each cookie in melted white or dark chocolate. The combination of fruity cookie and rich chocolate is fantastic.
If you want a little texture contrast, fold in ½ cup of white chocolate chips or finely chopped nuts after mixing the dough. The creamy white chocolate pairs beautifully with the fruit flavors, especially with raspberry or orange Jell-O.
How to Store, Freeze & Reheat
These cookies stay wonderfully soft for days. I store them in an airtight container at room temperature for up to 5 days. If you layer them, place a piece of parchment paper between the layers to prevent sticking. They retain their chewy texture beautifully.
You can freeze the baked cookies for longer storage. Once completely cooled, place them in a single layer in a freezer bag or airtight container. They will keep for up to 3 months. Thaw at room temperature. You can also freeze the portioned dough balls on a baking sheet, then transfer to a bag. Bake from frozen, adding 1-2 minutes to the bake time.
To refresh leftover cookies or enjoy them warm, you can microwave a single cookie for 5-8 seconds. This gently softens it and makes it taste freshly baked again. Be careful not to overdo it, or it can become too soft.
Conclusion
These Jello Cookies are more than just a colorful treat to me; they’re a passport back to childhood, a project full of joy, and a guaranteed way to brighten any day. They have become my most-requested cookie for parties and a recipe I love sharing for its sheer simplicity and delightful results. I hope this recipe brings a splash of color and a whole lot of chewy, fruity happiness to your kitchen, creating sweet memories with every vibrant bite. Now, go pick your favorite Jell-O flavor—a batch of soft, chewy joy is waiting to be baked.