
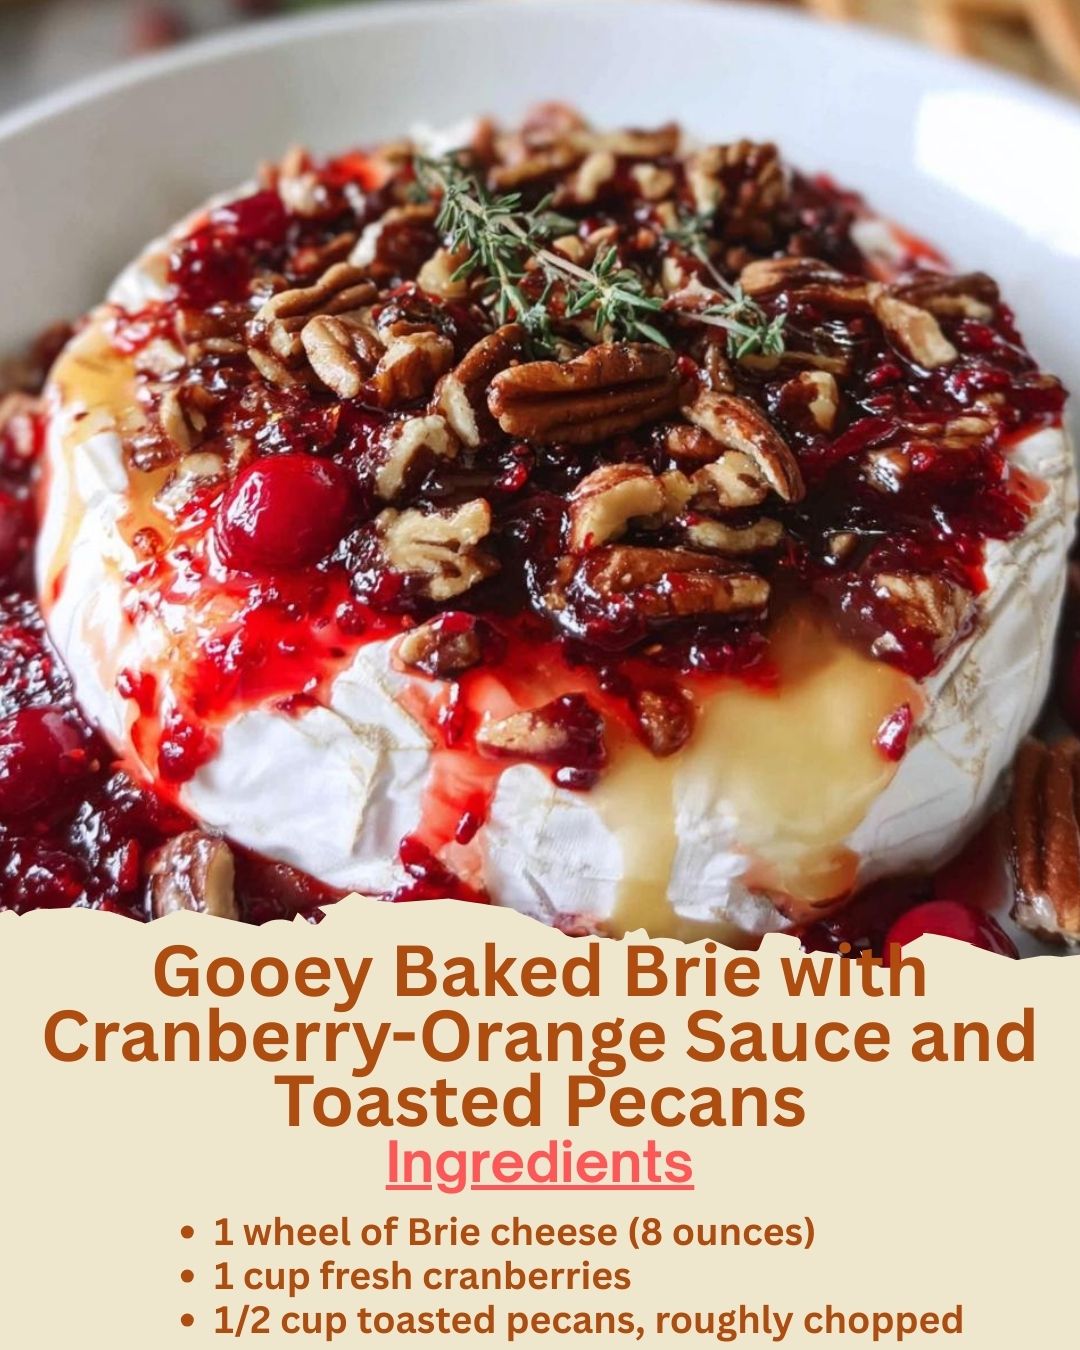
I first threw together this Gooey Baked Brie in a last-minute panic before friends arrived for a holiday gathering. My kitchen was a whirlwind, but as the Brie warmed, its rich, earthy aroma began to mingle with the bright, tangy scent of bubbling cranberries and orange. The moment I pulled it from the oven, the cheese was perfectly pourable, the pecans were toasty, and the sauce glistened. That first cracker dipped into the warm, creamy cheese and tart-sweet sauce was a revelation—it felt luxurious, effortless, and instantly became my favorite centerpiece for any celebration. It’s the recipe that looks like you fussed for hours but secretly comes together with joyful ease.
Why You’ll Love This Recipe
You will absolutely adore this recipe because it is the ultimate crowd-pleaser that requires minimal effort for maximum wow factor. It combines creamy, decadent cheese with a vibrant, homemade sauce and crunchy nuts in a way that feels both elegant and deeply comforting. From a practical standpoint, you can prepare almost everything ahead of time, so you’re not stuck in the kitchen when guests arrive. It’s the kind of dish that sparks conversation, brings everyone together around the table, and leaves them begging you for the recipe. Trust me, it’s a guaranteed hit.
Ingredients
- 1 wheel of Brie cheese (8 ounces), cold
- 1 cup fresh or frozen cranberries
- 1/4 cup granulated sugar
- Zest and juice of 1 medium orange (about 1/4 cup juice)
- 1/2 cup toasted pecans, roughly chopped
- 1 tablespoon maple syrup or honey
- A pinch of salt
- Fresh thyme or rosemary for garnish (optional) (See the next page below to continue…)
Equipment Needed
- Small saucepan
- Small baking dish or cast-iron skillet (just larger than the Brie wheel)
- Parchment paper
- Zester or fine grater
- Cutting board and knife
- Measuring cups and spoons
- Spoon for stirring
Step-by-Step Instructions
Let’s start with the star: the Brie. The first thing I do is take it out of the fridge and, using a sharp knife, carefully score the top rind. I make a simple crosshatch pattern, cutting about 1/4 inch deep. I learned through trial and error that this is the secret to that beautiful, oozy flow. Don’t cut off the entire top rind—I tried that once, and the cheese melted into a flat, uncontrollable puddle. The scoring helps it open up like a flower in the oven. I place the scored wheel on a piece of parchment paper in my small baking dish. This setup is a lifesaver for easy serving and cleanup.
While the oven preheats to 350°F, I make the cranberry-orange sauce. In a small saucepan, I combine the fresh cranberries, sugar, and orange juice. I always use fresh cranberries when they’re in season; their pop of tartness is unmatched. I bring it to a simmer over medium heat, stirring occasionally. As the cranberries heat up, they start to pop and burst with a satisfying plink sound, and the mixture will slowly thicken. This takes about 8-10 minutes. I remove it from the heat and stir in the orange zest—adding it off the heat preserves that bright, citrusy fragrance.
For the pecans, toasting them is non-negotiable. I spread them in a single layer on a dry baking sheet and toast them in the preheating oven for 5-7 minutes, until they’re fragrant. I’ve tried skipping this step, and the raw nuts just get lost in the texture. Once they’re slightly cooled, I give them a rough chop and toss them with a tablespoon of maple syrup and a tiny pinch of salt. This little glaze makes them sticky, sweet, and savory all at once, and they’ll clump delightfully on top of the Brie. (See the next page below to continue…)
Now, for the assembly and bake. I pour about two-thirds of the warm cranberry sauce over the top of the scored Brie, letting it seep into the cuts. Then, I pile the maple-glazed pecans right on top. It goes into the oven for 12-15 minutes. Watch it closely! You’re looking for the Brie to visibly soften and lose its shape, and the sauce should be bubbling around the edges. I pull mine when it looks like a soft, warm pillow. I let it sit for 5 minutes—this rest period is crucial so it doesn’t erupt like a cheese volcano when you cut into it—then garnish with the remaining sauce and a sprig of thyme.
Pro Tips for Best Results
My biggest tip is about the Brie itself: use it cold. I tested this with room-temperature Brie once, thinking it might bake more evenly. It turned into a completely melted, un-scoopable mess in the oven. Starting with a cold wheel straight from the fridge gives you a much bigger window for that perfect gooey-but-held-together texture. The center gets molten while the outer structure just barely holds its majestic, wheel-like shape.
Don’t skip the orange zest. I’ve made the sauce with just juice, and it lacked a certain vibrant punch. The zest is where all the potent, fragrant citrus oils live. Adding it off the heat, after cooking the sauce, preserves that bright, sunny flavor. It’s the difference between a good sauce and a spectacular one. I use a microplane to get the finest zest without any of the bitter white pith.
For the pecans, the maple syrup toss is my secret weapon. I tried just using plain toasted pecans, and I tried tossing them in the sauce. The plain ones were fine, but the saucy ones got soggy. Tossing them in that single tablespoon of maple syrup with a pinch of salt creates these irresistible little sweet-and-salty clusters that add amazing textural contrast to the creamy cheese. It’s a tiny step that elevates the whole dish.
Common Mistakes to Avoid
The first time I made this, I used a baking dish that was far too large. My little Brie wheel looked lonely and lost, and the sauce just spread out into a thin, burnt layer on the dish. It was a sad sight. Now, I use a dish or skillet that’s just an inch or two larger in diameter than the cheese wheel itself. This keeps everything nestled together, ensuring every bite has the perfect cheese-to-topping ratio. (See the next page below to continue…)
Overbaking is the most common pitfall, and I’ve definitely done it. You might think, “Five more minutes will make it even gooier!” But what happens is the cheese separates, releasing a pool of oily fat, and the texture becomes grainy. It still tastes okay, but it loses its luxurious, velvety mouthfeel. Trust the 12–15-minute window and look for that visual cue: the wheel should look puffed and soft, like it’s begging to be cut into, but not collapsed.
Using canned cranberry sauce is a mistake I urge you to avoid. I tried it once in a pinch, and the overly sweet, gelatinous texture just sat on top of the Brie like a blanket—it didn’t meld or create that beautiful sweet-tart synergy. The fresh sauce cooks in minutes, allows you to control the sweetness, and provides those lovely bursts of real fruit. It makes a huge difference in the overall freshness and balance of the dish.
Finally, don’t forget to let it rest. I was so excited to serve my first one that I cut into it the second it left the oven. The cheese erupted like a creamy geyser, flowing wildly across the plate. Letting it sit for a full 5-7 minutes allows the cheese to set just enough so that when you slice or scoop, it oozes out gracefully instead of flooding your board. This patience is key to a beautiful presentation.
Serving Suggestions
I love serving this right in its baking dish placed on a large wooden board or platter. Around it, I arrange an assortment of dippers: simple water crackers are a classic, but I also include slices of a crisp, tart apple like Granny Smith, and sturdy pieces of a baguette toasted with a brush of olive oil. The variety lets guests choose their own adventure—the apple slice with the cranberry sauce is a particularly fantastic combination.
For a more substantial offering, I sometimes turn this into the star of a cozy night in. I’ll place the warm Brie board in the center of the coffee table alongside a simple green salad dressed with a citrus vinaigrette. It becomes the perfect, interactive meal for watching a movie or catching up with a friend. The warm, rich cheese feels indulgent, while the salad and fruit keep it feeling somewhat balanced.
If I’m hosting a larger party, I make two of these! I bake them in staggered batches so one is always warm and ready to go. I label one with a note for any nut allergies. It’s such an easy way to make sure everyone gets to experience it, and having two ensures there’s no fighting over the last glorious, cheesy scoop.
Variations & Customizations
This recipe is wonderfully adaptable. If you’re not a fan of cranberries, I’ve had incredible success with a savory-sweet fig jam. I’ll simmer a cup of chopped dried figs with a little water, balsamic vinegar, and honey until jammy, then spoon it over the Brie and top with walnuts instead of pecans. The deep, caramelized flavor is fantastic for an autumn gathering.
For a more herbaceous twist, try this: after scoring the Brie, tuck a few sprigs of fresh rosemary or thyme under the wheel before baking. The herbs infuse the cheese with a subtle, woodsy fragrance as it heats. I then top it with a quick cherry compote (frozen cherries, a splash of red wine, and sugar) and slivered almonds. It’s a more grown-up, complex flavor profile.
You can also play with the cheese format. Instead of a whole wheel, I’ve used a smaller, personal-sized Brie for individual servings, which is adorable for a dinner party. Conversely, for a huge crowd, I’ve taken the “Brie en croûte” route, wrapping a large wheel in store-bought puff pastry before topping and baking. The pastry contains the melt and adds a fabulous flaky layer.
How to Store, Freeze & Reheat
Storing leftovers is tricky because this dish is best served fresh, but if you do have some, here’s what works. Once completely cooled, I carefully scrape the cheese and toppings into an airtight container. It will keep in the fridge for 2-3 days. The texture will be firm and not as creamy, but it’s still delicious. My favorite way to use leftovers is to spread the cold mixture on a sandwich with turkey or ham the next day—it’s phenomenal.
I do not recommend freezing the assembled and baked dish. The cheese will separate and become grainy when thawed and reheated. However, you can absolutely prepare components ahead. The cranberry-orange sauce freezes beautifully for up to 3 months in a small container. The maple-glazed pecans can be stored in a bag at room temperature for a week. This way, you can have a nearly-instant appetizer by just baking a fresh wheel of Brie and adding your pre-made toppings.
Reheating an entire leftover portion is not ideal, but reheating a small portion can work. I place a individual serving in a ramekin and warm it in a toaster oven or conventional oven at 300°F for about 8-10 minutes, just until it’s warmed through. The microwave will work in a pinch, but it will likely melt the cheese completely and unevenly heat the nuts. For the best experience, I always aim to make and serve this fresh.
Conclusion
This Gooey Baked Brie with Cranberry-Orange Sauce and Toasted Pecans is more than just a recipe—it’s a little edible event. It has saved me from countless “what to bring” dilemmas and turned ordinary evenings into something special. I hope it brings as much warmth, connection, and delicious joy to your table as it has to mine. Now, go grab a wheel of Brie and get ready for the compliments to roll in. Happy entertaining