
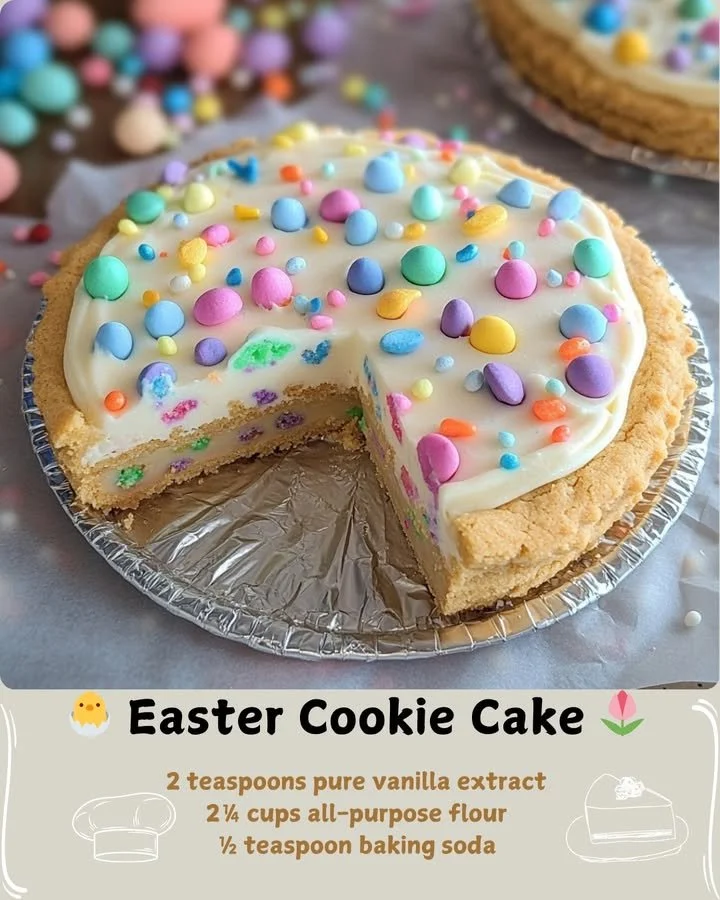
Easter is one of my favorite holidays, and this year, I decided to bring a new twist to our dessert table with a delightful Easter Cookie Cake. Imagine a soft, chewy cookie that’s as big as a cake, filled with colorful sprinkles and topped with creamy frosting—it’s the perfect centerpiece for your celebrations. I absolutely love how this dessert carries the spirit of Easter, combining the joy of cookie-making with the celebration of spring!
Why You’ll Love This Recipe
This Easter Cookie Cake is not only a feast for the eyes, but it’s also incredibly easy to make. With just a handful of ingredients and minimal prep time, it can quickly become a family favorite. The best part? You can customize it with your favorite toppings or sprinkle in some seasonal flavors. Who doesn’t love a giant cookie? We all know it’s the best part of a cookie platter! You’ll find yourself going back for seconds—trust me! I can hardly wait for you to try it! (See the ingredients in the next page below…)
Ingredients
- 2 ½ cups all-purpose flour
- 1 teaspoon baking soda
- ½ teaspoon salt
- 1 cup unsalted butter, softened
- 1 cup brown sugar, packed
- ½ cup granulated sugar
- 2 large eggs
- 1 tablespoon vanilla extract
- 1 ½ cups chocolate chips or Easter candy pieces
- ½ cup colorful sprinkles (optional)
- 1 cup frosting (store-bought or homemade)
Equipment Needed
- Large mixing bowl
- Electric mixer (or whisk and elbow grease!)
- Baking sheet (or a round pizza pan)
- Parchment paper
- Cooling rack
- Spatula or knife (for frosting)
Step-by-Step Instructions
Let’s kick things off by preheating your oven to 350°F (175°C). This is such an important step, as it sets the perfect baking environment for our cookie cake. In a large bowl, I start by mixing all the dry ingredients: flour, baking soda, and salt. In another bowl, using my electric mixer, I cream together the softened butter, brown sugar, and granulated sugar until it’s light and fluffy. Then I add the eggs and vanilla extract, beating just until combined. It smells heavenly! This is also when I get to fold in my favorite chocolate chips (or Easter candy if you’re feeling adventurous). (See the next page below to continue steps…)
Next, I grab my prepared baking sheet and line it with parchment paper for easy cleanup. I gently pour the cookie dough onto the sheet and spread it into an even layer, making sure to press in some extra candy pieces or sprinkles on top for that festive touch. Now the fun part: placing it in the oven! I bake the cookie cake for about 20-25 minutes until it’s golden brown and just set in the middle. Your kitchen will smell like a dream, and I can guarantee you’ll be impatiently waiting for it to cool.
Once the cookie cake is baked, I let it cool on a wire rack for about 10-15 minutes before transferring it to a serving platter. While it’s cooling, I prepare my frosting—this can be store-bought or homemade. When the cookie cake is completely cool, I spread the frosting generously on top. I love to decorate it with more sprinkles, and sometimes I even throw on some fresh fruits or mini chocolate eggs!
The final touch is to slice it into wedges, just like a cake! There’s something so satisfying about watching friends and family grab their pieces, their eyes lighting up as they discover the colorful bits hidden within the warm cookie. This dessert is not just for Easter—it’s delightful for any celebration!
Pro Tips for Best Results
I’ve tested this recipe three different ways to find the perfect texture, and what I found was that using room temperature butter makes the creaming process much easier and gives a softer cookie. If you’re short on time, you can always pop the butter into the microwave for about 10 seconds—just don’t melt it completely!
Another great tip I learned is to chill the cookie dough for about 30 minutes before baking if you want a thicker, chewy cookie. It helps in keeping the cookie from spreading too thin while baking. I tried it both ways, and it was a game-changer!
Lastly, for a little twist, consider adding some almond or lemon extract to your batter for an unexpected flavor boost. It’s exciting to play around with flavors, and once you find your favorite, I promise it’ll make this Easter Cookie Cake even more special!
Common Mistakes to Avoid
One common mistake I’ve made in the past is overmixing the dough after adding the flour. If you mix it too long, you can develop gluten, which can lead to a tougher cookie cake rather than the soft, chewy goodness we’re after. I now mix just until the ingredients are combined. (See the next page below to continue…)
Another thing I learned was to be careful with baking time. It can be tempting to leave the cookie cake in just a few minutes longer, but trust me, it will continue to cook a bit even after you take it out of the oven. If you pull it out when it’s golden brown and slightly firm in the center, it’ll yield the perfect texture!
Also, if you accidentally forget to add the baking soda, don’t fret, but do remember how crucial it is for the rise! If it slips your mind, your cookie cake might end up flat and dense. I recommend checking your ingredients list and checking them off as you add them; it makes a world of difference.
Serving Suggestions
When it comes to serving, I love to pair my Easter Cookie Cake with a scoop of vanilla ice cream. The combination of warm cookie and cold ice cream is simply heavenly! You can also serve it with fresh berries on the side for some natural sweetness and a pretty presentation.
For a fun spin, consider drizzling some chocolate or caramel sauce over each slice. It adds an indulgent touch and makes each serving feel extra special. My friends have even started requesting a “sauce bar” when I make this recipe!
Finally, don’t forget about the drinks! A glass of milk or a refreshing lemonade works wonders alongside this cookie cake. It’s a happy, complete meal that everyone will talk about long after the last crumb has been eaten.
Variations & Customizations
I love how versatile this Easter Cookie Cake can be! There’s no limit to how you can customize it based on what you love. For instance, swapping in different types of chocolate chips, such as dark, milk, or even butterscotch chips, gives your cake a unique flair that’s bound to impress your guests.
Another fun variation is to mix in crushed nuts or coconut for a different texture and flavor. I once added some toasted coconut, and it transformed the cookie into a tropical delight! You could also experiment with seasonal flavors such as pumpkin spice or even peppermint extract around the holidays.
Finally, let’s not forget about toppings! You can change it up each time you make this recipe. Think crushed Oreos, mini marshmallows, or even colorful sprinkles to celebrate the season. The sky’s the limit, and each variation is a chance to create something entirely new!
How to Store, Freeze & Reheat
After all that fun in the kitchen, you’ll want to store any leftovers properly. I usually place any remaining cookie cake in an airtight container and keep it on the counter for up to three days. It’s perfect for snacking with coffee or tea later on.
If you want to keep it longer, you can freeze individual slices. Just wrap each slice tightly in plastic wrap and place them in a freezer-safe container. They can stay fresh for up to two months. When you’re ready to enjoy a slice, just let it thaw at room temperature or pop it in the microwave for a few seconds.
Reheating is super easy and makes the cookie cake taste almost freshly baked again! A quick 15-20 seconds in the microwave will warm it perfectly, and adding a scoop of ice cream over the top will take it to another level of deliciousness.
Conclusion
I hope you’re as excited to make this Easter Cookie Cake as I am. It’s not only a showstopper dessert for your holiday celebrations, but it also makes for a cozy family activity in the kitchen. I can’t wait for you to try it and see the smiles it brings to the faces of your loved ones. Happy baking, and have a lovely Easter celebration!