
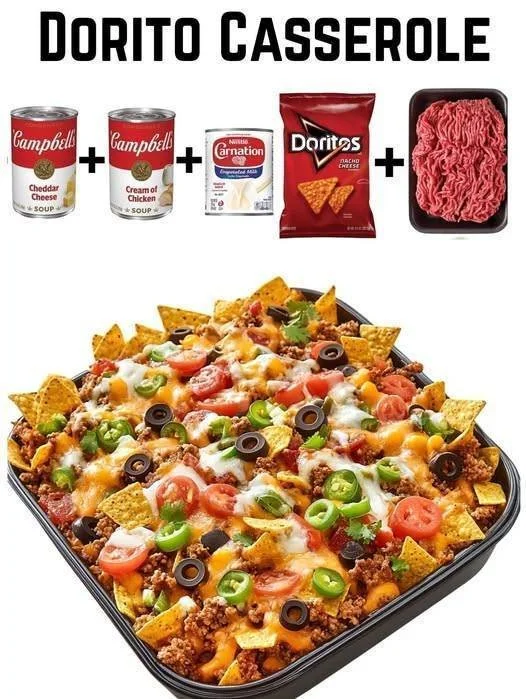
Dorito casserole holds a special place in my heart. I first came across this delightful recipe during a potluck, where its cheesy, crunchy goodness had everyone coming back for seconds. The smells wafting through my kitchen while it bakes remind me of those comforting family gatherings—everyone just enjoying each other’s company and the delicious food on their plates. The moment I took that first bite, I knew I’d found a new favorite dish to make at home. It’s hearty, satisfying, and oh-so-simple to whip up!
Why You’ll Love This Recipe
You’re going to absolutely love this recipe because it beautifully combines the crunch of Doritos with hearty ground beef and gooey cheese. It’s like a cozy blanket for your taste buds! Plus, it’s a total crowd-pleaser—perfect for family dinners, game nights, or even just an easy weeknight meal when you don’t want to fuss too much in the kitchen. Every single layer adds a flavorful punch that will have you savoring every bite.
Ingredients
- 1 pound ground beef
- 1 can (15 oz) black beans, drained and rinsed
- 1 can (15 oz) corn, drained (See the next page below to continue…)
- 1 can (10 oz) diced tomatoes with green chilies
- 1 packet taco seasoning
- 4 cups Doritos, crushed (nacho cheese flavor works best)
- 2 cups shredded cheddar cheese
- 1 cup sour cream
- 1 small onion, chopped
- 1 cup bell pepper, chopped
Equipment Needed
- Large skillet
- 9×13 inch baking dish
- Mixing bowl
- Wooden spoon
- Measuring cups and spoons
- Aluminum foil
Step-by-Step Instructions
When I start making my Dorito casserole, I like to begin by browning the ground beef in a large skillet over medium heat. As it cooks, I add the chopped onion and bell pepper. The combination of sautéing beef, onion, and bell pepper creates an aroma that’s simply irresistible. I cook it for about 8-10 minutes until everything is browned nicely and the veggies have softened. After draining the grease, I stir in the taco seasoning, black beans, corn, and diced tomatoes.
Next, it’s all about layering! In a mixing bowl, I combine the beef mixture with half the crushed Doritos and half the shredded cheese. The first time I made this, I skipped the mixing step and just layered everything, but trust me—mixing it all together makes each bite more flavorful. I spread this mixture into a 9×13 inch baking dish and then top it with remaining Doritos, cheese, and a dollop of sour cream. I cover it with aluminum foil and pop it in a preheated oven at 350°F.(See the next page below to continue…)
After about 25 minutes of baking, I remove the foil and let it bake for an additional 10 minutes. This is when my kitchen really starts to smell irresistible! Watching the cheese bubble and turn golden is pure joy. I’ve learned that keeping an eye on the casserole is essential during this stage; you want it bubbly but not burnt. Once it looks all melty and toasty, I take it out and let it sit for a few moments before serving.
Pro Tips for Best Results
I’ve tested this recipe with different cheese types, but I have to say, don’t skip the sharp cheddar! It adds a richness that goes perfectly with the Doritos. I also recommend using the nacho cheese flavor for the chips—it enhances the overall flavor of the dish. In my experience, the casserole tastes even better the next day, as the flavors have time to meld together, so I like to make it in advance whenever possible.
Another tip I swear by is to not go overboard with the toppings. Less is more here; I’ve found that too many toppings can make the casserole fall apart when serving. Stick to one layer of crushed Doritos on top and a good sprinkle of cheese, and trust me, it’ll be more than enough!
Lastly, I always use a light hand when pouring the ingredients together—don’t just dump them in! Gently folding them helps maintain that perfect texture, so each section has a delightful contrast of crunch and creaminess.
Common Mistakes to Avoid
I’ll be honest; my first attempt at Dorito casserole was a bit of a disaster. I used way too many layers of ingredients and ended up with a soggy mess. If you’re like me and tend to be a bit heavy-handed, take it easy on the layering! Stick to the method I’ve described, and you’ll be fine.(See the next page below to continue…)
Another thing to watch out for is overcooking the beef. It’s tempting to want it browned to perfection, but if you overdo it, it can become chewy instead of tender. I’ve learned to aim for a nice brown color while keeping an eye on the moisture to ensure it stays juicy.
Also, don’t forget to drain your canned ingredients! The first time I didn’t, and my casserole ended up way too watery, making a soupy mess instead of the hearty dish I was going for. Trust me, a quick rinse and drain will make a world of difference.
Lastly, please please please resist the urge to skip letting it cool a bit before serving. I know it’s tempting to dig right in, but that little bit of resting time allows the layers to set, making it easier to cut and serve without turning into a gooey pile.
Serving Suggestions
I love serving my Dorito casserole with a side of fresh guacamole or salsa for that added pop of flavor. The richness of the cheese and meat pairs perfectly with the freshness of the guac, creating a harmonious balance on the plate. If I want to keep it light, I’ll whip up a simple green salad with a zesty vinaigrette; the crunch of the salad complements the casserole beautifully.
Another favorite of mine is to serve it with a dollop of sour cream and a sprinkle of fresh cilantro on top for an added touch of color and taste. It gives each bite a refreshing twist. If I’m in a festive mood, I sometimes add diced jalapeños as an extra topping to provide a little heat, which I think elevates the entire dish!
Variations & Customizations
One of the things I love about Dorito casserole is its versatility! If you’re not a beef eater, you can easily replace it with ground turkey or chicken, and it turns out just as delicious. I’ve seen friends use shredded rotisserie chicken for a quick weeknight meal, and it’s a game changer! The flavors seem to meld even more, resulting in a comforting, creamy dish.
You can also play around with different cheese blends. I’ve tried mozzarella for a milder taste alongside Monterey Jack, and it added a lovely stretchiness. And for a more indulgent version, I added cream cheese in the layering, creating an ultra-creamy texture that took this casserole to new heights.
Lastly, if you want to add some extra veggies, I recommend incorporating diced zucchini or mushrooms. They’ll soak up all that flavor, and the added texture is delightful. Each variation creates a slightly different dish, making it impossible to get bored with this delightful recipe.
How to Store, Freeze & Reheat
After cooking, my Dorito casserole leftovers usually disappear quickly, but I always make sure to store them in an airtight container in the fridge for up to three days. When reheating, I recommend using the oven instead of microwaving, as it helps retain that crispy texture of the Doritos while warming through.
If you want to freeze some for later, I suggest letting it cool completely and then covering it tightly with plastic wrap and aluminum foil. It can stay in the freezer for up to three months. When it’s time to enjoy again, let it thaw in the fridge overnight—the taste will still be just as tasty!
When reheating from frozen, I’ll pop it in a preheated oven at around 350°F and cover it with foil to avoid over-browning until it’s heated through. This gentle reheating method helps maintain that perfect cheesy goodness I love.
Conclusion
Making Dorito casserole has become a cherished tradition in my kitchen, filled with memories, laughter, and, of course, deliciousness. It’s so easy to make and perfect for gatherings or cozy dinners at home. I hope this recipe finds a special place in your kitchen, too—trust me, you won’t regret plunging into this cheesy, crunchy explosion of flavor! Enjoy every bite and create your own memories around the table with loved ones.