
Another pitfall is not letting the bars cool completely before refrigerating them. If you rush this process, you might end up with sweaty bars instead of the creamy, luscious dessert you are aiming for. Allow them to cool to room temperature before placing them in the fridge ensures perfect texture and prevents water from forming on their surface.
Lastly, don’t forget to line your pan with parchment paper! Skipping this step may lead to the dreaded cheesecake-stuck-to-the-pan issue. I always lay down a piece of parchment extending over the edges of the pan, making it easy to lift the entire block out when it’s time to cut.
Serving Suggestions
These caramel cheesecake bars are perfect for any gathering or celebration! I love serving them on a pretty platter, garnished with extra drizzles of caramel and a sprinkle of sea salt for added flair. They also pair beautifully with a steaming cup of coffee or tea—it’s the ultimate match made in dessert heaven!
For a fun twist, I often serve these bars with fresh berries on the side. The tartness of the berries cuts through the richness of the cheesecake and adds a pop of color to the plate. Trust me; your guests will love this fresh contrast!
If you want to turn these bars into an even fancier dessert, consider topping them with a dollop of whipped cream. It adds a light, airy texture that perfectly complements the dense cheesiness of the bars.
Variations & Customizations
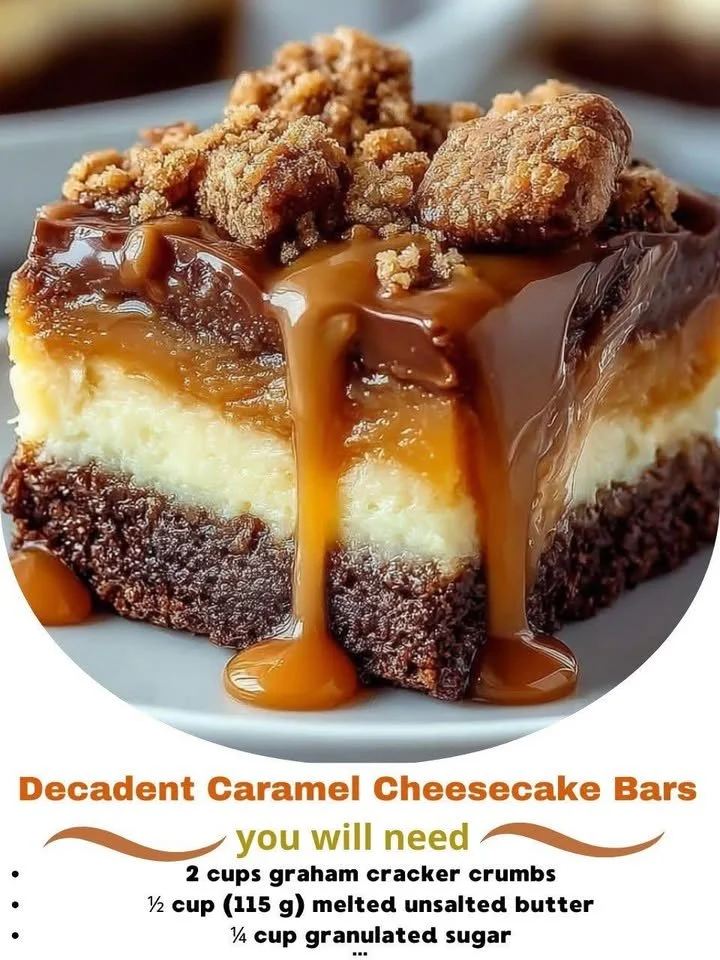
If you’re looking to mix things up, consider swapping the graham cracker crust for a chocolate cookie crust. The combination of chocolate with caramel and cheesecake is simply heavenly! I tried this once, and it took these bars to a whole new level!
Another fun variation is to incorporate different flavorings into the cheesecake filling. For instance, adding a tablespoon of espresso powder can give your bars a mocha twist, which I find exceptionally delightful. If you’re a fan of chocolate, folding in mini chocolate chips into the batter before baking can create little pockets of sweetness throughout.
Lastly, don’t hesitate to experiment with your toppings. Instead of caramel, you can try a chocolate ganache or a fruit puree for a refreshing change. The possibilities are endless, and it’s always exciting to tailor the recipe to your tastes!
How to Store, Freeze & Reheat
Storing these cheesecake bars is a breeze! After they’ve set and cooled, simply cover them with plastic wrap or place them in an airtight container in the refrigerator. They will last up to five days, making them a delicious option for your sweet cravings throughout the week.
If you want to prepare them ahead of time, these bars freeze wonderfully! Just cut them into squares and layer them in a freezer-safe container separated by parchment paper. They can be stored in the freezer for up to three months. When you’re ready to enjoy them, let them thaw in the fridge overnight before serving.
Reheating isn’t necessary, but if you prefer them warm, simply pop them in the microwave for about 15-20 seconds. Make sure to not overdo it; you want them just warm enough to enjoy that delightful gooeyness without sacrificing their texture.
Conclusion
I hope you enjoyed this journey through my decadent caramel cheesecake bars recipe! They’re truly a labor of love that fills my home with warmth and sweetness. Whether you’re hosting a gathering or just treating yourself, these bars will surely impress. Happy baking, and may your kitchen be filled with the delightful aroma of caramel and cream cheese!