
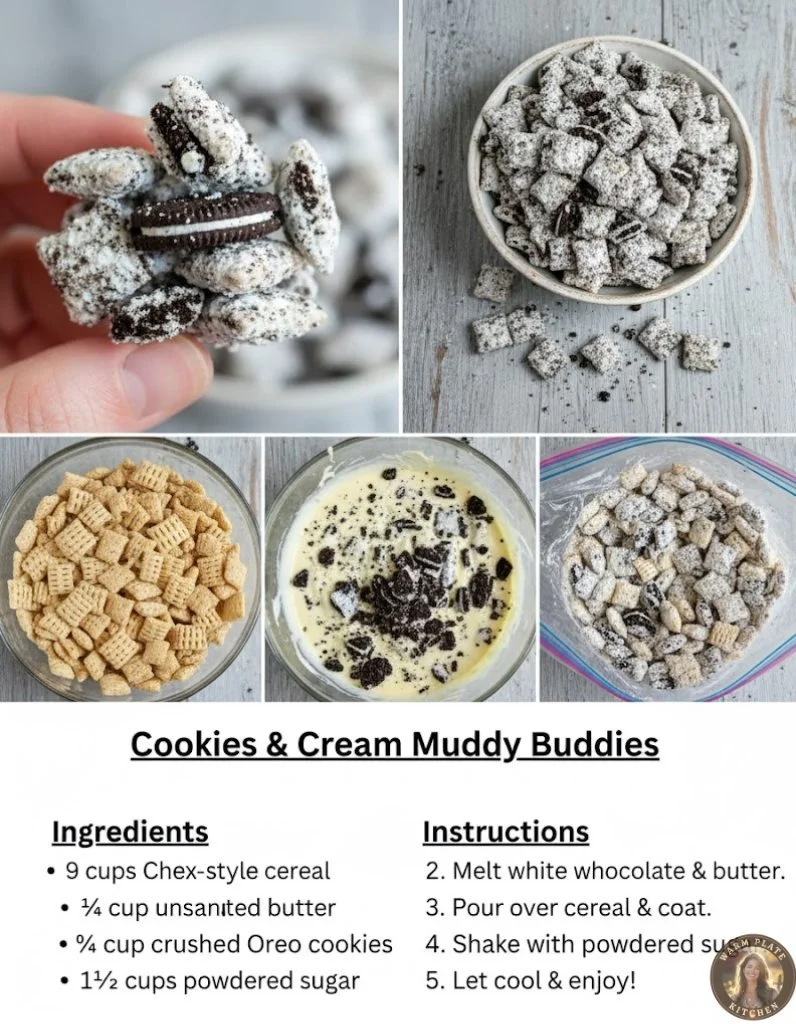
I’ve always had a soft spot for snacks that combine the deliciousness of chocolate and a fun crunch. That’s why I’m so excited to share my recipe for Cookies & Cream Muddy Buddies! These delightful little snacks are perfect for any occasion, from cozy movie nights to festive gatherings. With their sweet chocolaty coating and the familiar taste of cookies and cream, they’re simply irresistible. So, let’s dive into creating this sweet treat right in my kitchen!
Why You’ll Love This Recipe
If you’re a fan of the classic Muddy Buddies, this Cookies & Cream twist will take your snacking game to a whole new level. They’re quick to make, fun to customize, and ideal for sharing (if you want to—no judgment if you want to keep them all for yourself!). The creamy chocolate paired with crunchy cereal and crumbled cookies creates a wonderfully textured delight that’s hard to resist. I can almost taste them now! (See the ingredients in the next page below…)
Ingredients
– 6 cups Rice Chex cereal
– 1 cup semisweet chocolate chips
– 1/4 cup unsweetened cocoa powder
– 1/2 cup creamy peanut butter
– 1 1/2 cups Oreo cookies, crushed
– 1 cup powdered sugar
– 1 teaspoon vanilla extract
Equipment Needed
– Large mixing bowl
– Microwave-safe bowl
– Rubber spatula or spoon
– Resealable plastic bag or large zip-top bag
– Baking sheet
– Parchment paper
Step-by-Step Instructions
First, I start by preparing everything in my kitchen, making the process a breeze. Begin by measuring out the Rice Chex cereal and placing it in a large mixing bowl. Then, in a microwave-safe bowl, combine the semisweet chocolate chips and creamy peanut butter. Microwave carefully in 30-second intervals, stirring in between, until the mixture is smooth and completely melted. The smell of melting chocolate and peanut butter mingles in the air, and it’s heavenly! (See the next page below to continue steps…)
Next, I stir in the vanilla extract and mix everything until it’s well combined. Once the chocolate-peanut butter mix is smooth, I gently pour it over the Rice Chex cereal. It’s important to fold the mixture softly so that each piece of cereal is coated evenly. I can’t help but admire the shiny chocolate coating as I work. Once combined, I let it sit for just a moment while I prepare the next step.
In a separate resealable plastic bag, I combine the cocoa powder and powdered sugar. This is where the fun begins! I use my hands to mix everything well, and even though my kitchen gets a little messy, I love seeing those sugary and chocolaty clouds of goodness. I add the coated cereal to the bag, seal it tightly, and then shake it up until every piece is generously coated. This is definitely a moment that makes me smile, with the bag filled with fluffy powder and cereal.
Lastly, I spread the finished Muddy Buddies out on a baking sheet lined with parchment paper to cool. This step helps them set, and I also love the moment of anticipation as I wait for the flavors to meld together. Once they’re cooled, I store them in a fun snack bowl and dig in—pure bliss!
Pro Tips for Best Results
I’ve tested this recipe multiple times, and one of my favorite tricks is to let the chocolate-peanut butter mixture cool slightly before pouring it over the cereal. This prevents the cereal from getting too soggy and keeps that nice crunch. Also, using a combination of smooth peanut butter and a little bit of crunch adds an interesting texture that I just adore.
If you want to make even more of a cookies and cream experience, consider adding some mini Oreo cookies to the mix before coating. It ramps up the flavor and makes every bite feel special! As an added bonus, I love tossing in some white chocolate chips with the semi-sweet ones for a different flavor dimension.
Lastly, I always recommend giving them a generous dusting of powdered sugar after they cool. It not only helps with stickiness but also makes these Muddy Buddies look extra appealing—perfect for sharing (or not!).
Common Mistakes to Avoid
One of the most common pitfalls I’ve encountered while making Muddy Buddies is rushing the chocolate melting process. Believe me, taking your time will pay off in a smooth and perfectly blended mixture. I’ve tried to hurry it along and ended up with chocolate that seized, which leads to a less satisfying texture. So, patience truly is a virtue here! (See the next page below to continue…)
Another mistake is using too much cereal. I learned the hard way that just the right ratio is essential for balancing out the chocolate and peanut butter. Too much cereal can make it hard to get that delicious coating on every piece. I usually stick to around six cups, but if you want to experiment, be cautious not to overdo it!
A common oversight is not allowing the Muddy Buddies to cool enough before storing. If they’re still warm, the chocolate can melt and get gooey again, which isn’t ideal. I’ve even learned that it’s better to let them rest longer than you think—sometimes I even leave them overnight to harden for the best results!
Serving Suggestions
Once my Cookies & Cream Muddy Buddies are ready, I love to serve them in a big bowl for everyone to enjoy. They make the perfect snack for movie nights, and I might even throw in a few more crumbled Oreos on top for decoration! You can also consider serving them alongside popcorn for a fun mix of sweet and salty—it’s a combo my friends adore.
For parties, I find it fun to package them in individual bags tied with a cute ribbon. They make such a delightful take-home treat, and people love the thoughtful gesture. Plus, they travel well, so you can cart them anywhere without worrying about mess!
During the holidays, I like to add festive sprinkles to the mix or even color the chocolate with food coloring for a seasonal spin. Whether Halloween orange, Christmas red and green, or pastel shades for Easter, it adds a fun visual appeal that guests can’t resist.
Variations & Customizations
One of the best parts of this recipe is its versatility. You can swap out classic Oreos for different flavors, like mint or peanut butter-filled Oreos, for a twist that’s sure to excite your taste buds. I love experimenting with these variations to match the themes of different gatherings.
If you’re feeling adventurous and want to up the ante, try adding a layer of caramel drizzled over the top after coating. Just melt some caramel candies and drizzle it over your Muddy Buddies before letting them cool. It adds an indulgent richness that makes them even more special.
For a healthier twist, you can replace the Rice Chex with a whole grain option or use lower-sugar chocolate chips. I’ve even used granola in place of the cereal before, which added a wonderful nutty flavor while still keeping that crunchy bite. There are so many possibilities!
How to Store, Freeze & Reheat
Storing these little treats is easy-peasy! I usually keep mine in an airtight container at room temperature, and they last about a week (if they last that long!). Just make sure they’re completely cool before sealing them up.
If you want to store them for a longer period, you can freeze them! Simply place the Muddy Buddies in a resealable plastic bag, push out as much air as possible, and pop them in the freezer. They can last for up to a month. When you’re ready to snack, simply take them out and let them sit at room temperature for a few minutes before enjoying.
Reheating isn’t necessary—just snack and go! If they happen to clump together in the freezer, give the bag a gentle shake, and they’ll separate just right. Trust me, taking a bite of these crunchy, chocolaty treats straight from the freezer is a refreshing surprise on a hot day!
Conclusion
I hope you give my Cookies & Cream Muddy Buddies a try! They’re such an easy and delightful treat that brings a smile to my face every time I make them. Whether for a party, a movie night, or just because you want something sweet, these Muddy Buddies are sure to hit the spot. Thanks for joining me in my kitchen, and happy snacking!