
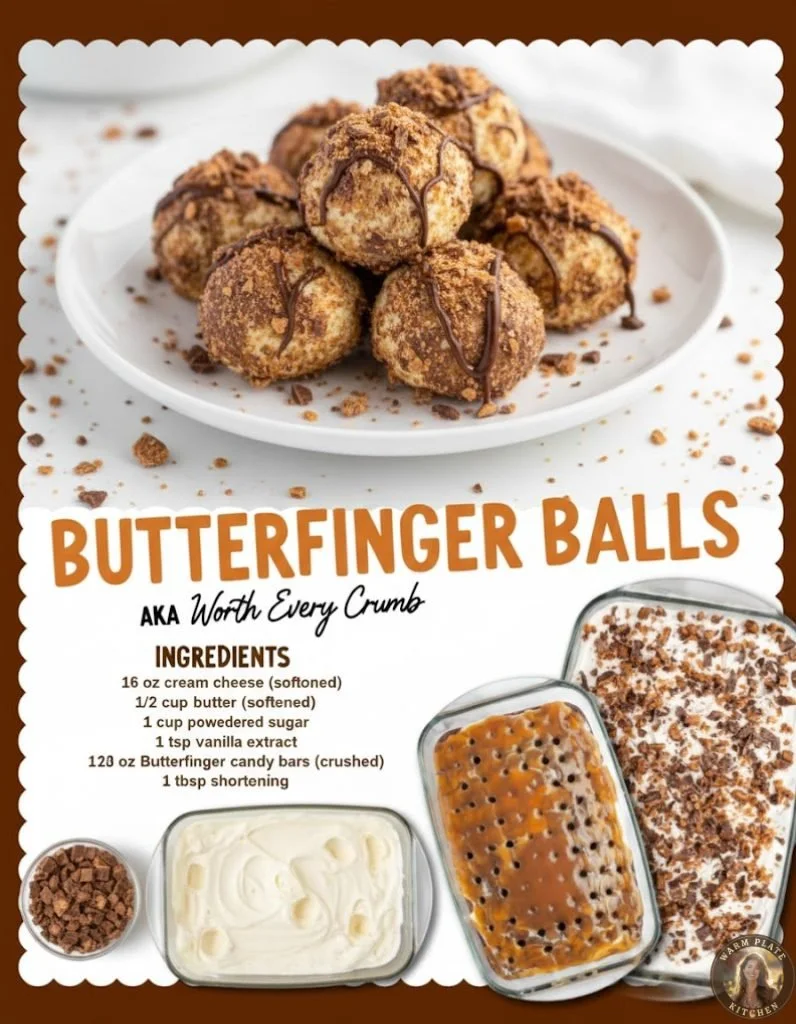
Welcome to my kitchen! Today, I’m absolutely thrilled to share one of my newest obsessions: Butterfinger Cheesecake Balls. If you’re on the hunt for a quick, no-bake dessert that combines creaminess, crunch, and a hint of nostalgia, you’re in for a treat. I assure you, once you give these a try, you’ll find yourself making them over and over again!
Why You’ll Love This Recipe
These Butterfinger Cheesecake Balls are not only a cinch to whip up, but they also capture that iconic candy bar flavor that we all know and love! The combination of creamy cheesecake and the crunch of Butterfingers wrapped in a delightful coating makes each bite utterly irresistible. Plus, they look as good as they taste, making them perfect for parties, potlucks, or just a cozy night in. (See the ingredients in the next page below…)
Ingredients
– 8 oz cream cheese, softened
– 1 cup powdered sugar
– 1 teaspoon vanilla extract
– 1 cup crushed Butterfinger candy bars (about 3 full-size bars)
– 1 cup crushed graham crackers
– 1 cup chocolate chips (for coating)
– Extra crushed Butterfinger for garnish
Equipment Needed
– Mixing bowl
– Electric mixer (or a sturdy whisk)
– Baking sheet
– Parchment paper
– Microwave-safe bowl (for melting chocolate)
– Cookie scoop or tablespoon
Step-by-Step Instructions
First, start by softening the cream cheese. I usually pull it out of the fridge about 30 minutes before I begin. In a large mixing bowl, beat the softened cream cheese with an electric mixer until it’s nice and creamy. Then, gradually add in the powdered sugar, mixing until well combined. Add the vanilla extract and mix a bit more. The mixture should be smooth and creamy, tempting enough to eat right off the mixer. (See the next page below to continue steps…)
Next, it’s time to fold in the crushed Butterfinger candy bars. I love the sweet smell that fills the air as you mix! Once that’s well blended, sprinkle in the crushed graham crackers and mix until everything is evenly combined. At this point, I like to taste the mixture. Adjust the sweetness by adding a bit more powdered sugar if you prefer!
Once everything is perfectly tasty, it’s time to shape the mixture into small balls. I typically use a cookie scoop for uniformity, but using a tablespoon works just as well. Place them onto a baking sheet lined with parchment paper. Pop the tray in the fridge for about 30 minutes. This will help the balls firm up a bit, making them easier to coat.
While those chill, melt the chocolate chips in a microwave-safe bowl in 30-second intervals. Stir in between until smooth. Once your cheesecake balls are ready, dip each one into the melted chocolate, ensuring they’re fully coated. I like to let the excess chocolate drip off before placing them back on the parchment-lined sheet. Before the chocolate hardens, sprinkle some extra crushed Butterfinger on top for that extra touch of sweetness!
Pro Tips for Best Results
I’ve tested this recipe a few ways, and one key take-away is to ensure your cream cheese is fully softened. If it’s still cold, you’ll end up with lumps in your cheesecake balls. Nobody wants that! Another tip is to refrigerate the mixture for at least 30 minutes before rolling. This helps the balls hold their shape when you dip them in the chocolate coating.
If you have a busy schedule like I do, prepare the mixture a day in advance. It holds up beautifully in the fridge! Just shape and coat the next day. I also recommend using high-quality chocolate—a good chocolate coating can make a world of difference in flavor. I personally love semi-sweet, but feel free to use milk or dark chocolate according to your preference.
Lastly, feel free to get creative with the toppings. I’ve added sprinkles and crushed nuts for added flair! If you have little ones around, they will love getting involved in the decorating process.
Common Mistakes to Avoid
One common mistake is overmixing the cheesecake filling. It can become too mushy, making it hard to form into balls. Stick to mixing just until combined to maintain that perfect texture. If you find that your mixture is too runny, don’t panic! Just sprinkle in a touch more crushed graham crackers to help firm it up. (See the next page below to continue…)
Another issue I’ve faced is dipping the balls in chocolate when they’re too warm. The warm cheesecake can cause the chocolate to seize, making it difficult to get a nice coating. Ensure that they’re nice and chilled from the fridge before you dip.
And finally, I’ve made the mistake of forgetting the garnish! Those extra crushed Butterfinger pieces not only feel like a nice finish for looks; they also add that extra crunch and flavor pop that makes these bites so delightful. Don’t skip it!
Serving Suggestions
These Butterfinger Cheesecake Balls are delightful at room temperature, making them perfect for parties! I love arranging them on a cute platter and drizzling some leftover chocolate over the top while they’re still festive and pretty. They’re great for an afternoon snack or dessert after dinner.
If you’re looking to impress guests, consider serving them with a side of whipped cream and drizzled chocolate sauce. This creates a lovely presentation and adds a touch of luxury to your treat.
Lastly, they pair beautifully with a hot cup of coffee or cocoa! I find that the rich flavors of chocolate and cream cheese balance perfectly with a warm beverage, making it a cozy evening snack.
Variations & Customizations
If you want to mix things up, try adding different flavors to your cheesecake mixture! For a peanut butter twist, you could replace some of the cream cheese with peanut butter, which pairs wonderfully with the Butterfinger taste.
I’ve also experimented with different candy coatings. Instead of chocolate, why not try butterscotch chips for a different flavor profile? You can even use white chocolate, just make sure to adjust the sweetness, as white chocolate is usually sweeter than semisweet or dark chocolate.
And for those who aren’t huge Butterfinger fans (gasp!), you can customize these by using other crushed candy bars. Snickers or Reese’s Pieces work wonderfully too and can create a whole new experience with the same fun format!
How to Store, Freeze & Reheat
To store these delicious treats, keep them in an airtight container in the fridge. They’re good for up to a week, but I can bet they won’t last that long once you share them with friends or family!
If you want to freeze them, make sure to freeze them in a single layer on a baking sheet first. Once frozen, you can transfer them to a freezer-safe container. They can last in the freezer for about a month. Just remember to let them thaw in the fridge before enjoying; it helps retain their luscious texture.
Reheating isn’t necessary for these cheesecake balls, but if you prefer them warm, a few seconds in the microwave should do the trick. Just be cautious not to overdo it; you don’t want melted chocolate running everywhere!
Conclusion
I hope you’re as excited to make these Butterfinger Cheesecake Balls as I was when I first concocted this delightful little dessert! With just a handful of ingredients and a pinch of love, you can create a treat that brings back cherished childhood memories while also delighting the taste buds of anyone lucky enough to enjoy them. Happy baking, and enjoy those sweet moments!