
This style of Christmas candy is a vintage holiday tradition: families cook large batches of flavored sugar syrup on the stove, scenting the house with cinnamon, clove, peppermint, and other intense aromas as the mixture boils.
Once the syrup reaches about 300°F (hard‑crack stage), concentrated flavoring oil and food coloring are stirred in, then the candy is poured in a thin layer over a powdered‑sugar‑lined pan. After it sets, the sheet is broken up with the back of a spoon or a meat mallet into bite‑size shards and coated in powdered sugar to keep the pieces from sticking, then bagged up for gifting or piled into candy dishes.
Equipment
- Heavy‑bottomed saucepan large enough to hold boiling sugar syrup.
- Candy thermometer (clip‑on) to monitor the syrup to 300°F / hard‑crack.
- Rimmed baking sheet or jelly‑roll pan lined with foil and heavily dusted with powdered sugar.
- Heat‑resistant spatula or wooden spoon for stirring.
- Measuring cups and spoons for sugar, water, corn syrup, coloring, and flavor oils.
- Meat mallet, hammer, or heavy spoon to crack the cooled candy into pieces.
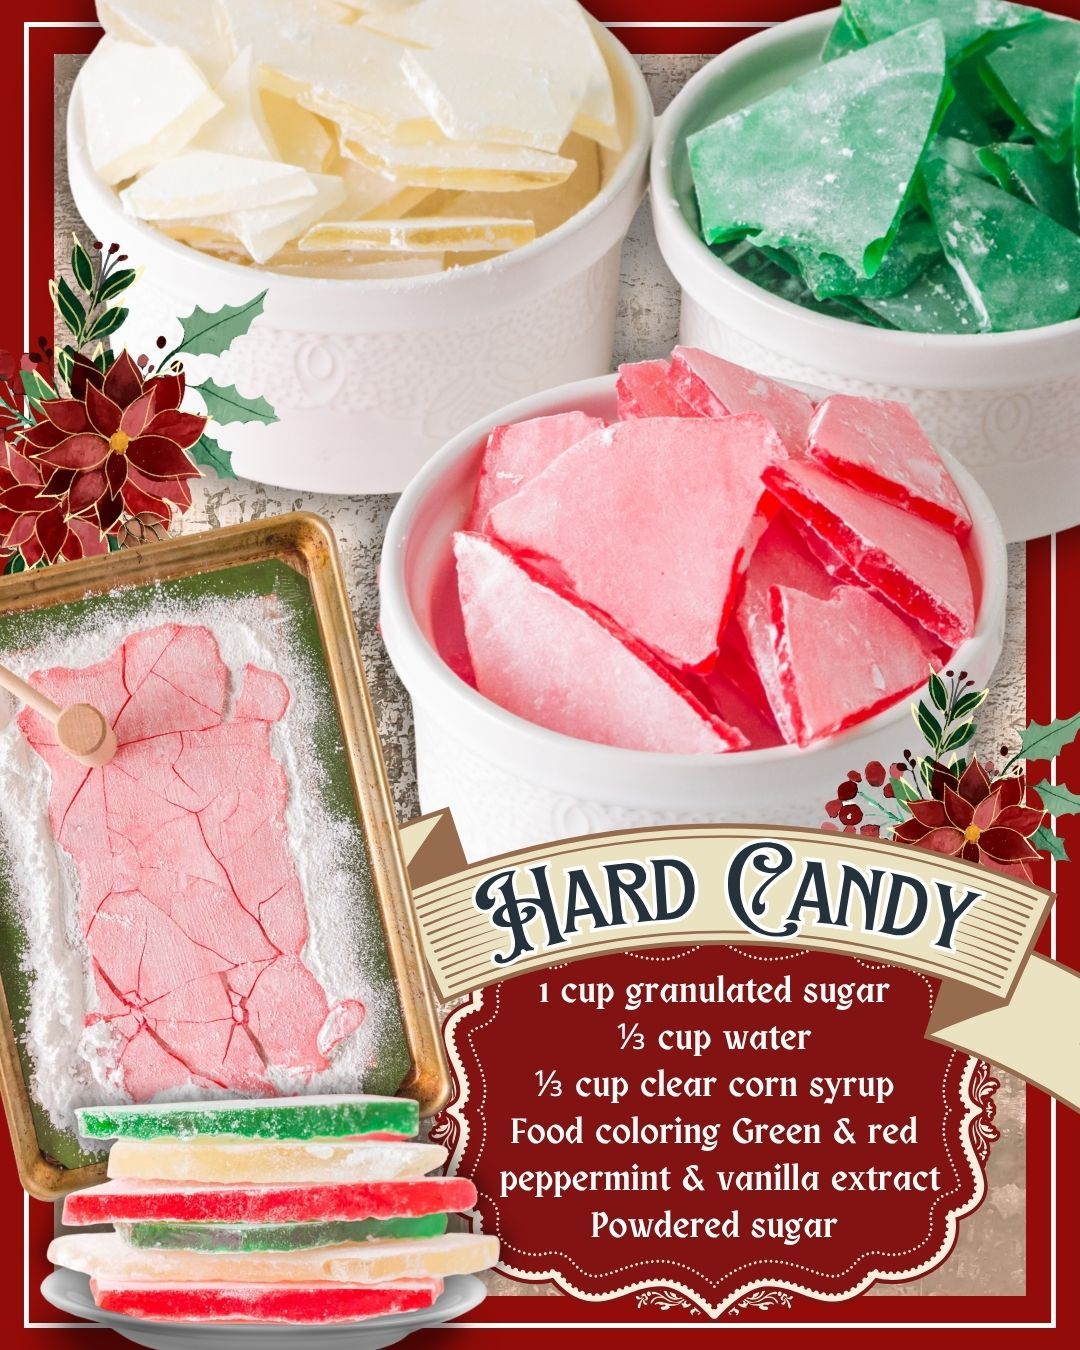
Ingredients
- Granulated sugar.
- Light corn syrup.
- Water.
- Flavoring oils such as cinnamon, peppermint, spearmint, wintergreen, cherry, or fruit flavors (often LorAnn brand).
- Food coloring (liquid or gel) to match each flavor—red for cinnamon, green for spearmint, etc.
- Powdered sugar for dusting the pan and coating finished pieces.
Instructions and steps
To make Christmas hard candy, start by preparing the pan and workspace, since the candy moves quickly once it reaches temperature. Line a rimmed baking sheet with foil and sift a thick layer of powdered sugar over the entire surface, creating a soft bed for the hot syrup.
Have your flavoring oil and food coloring measured and ready nearby, but do not add them to the pot yet; they go in at the very end, off the heat.
In a heavy saucepan, combine sugar, corn syrup, and water, stirring over medium heat until the sugar dissolves and the mixture looks clear. Attach the candy thermometer to the side of the pan, making sure it does not touch the bottom, then increase the heat and bring the syrup to a steady boil.
Once it begins boiling, most recipes instruct you to stop stirring and let it cook undisturbed, occasionally washing down the sides with a wet pastry brush if sugar crystals form.
Boil the mixture until it reaches 300°F (about 149°C), known as the hard‑crack stage, where a drop of syrup in cold water forms brittle threads that snap when bent. This can take 20–45 minutes depending on batch size and stove, so patience and close attention are essential; overcooking can darken and burn the sugar, while undercooking leaves candy sticky or soft.
When the syrup hits 300°F, remove the pan from the heat immediately. Working quickly and keeping your face back (especially with strong oils like cinnamon), add your chosen flavoring oil and food coloring to the hot syrup and stir carefully to combine. The mixture will bubble and steam as the volatile oils hit the heat, filling the room with fragrance.
Pour the hot candy onto the prepared, powdered‑sugar‑lined baking sheet, tilting the pan if needed (with oven mitts) to spread it into an even layer that’s not too thick. Some methods pour into powdered‑sugar “troughs” to create rope‑like pieces, but most home recipes simply spread a thin sheet. Let the candy sit undisturbed until completely cool and hard, usually 30–60 minutes.
Once the sheet is fully set, crack it into pieces. Use a meat mallet, the back of a heavy spoon, or even your hands (with gloves) to break the candy into bite‑size shards that look like stained glass.
Toss the pieces in additional powdered sugar to prevent sticking and to give them a frosty, snow‑dusted appearance, then store in airtight containers or bags at room temperature. Properly cooked hard candy keeps for weeks and is a classic choice for tins, gift bags, and candy dishes through the Christmas season.
Tips and tricks
Because you’re working with very hot sugar syrup, safety and precision matter. Many experienced candy makers recommend covering surrounding surfaces with foil or newspaper, wearing long sleeves and closed shoes, and keeping kids and pets away from the stove while boiling and pouring.
Using a reliable candy thermometer or the cold‑water hard‑crack test helps you avoid under‑ or overcooking; some recipes even note that altitude can slightly change target temperatures.
Flavoring oils are much more concentrated than extracts and stand up better to high candy‑making temperatures, which is why most Christmas hard candy recipes specifically call for LorAnn‑type oils.
Strong flavors like cinnamon can be quite potent and even irritate eyes and throat when added to very hot syrup, so multiple sources advise turning your head away or briefly stepping back while stirring them in. You can divide one large batch into smaller portions after cooking and quickly stir different colors and flavors into each, but you’ll need to work fast before the syrup thickens.
For the prettiest “stained glass” effect, bold, clear colors and a generous powdered‑sugar coat work best. Deep reds and greens are traditional for Christmas, often paired with cinnamon and spearmint or wintergreen, while clear, bright colors like yellow, blue, or purple are used for fruit flavors such as lemon, blue raspberry, or grape. Some makers dust only the back of the candy so the front stays shiny, while others coat all sides for a frosted look and less stickiness.
Variations
“Christmas hard candy” covers several styles. Classic hard tack candy is simply poured into a pan and broken into irregular bits, dusted with powdered sugar. Stained glass rock candy follows the same method but emphasizes vivid colors and clear, glass‑like pieces, often using cinnamon for red and spearmint or green apple for green.
Ribbon candy is a more advanced variation where the hot candy is pulled and shaped into ruffled ribbons, but it uses the same sugar‑syrup base and holiday flavors.
You can also pour hot candy into prepared molds to make shaped Christmas candies, lollipops, or small disks rather than shards. Some recipes use silicone molds or spoon drops onto powdered‑sugar‑lined trays to make bite‑size lozenges. Others turn one large sheet into a “shattered glass” effect for decorating gingerbread houses or as an edible stained‑glass garnish on cakes and cupcakes.
Flavors are endlessly customizable: beyond classic cinnamon and mint, popular holiday choices include clove, anise, wintergreen, cranberry, cherry, and spiced orange.
By changing the color and flavor pairings, the same basic recipe can cover everything from nostalgic church‑bazaar cinnamon rock candy to multi‑colored, fruit‑flavored hard candy assortments for gift tins, making Christmas hard candy a versatile, old‑school treat that still fits right in on modern holiday sweet trays.