
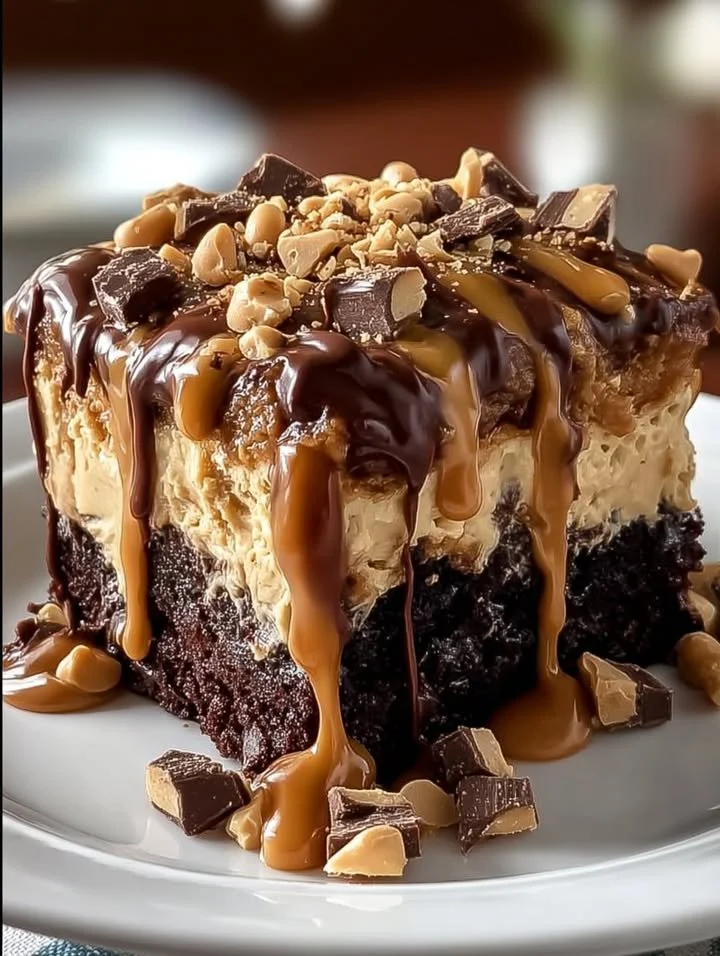
There’s something utterly irresistible about the combination of chocolate and peanut butter. These two flavors have a way of playing off each other that makes my heart sing every time I take a bite. Recently, I decided to whip up a Chocolate Peanut Butter Poke Cake, and let me tell you, it was a sweet journey filled with rich, creamy goodness and an explosion of flavors. Nothing warms the heart (and the home!) like a fresh-baked cake that’s both comforting and satisfying, which is why this recipe has become a cherished favorite in my kitchen.
Why You’ll Love This Recipe
This Chocolate Peanut Butter Poke Cake is not only visually stunning but also incredibly simple to prepare. The rich chocolate cake, perfectly moist with creamy peanut butter filling and luscious ganache, makes it a downright showstopper for any occasion. Plus, it’s easily customizable, so you can tailor it to suit any preferences. Trust me, once you try this delightful dessert, it’ll be a go-to for family gatherings and cozy nights in. (See the ingredients in the next page below…)
Ingredients
– 1 box of chocolate cake mix (plus ingredients required on the box)
– 1 cup creamy peanut butter
– 1 cup powdered sugar
– 1 cup heavy cream
– 1 cup chocolate chips
– 1 tsp vanilla extract
– 1/2 cup milk (for pouring into the cake)
– Whipped cream and chopped peanuts for garnish (optional)
Equipment Needed
– Large mixing bowl
– Electric mixer or whisk
– 9×13 inch cake pan
– Measuring cups and spoons
– Wooden skewer or fork (to poke the cake)
– Small saucepan (for the ganache)
– Spatula
Step-by-Step Instructions
First, start by preheating your oven to 350°F (or the temperature indicated on your cake mix box). Grease the 9×13 inch cake pan well so that your cake comes out smoothly. In a large mixing bowl, prepare your chocolate cake batter according to the package instructions. As I mix in the eggs and oil, the smell of chocolate fills my kitchen, and I can hardly wait to get it in the oven! Once you’ve mixed it well, pour the batter into the prepared pan and bake for about 30-35 minutes, or until a toothpick inserted in the center comes out clean. (See the next page below to continue steps…)
Next, while the cake is baking, I usually take this time to prepare the peanut butter filling. In a separate bowl, combine the creamy peanut butter and powdered sugar. You want to get this mixture nice and smooth; sometimes I add a splash of milk to help it reach that creamy consistency. Once the cake is baked and completely cooled, I take a wooden skewer and poke holes all over its surface, creating little pockets to fill with that delectable peanut butter mixture. Then, I spread the peanut butter filling into the holes, allowing it to seep into the cake—it looks like a delicious mess, and trust me, it’s going to be amazing!
Now, let’s make the ganache! In a small saucepan, heat the heavy cream over medium heat until it’s just about to simmer. Remove it from heat and add the chocolate chips, whisking until it’s wonderfully smooth and glossy. The aroma of warm chocolate is simply heavenly; it’s one of those moments that has my whole family eagerly gathering around the kitchen. Once the ganache is ready, I pour it over the peanut butter-filled cake, allowing it to drape lovingly over the edges, creating a chocolatey waterfall. I put the cake in the fridge for about an hour to set up nicely.
To serve, I like to add a dollop of whipped cream and sprinkle some chopped peanuts on top for a beautiful finish. And there you have it—a Chocolate Peanut Butter Poke Cake that is every bit as fun to make as it is to enjoy!
Pro Tips for Best Results
When I first started making this cake, I tested it in three different ways: using natural peanut butter, creamy peanut butter, and even a whipped peanut butter spread. I found that creamy peanut butter works best for that smooth filling I love, but if you’re feeling adventurous, natural peanut butter could add a nice touch, though it’s crunchier!
Another thing I’ve learned through trial and error is to let the cake cool completely before poking holes. If you poke it while warm, all the filling will simply run to the bottom. I usually let it cool for at least 30 minutes on a wire rack before going to town with my skewer.
Lastly, for a richer flavor, I recommend letting the ganache set in the fridge for about 15 minutes before pouring it over the cake. This slight thickening helps it cling better and creates a beautiful, glossy finish.
Common Mistakes to Avoid
One common mistake I made initially was not using enough holes when poking the cake. If the holes are too few and far between, the filling won’t adequately saturate the cake, and instead, you’ll have dry areas. I now like to poke holes every inch apart to ensure that every bite is a rich blend of chocolate and peanut butter. (See the next page below to continue…)
Also, be aware that if you skip the refrigerator step after pouring the ganache, it can be a little too runny when you slice the cake. Trust me, letting it chill allows it to firm up and makes serving a lot easier!
Moreover, I once made the mistake of rushing the mixing process and ended up with a lumpy peanut butter filling. Make sure to properly combine the peanut butter and powdered sugar until it’s silky smooth. You want that filling to be luxurious!
Serving Suggestions
This cake is so decadent on its own that you don’t need much to elevate it further. I love serving it warm with a scoop of vanilla ice cream on top. The heat from the cake creates a lovely melty effect, and there’s nothing like that contrast of temperatures as you dig in with a fork.
If I’m serving this at a gathering, I like to cut it into smaller squares and plate them with a drizzle of chocolate sauce and a sprig of mint for a pop of color. The presentation is always met with oohs and aahs, and trust me, it tastes as good as it looks.
For a special touch, I sometimes serve it with a side of caramel sauce or whipped cream to enhance the dessert experience. Everyone loves the added richness, and it gives my guests options to customize their slices just the way they like!
Variations & Customizations
I love experimenting with this recipe! For a little crunch, I’ll sometimes fold in chopped nuts or crushed chocolate cookies into the peanut butter filling. It adds an unexpected texture that I find delightful.
If you’re a fan of different flavors, you can easily swap out the chocolate cake mix for a vanilla or even a red velvet base. Adjust the filling accordingly—think about adding a hint of cocoa powder to the peanut butter filling for a double chocolate twist.
If you’re looking for a lighter version, consider using a sugar-free cake mix and natural peanut butter sweetened with a bit of honey. It’s a great way to enjoy this delicious treat without as many calories or sugar.
How to Store, Freeze & Reheat
This cake can be stored in an airtight container in the refrigerator for up to four days. I usually cover it with plastic wrap after it has fully cooled down to keep it fresh. I find it tastes even better the next day as the flavors continue to meld together!
If you want to make this ahead for a special occasion, you can also freeze it. I suggest cutting it into squares, wrapping each piece in plastic wrap, and then placing them in a freezer-safe container. They can last up to three months. When you’re ready, allow it to thaw in the fridge overnight before serving.
When it comes to reheating, I usually pop a square in the microwave for about 15-20 seconds. This makes it warm and gooey again, perfect for enjoying with a scoop of ice cream or a dollop of whipped cream.
Conclusion
I hope you enjoy this Chocolate Peanut Butter Poke Cake as much as I do! It’s a truly delightful dessert that brings warmth and joy to any occasion. Whether it’s a family gathering or a cozy night in, this cake is bound to bring smiles and happy memories to your table. So, grab your apron, head to your kitchen, and let the sweet baking adventure begin!